-
Notifications
You must be signed in to change notification settings - Fork 0
Exporting Animations
This article explains how to export animations from Blender to the GMT format.
Make sure you have the same armature as the GMD model that will be using the animation in the game. When exporting, you have to select that armature in order for the animation to export properly.
If your animation has any drivers or anything that can be baked, make sure to bake it before exporting if you want it to stay in the exported GMT.
Before checking the export options, make sure you select the proper export format. The export options available might be different for each format, so it's important to select the format first before changing the options.

You can export to GMT, CMT, or IFA.

The export dialog can be found in the File menu in Blender: File -> Export -> Yakuza Animation (.gmt/.cmt/.ifa)
After opening the dialog, browse to the directory you want to save the GMT file in. If you're exporting an animation you imported before, the file name will be automatically set, otherwise you will have to choose a name for the file to be saved.
Next, you should check the Export Options on the right side of the dialog, and change them according to the animation you're exporting:

Here's a brief explanation on the options:
-
Action: The Blender action to export. This is the animation you want to export from Blender. By default, this is set to be the current action of the selected armature.
-
Armature: The animation will be exported based on this armature, so you want to select the same armature that this animation was made for. By default, this is the currently selected armature.
-
Game Preset: The game that the exported GMT will be used in. Check the detailed option explanations if you're not sure which game to choose.
-
GMT File Name: The internal name of the GMT file. This probably doesn't affect anything, but if you're exporting an animation you imported before, it will get automatically set.
-
GMT Animation Name: The internal name of the animation inside the GMT file. This probably doesn't affect anything, but if you're exporting an animation you imported before, it will get automatically set.
-
Split Vector: This option splits the animation from
center_c_nbone and applies it tovector_c_n. This is needed in order for the animation to work properly in the game. You should keep it enabled at all times. Only disable it if you know what you're doing, and you have modified thevector_c_nbone animation manually. -
Is Auth/Hact: If the GMT you're exporting will be used in the 'auth' or 'hact' folders/pars in the game, then you should enable this option. Otherwise, keep it disabled. It affects how
center_c_nanimation is split, and is required to be correct according to the target usage of the GMT in order from the exported animation to work properly.
You can check the Addon Options article for alternate descriptions of these options.
After changing the options, click the Export Yakuza GMT button at the bottom of the window, and the animation will be exported.
Here are the export options:

The Armature option will only show camera objects in the scene. By default, the active scene camera is selected, along with its Action.
The Game Preset option works the same way as when exporting GMTs, but the options are different. All games starting from Yakuza 5 use the same preset, including Dragon Engine games.
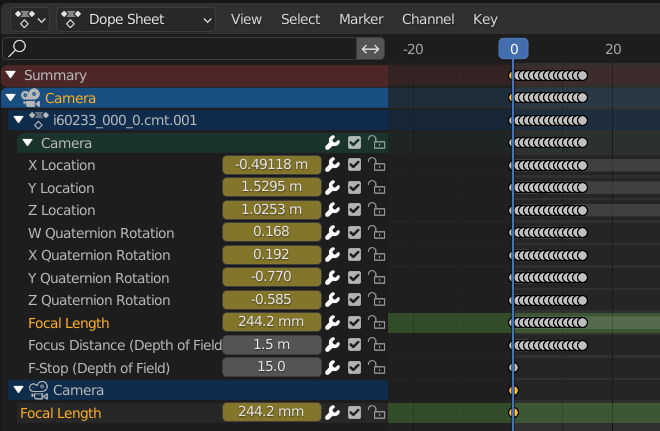
The Export Camera Data Keyframes options is important when dealing with multiple camera actions in Blender. When importing a CMT, its animation data for the camera Focal Length (FOV) and Focus distance (DOF) (along with other things) get imported into a new action. However, when inserting keyframes for the camera manually, the keyframes will be inserted into the camera data's action, which is separate from the camera object action.
The camera data action can be viewed in the Dope Sheet. In this example, Focal Length has 2 channels. The second one was created when I inserted a keyframe into the camera data instead of inserting it into the existing Focal Length channel in the CMT action.

Here's how the option works: If Export Camera Data Keyframes is enabled, then the exporter will show an error if you try exporting while having 2 of the same channel. To fix this error, you can either delete one of the 2 channels, and the other one will be used. Or, you can simply disable the option, and only the CMT action channel will be used.
The reason why this option is enabled by default is that while animating the camera, it is easier to insert a keyframe from the camera data property instead of the action channel. So if you insert it like that, you can still export the CMT properly, if you do not have a second channel in the CMT action.
Note that Depth of Field can only be exported as Focus distance. If you set an object in the scene as the focus point, DOF will not be exported properly.
The exporting process is similar to exporting GMTs, so you can refer to this section. Note that only the Armature and Action options will be available.