-
Notifications
You must be signed in to change notification settings - Fork 2
[재하] 1121(화) 개발기록
- 트러블 슈팅: Redis 설치 및 연동
- Multer 설치 및 파일 업로드 API 구현
- Multer 설치 및 검증
- 트러블 로그: Interceptor 방식 대안 구상
- 로컬 업로드 기능 구현
- RED: 실패하는 테스트 코드 작성
- GREEN: 성공하도록 구현
- REFACTOR: 리팩토링
- 개선
- board 모듈 입력값 유효성 검증
- POST /board
- ParseIntPipe로 id 타입 int로 변경
- PATCH /board/:id
- POST /board/:id/image
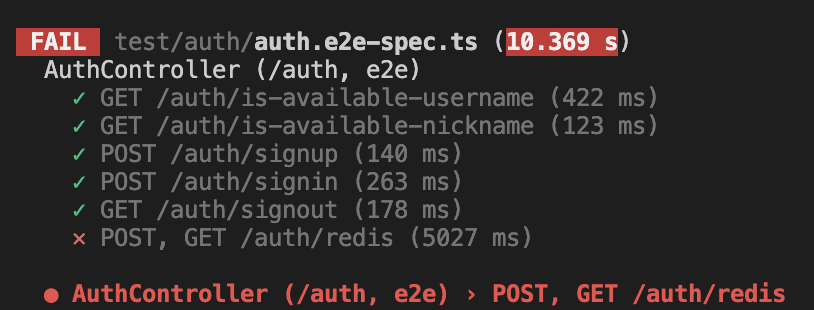
페어분이 Redis 관련 코드를 추가한 후 Redis 연결이 되지 않아 서버 프로젝트가 정상적으로 실행되지 않는 문제 발생.
학습 겸 로컬 환경에서 Redis를 설치하고 간단히 사용해보자.
sudo apt update
sudo apt upgrade
일단 업데이트 하고
sudo apt install redis-server
redis-server --version
잘 설치된 것 확인. 페어분과 동일버전
sudo vi /etc/redis/redis.confmaxmemory 1g
maxmemory-policy allkeys-lru
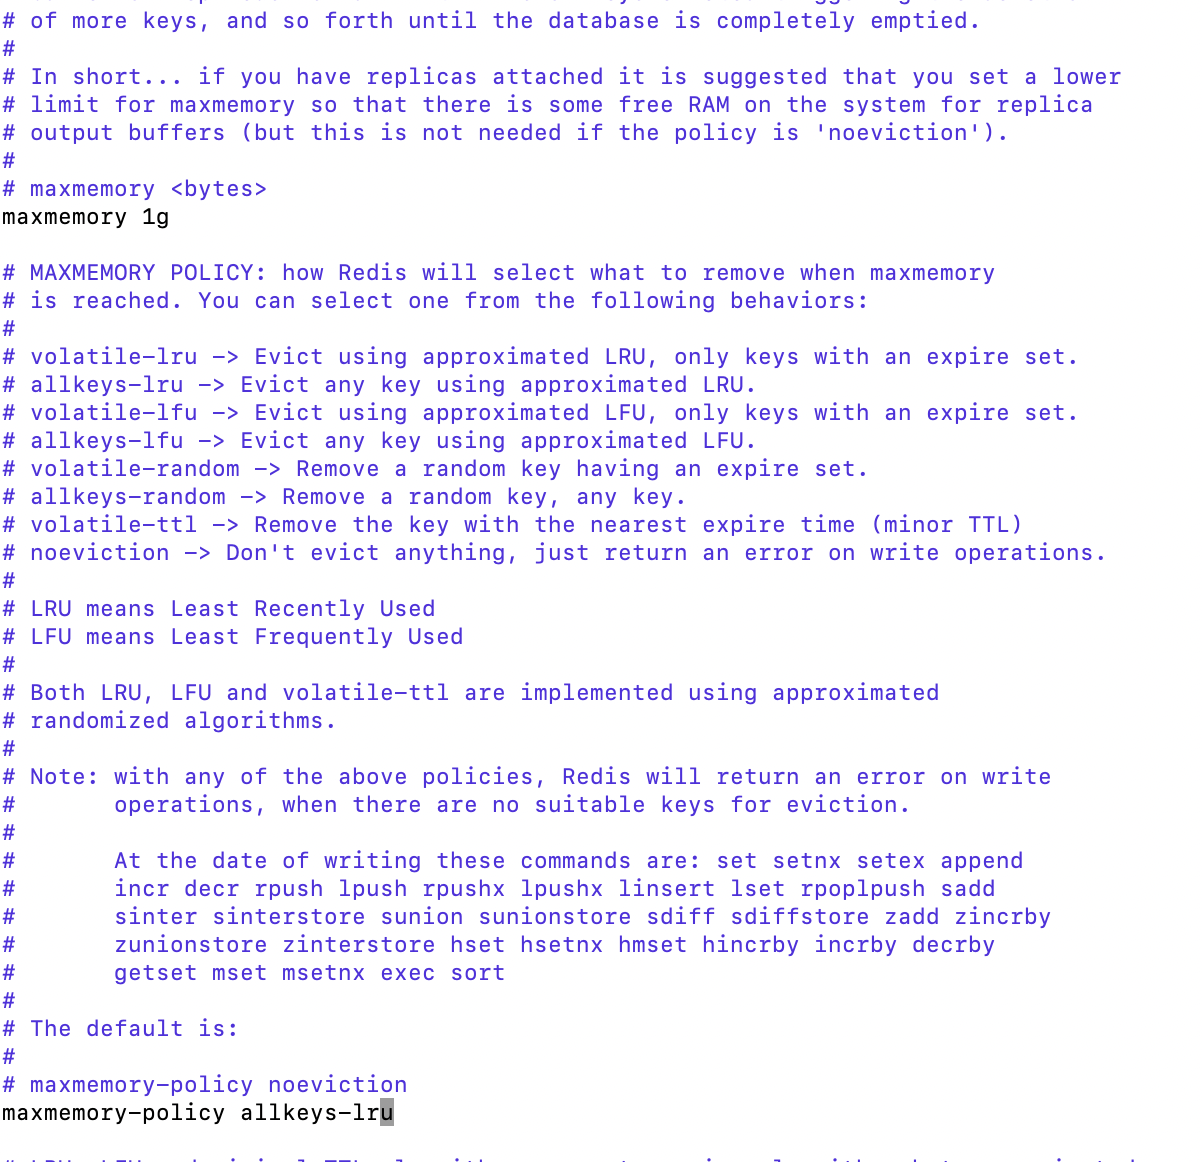
환경 설정. 보다보니 쎄한게 보이던데
bind 0.0.0.0
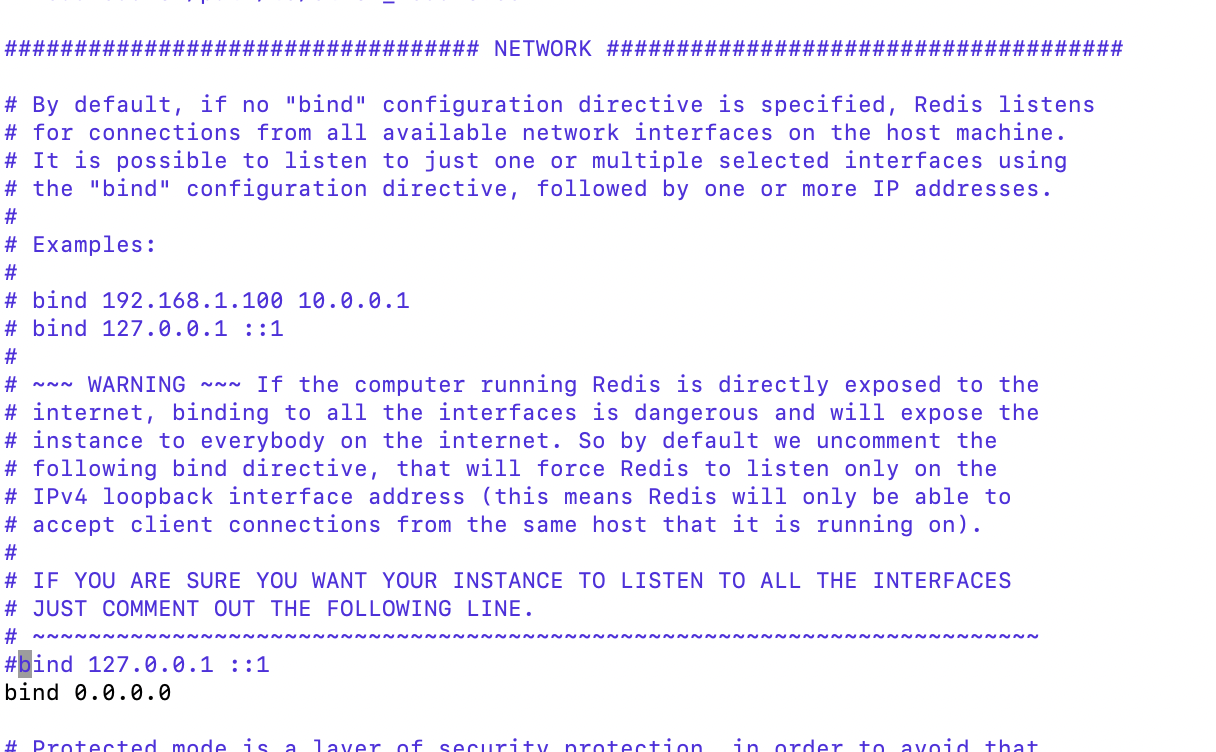
딱 보니까 외부접속 허용 안돼있는 것 같아서 MySQL처럼 bind 설정 해줬다. 두번은 안속지

port 6379인것도 확인
sudo service redis restart
service redis status
재시작해서 설정 적용하면
redis-cliset test "test
get test
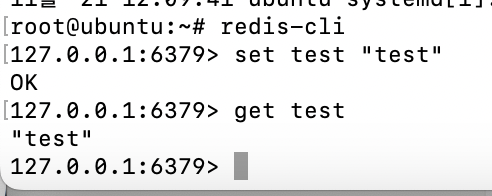
VM 내에서 잘 되고
brew install redis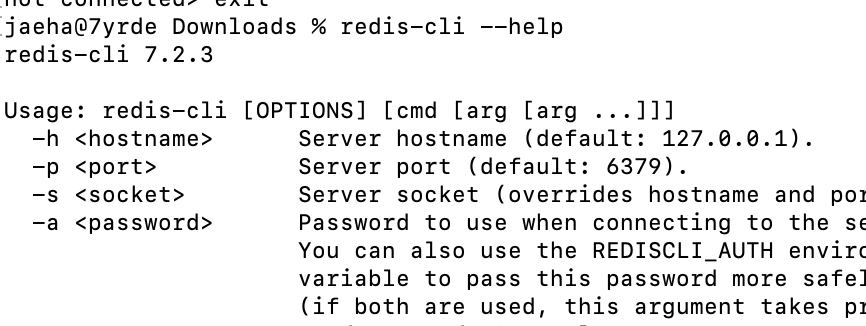
로컬에서 해봐야지. 대강 이렇게 hostname 설정 가능한가봄
redis-cli -h 192.168.64.2 -p 6379
응 먹통이야~ 방화벽 문젠가?
ufw allow 6379/tcp
uf status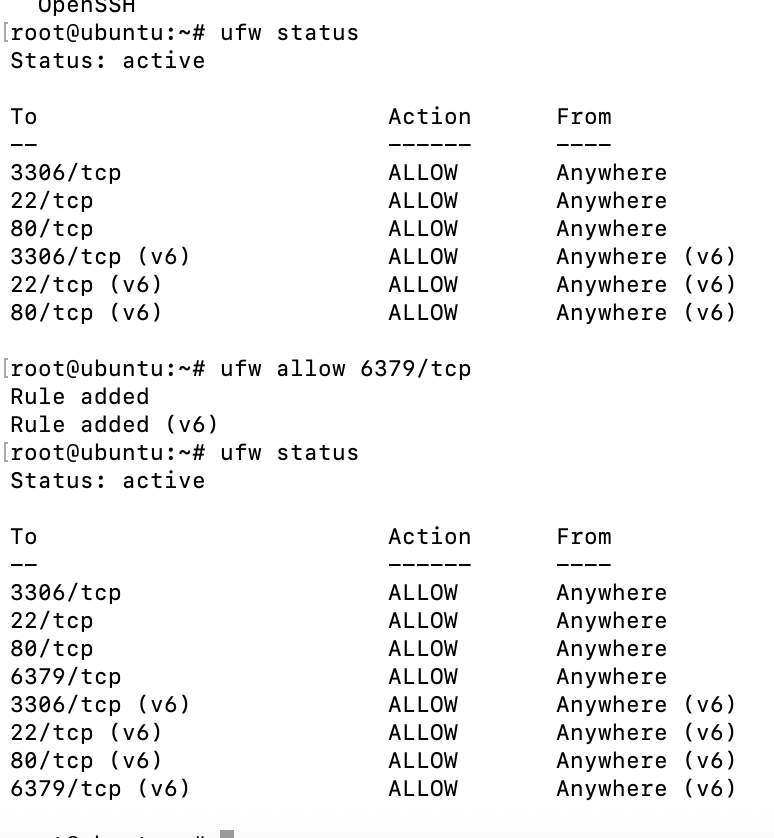
되겠다 이제

짜잔~~ 잘됨. 이제 이 설정을 .env 파일에도 반영해주자
REDIS_HOST=192.168.64.2
REDIS_PORT=6379
REDIS_PASSWORD=ubuntu
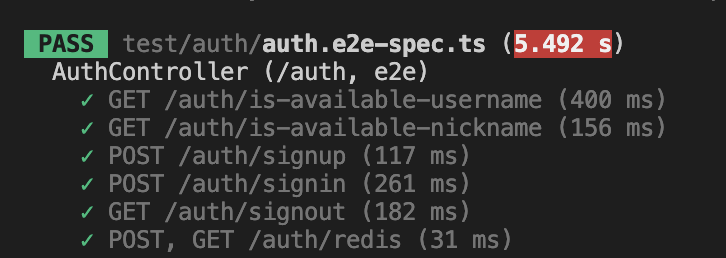
굳 이제 작업 ㄱ ㄱ
yarn add @types/multerNestJS에서는 파일 업로드 처리를 위해 multer 모듈을 사용함.
POST 메소드로 multipart/form-data 컨텐츠 타입 지원!
그룹 동료분의 소개로 찾아보다 국룰인 걸 알게됐다. 추가로 테스트 방법에 대해 상당히 고민했는데, 찾다보니 Postman에도 파일 업로드가 가능함.
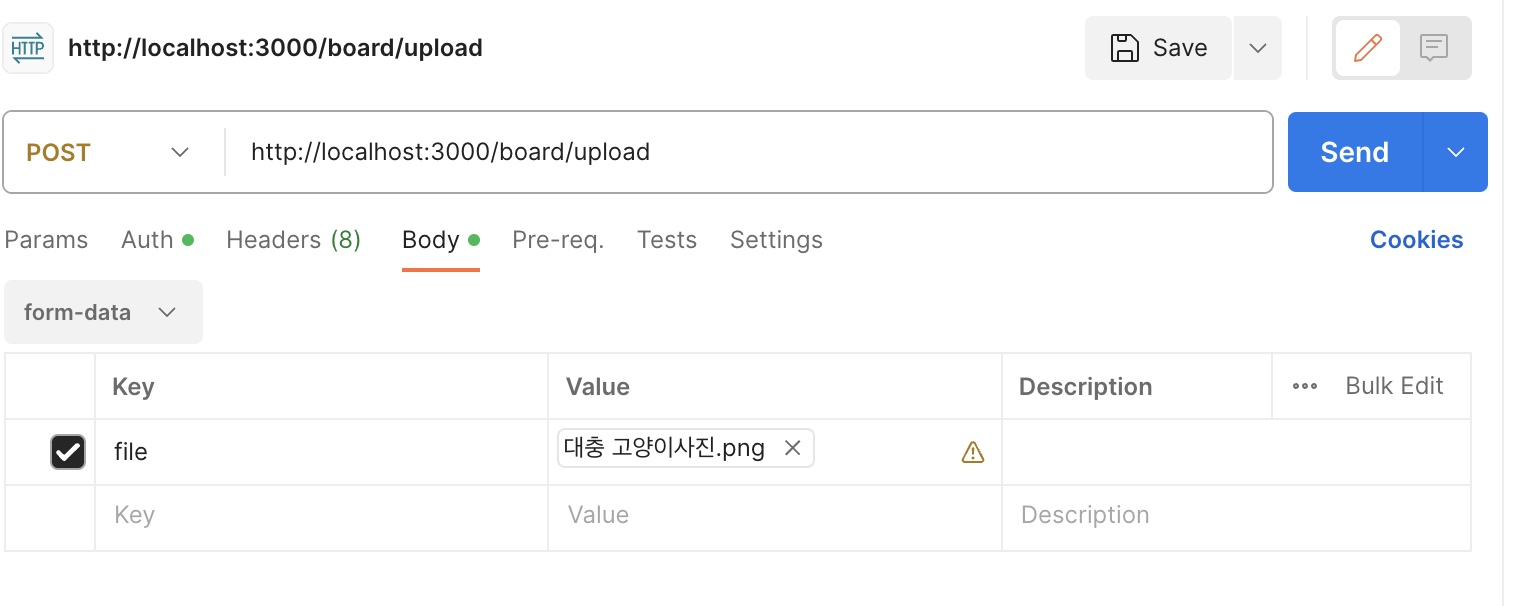
요런식으로
@Post('/upload')
@UseInterceptors(FileInterceptor('file'))
uploadFile(@UploadedFile() file: Express.Multer.File, @Body() body: any) {
  console.log('body', body);
  console.log('file', file);
}
간단하게 컨트롤러를 만들어 테스트해봤다.

껌이네
라고 하자마자 문제에 봉착했다.
// board.controller.ts
@Post('file-upload')
@UseInterceptors(FileInterceptor('file', { dest: './uploads' }))
uploadFile(
  @Body('board_id') board_id: any,
  @UploadedFile() file: Express.Multer.File,
): Promise<Partial<Board>> {
  return this.boardService.uploadFile(board_id, file);
}
파일 업로드 자체는 잘 되는데, 이 파일 업로드가 서비스단이 아닌 @UseInterceptors 어노테이션을 이용한
저장방식이여서, 유효성 검증을 하기가 까다로운 것이 문제다.
위 메소드에서 서비스에 넘어가기 전 이미 /uploads에 저장이 되어 버리는데, 지금이야 큰 문제 없지만
배포 후 클라우드에서 사용하게 되면, 이미지 파일이 아닌 잘못된 파일을 올리거나 board_id가 없는 게시물을 가리키면
그때 돼서 파일을 삭제하는 로직은 너무 큰 비용이 발생하게 된다.
// board.service.ts
async uploadFile(
  board_id: number,
  file: Express.Multer.File,
): Promise<Partial<Board>> {
  console.log('file', file);
  // 이미지 파일인지 확인
  if (!file.mimetype.includes('image')) {
    unlinkSync(file.path); // 파일 삭제
    throw new BadRequestException('Only image files are allowed');
  }

  const board = await this.findBoardById(board_id);

  // 게시글 존재 여부 확인
  if (!board) {
    unlinkSync(file.path); // 파일 삭제
    throw new NotFoundException(`Not found board with id: ${board_id}`);
  }

  // 파일이 정상적으로 업로드 되었는지 확인
  if (!file.path) {
    throw new InternalServerErrorException('No file uploaded');
  }

  // 이미 파일이 존재하는지 확인
  if (board.filename) {
    unlinkSync(file.path); // 파일 삭제
  }

  board.filename = file.filename;
  const updatedBoard = await this.boardRepository.save(board);

  return updatedBoard;
}
이렇게 서비스 단에서 에러처리를 할 수 밖에 없다. .
@Post('file-upload')
@UseInterceptors(
  FileInterceptor('file', {
    fileFilter: (req, file, cb) => {
      if (!file.originalname.match(/\.(jpg|jpeg|png|gif)$/)) {
        throw new BadRequestException('Only image files are allowed');
      } else if (file.size > 1024 * 1024 * 5) {
        throw new BadRequestException('Image file size is too big');
      } else if (!req.body.board_id) {
        throw new BadRequestException('Board id is required');
      }
      cb(null, true);
    },
    dest: './uploads',
  }),
)
uploadFile(
  @Body('board_id') board_id: any,
  @UploadedFile() file: Express.Multer.File,
): Promise<Partial<Board>> {
  return this.boardService.uploadFile(board_id, file);
}
그게 아니라면 필터를 이런식으로 작성해줘야 하는데, 실제로 board 테이블에 들어가는지 확인해주기는 힘든 상태다.

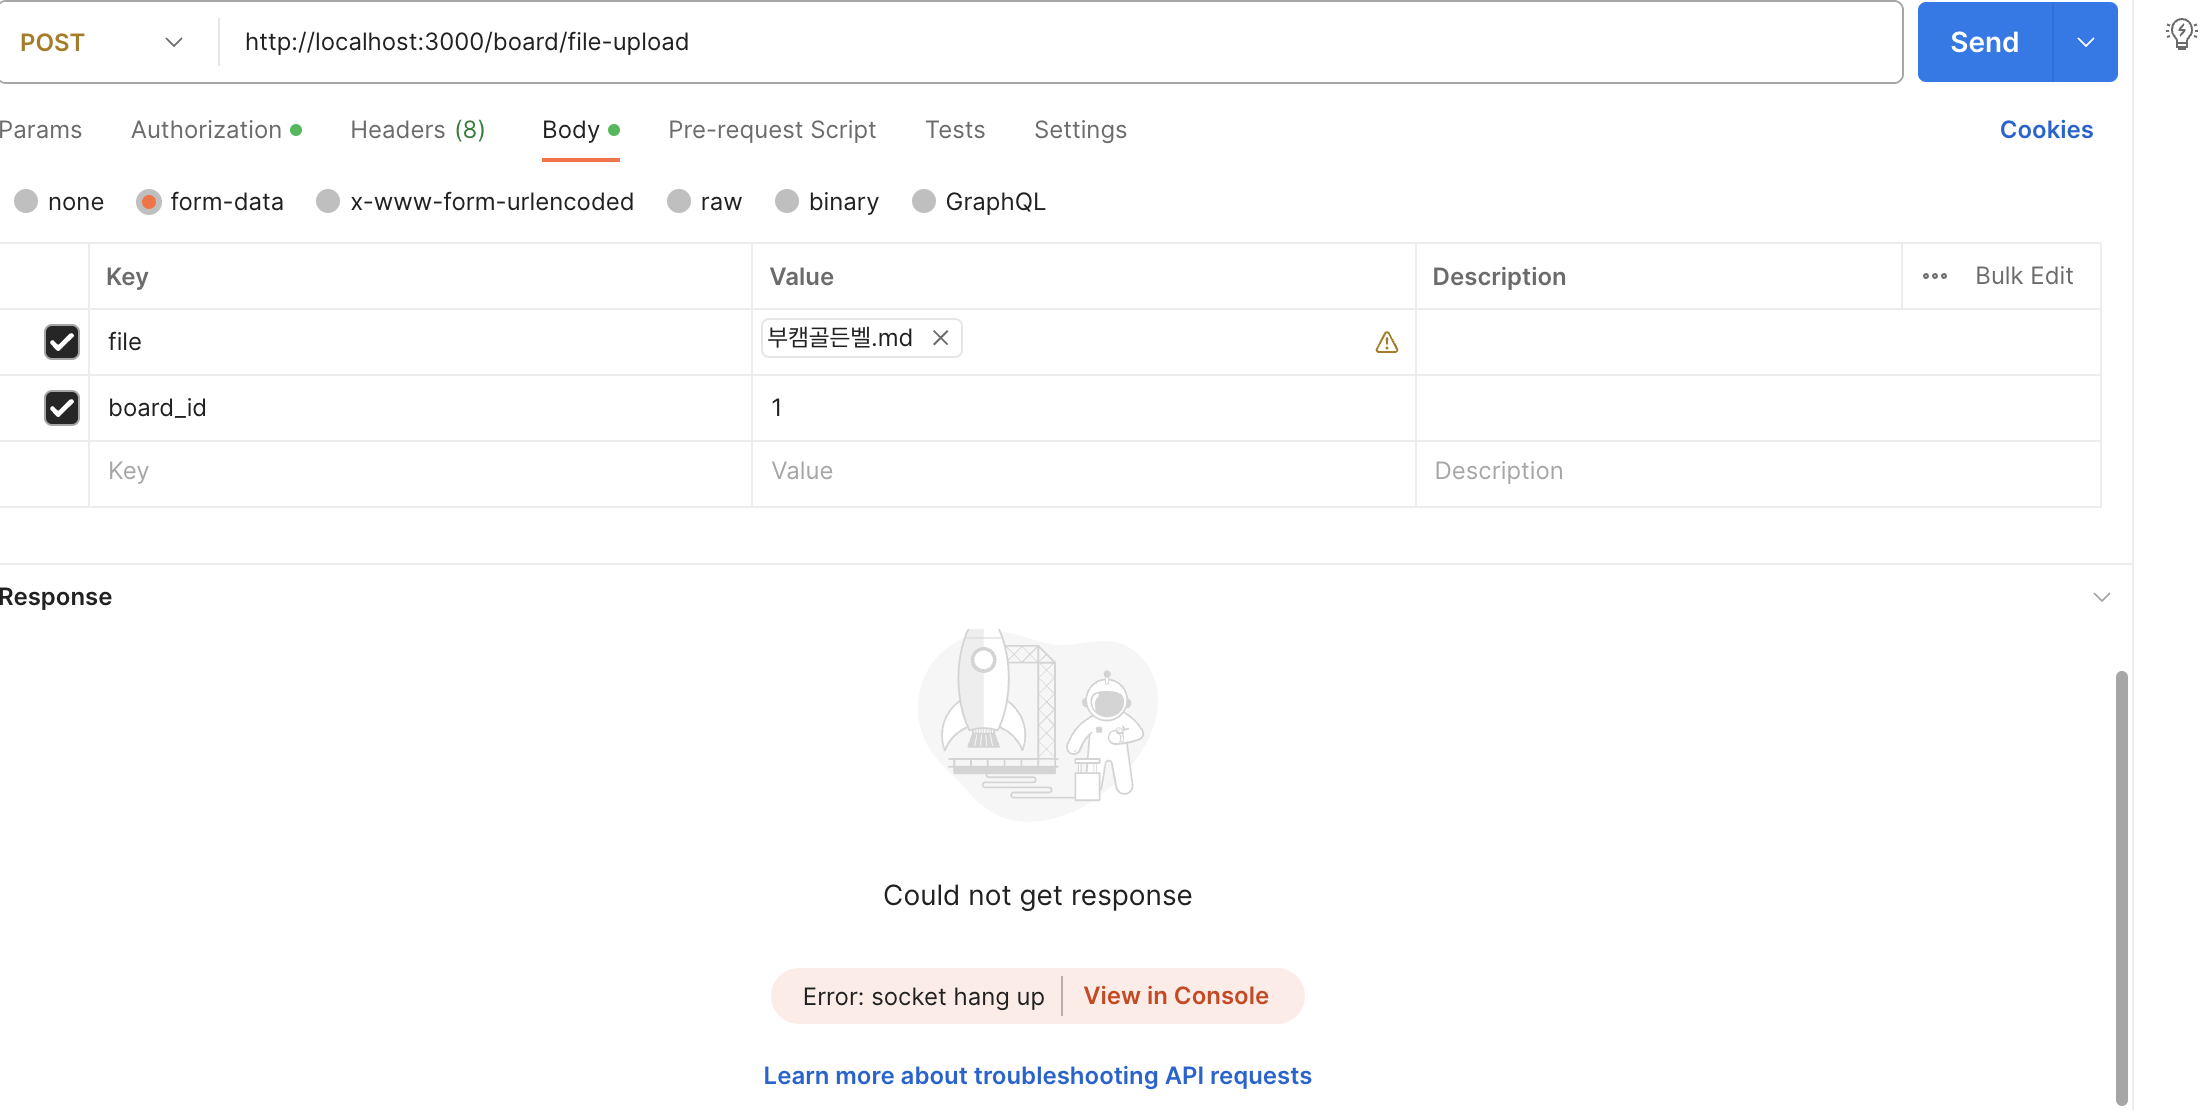
심지어 여기서 Exception을 발생시키면 Response로 전달되지도 않는다.
그래서 파일 업로드를 multer에서 제공하는 인터셉터 없이 수동으로 해주거나, S3(NCP Object Storage도 여기에 호환된다고 함) SDK만 이용해서 수동으로 서비스에서 업로드하는 방식이면 괜찮을 것 같기도 하다.
우선은 넘어가고 기능부터 만든 후 해결해보자.
// board.controller.ts
@Post('file-upload')
@UseInterceptors(FileInterceptor('file', { dest: './uploads' }))
uploadFile(
  @Body('board_id') board_id: any,
  @UploadedFile() file: Express.Multer.File,
): Promise<Partial<Board>> {
  return this.boardService.uploadFile(board_id, file);
}
컨트롤러는 우선 필터 없이 기능 구현만 하는 것으로 롤백.
async uploadFile(
  board_id: number,
  file: Express.Multer.File,
): Promise<Partial<Board>> {
  console.log('file', file);
  // 이미지 파일인지 확인
  if (!file.mimetype.includes('image')) {
    unlinkSync(file.path); // 파일 삭제
    throw new BadRequestException('Only image files are allowed');
  }

  const board = await this.findBoardById(board_id);

  // 게시글 존재 여부 확인
  if (!board) {
    unlinkSync(file.path); // 파일 삭제
    throw new NotFoundException(`Not found board with id: ${board_id}`);
  }

  // 파일이 정상적으로 업로드 되었는지 확인
  if (!file.path) {
    throw new InternalServerErrorException('No file uploaded');
  }

  // 이미 파일이 존재하는지 확인
  if (board.filename) {
    unlinkSync(file.path); // 파일 삭제
  }

  board.filename = file.filename;
  const updatedBoard = await this.boardRepository.save(board);

  return updatedBoard;
}
위에서도 언급했지만 서비스에선 꼼꼼하게 에러 처리해서 잘못된 요청이거나 에러면 다시 파일을 삭제하는 것으로 했다.
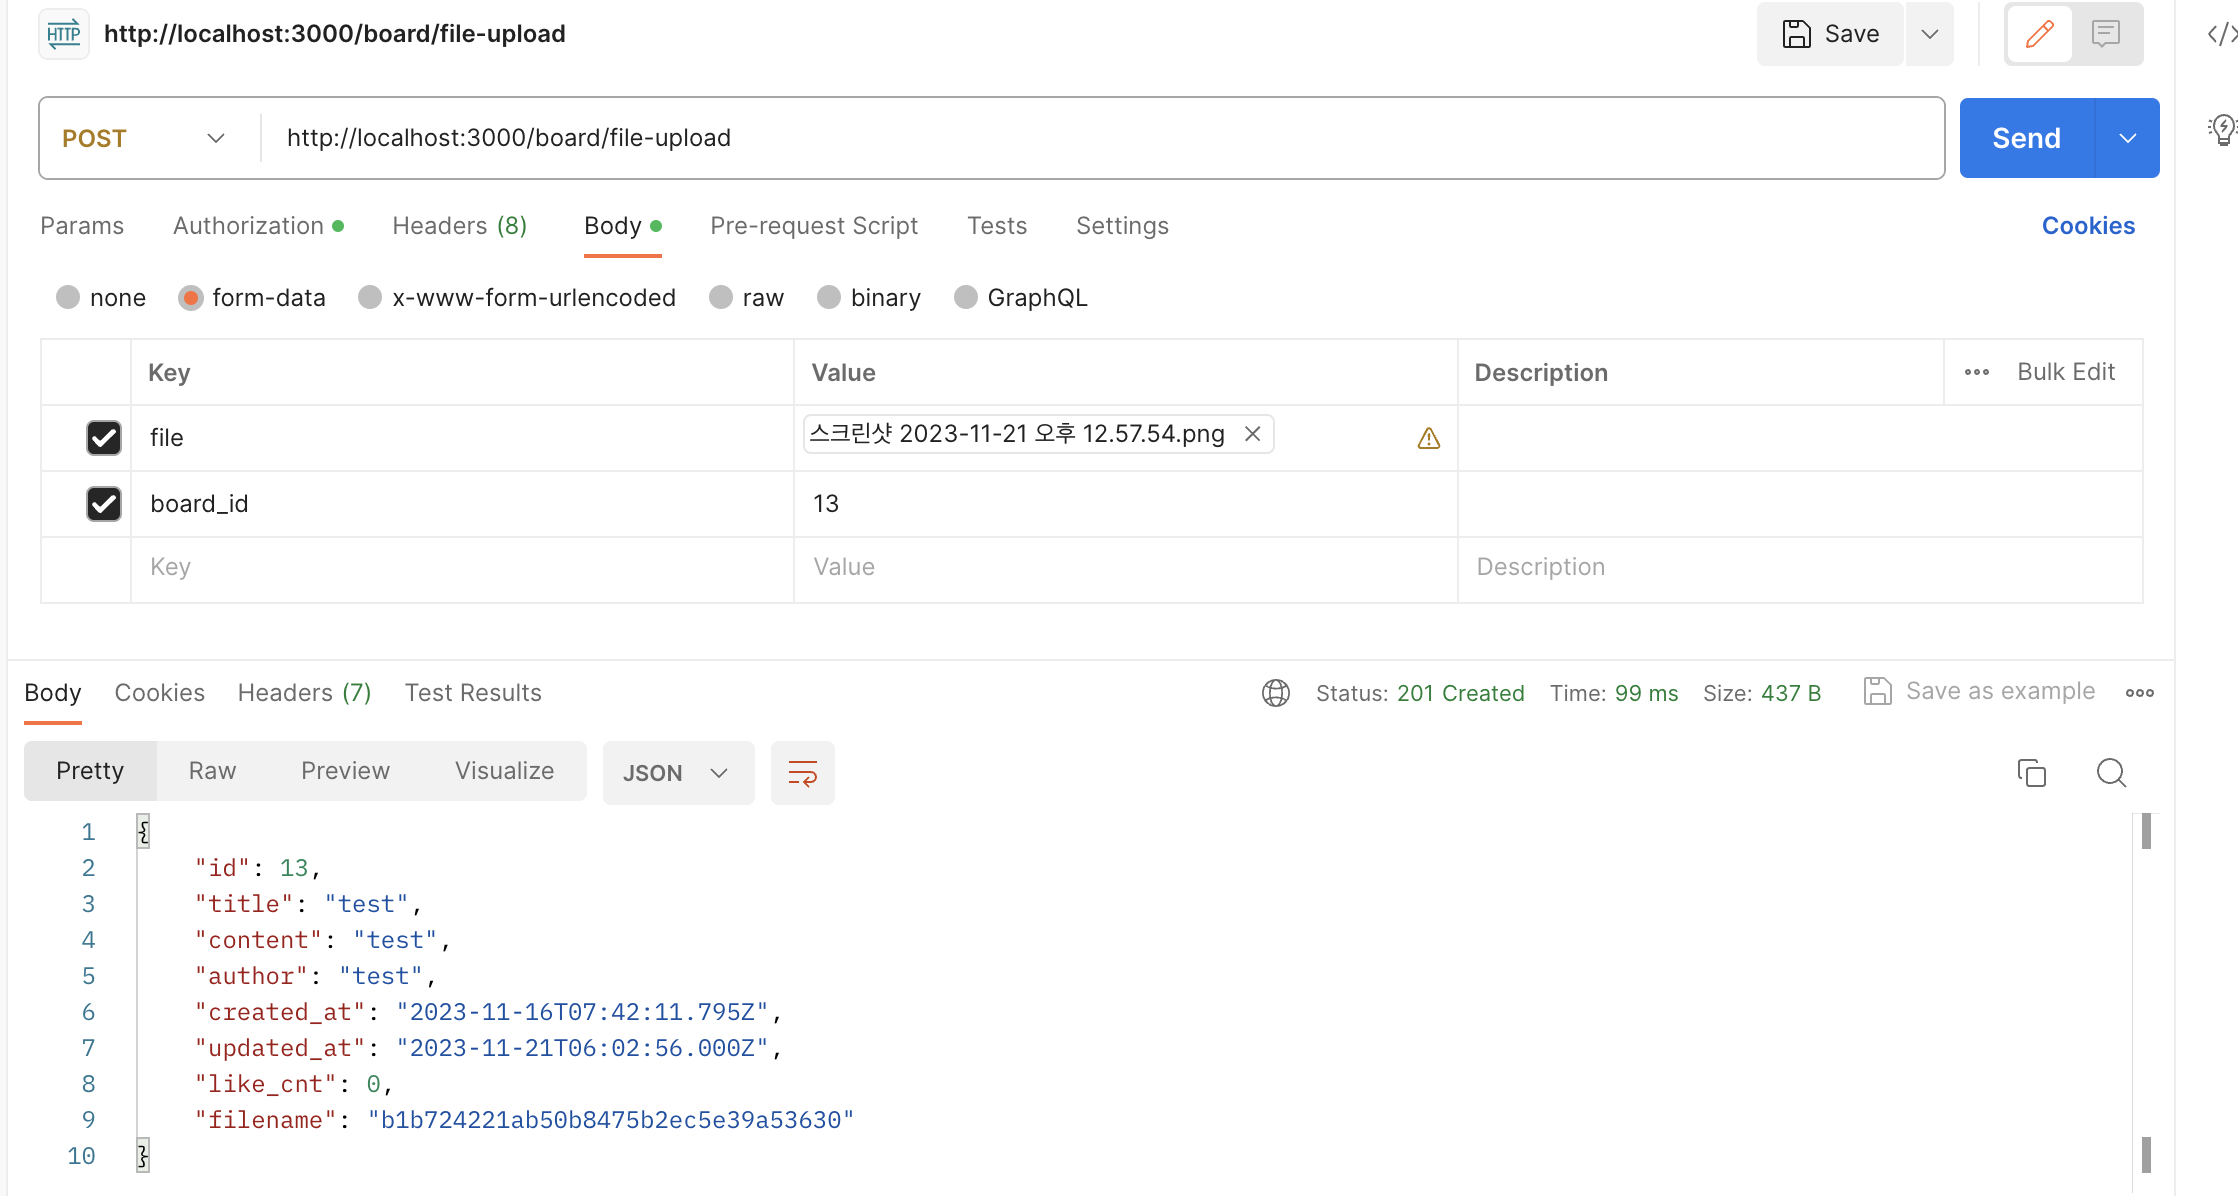
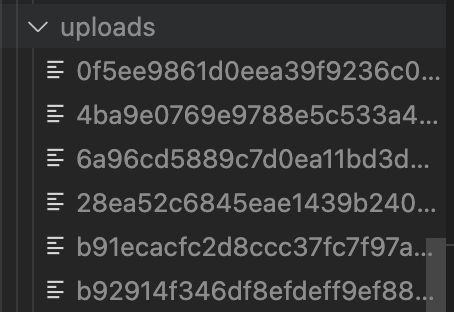
문제없이 잘 올라감.
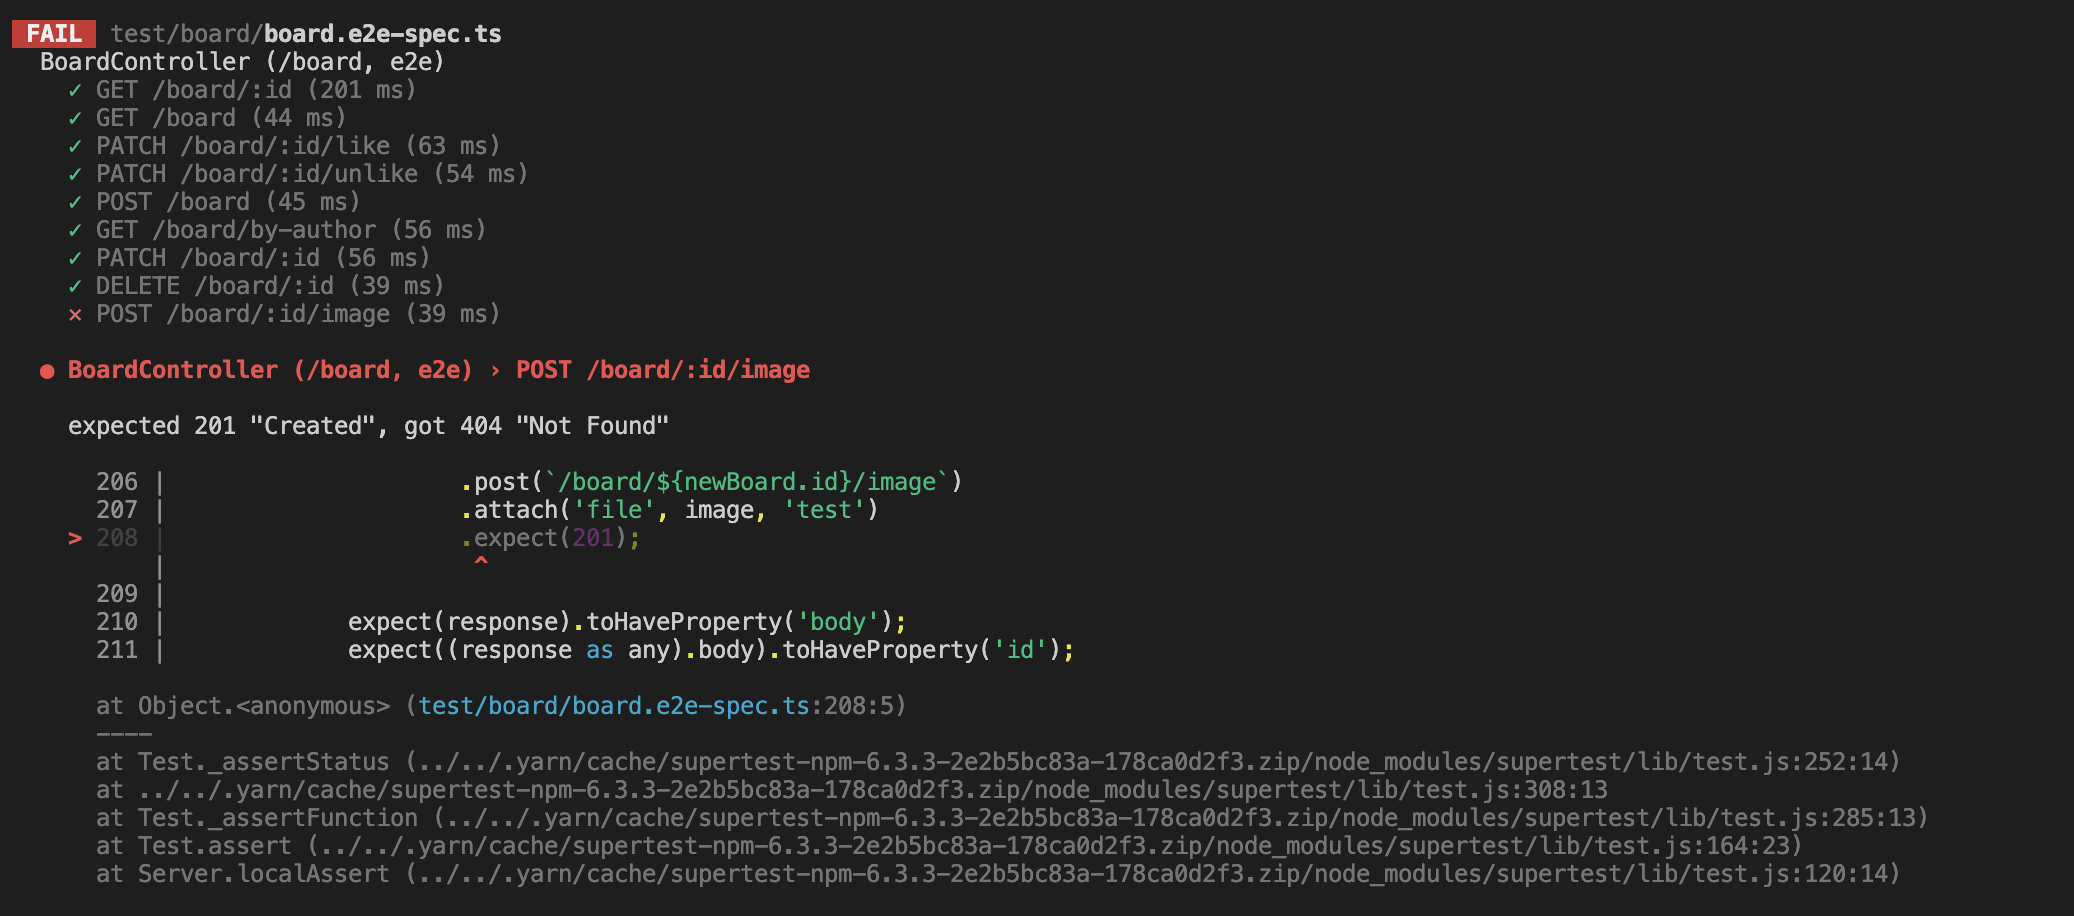
검증하기가 좀 까다롭긴 하다. Buffer를 이용하되 mimetype을 image/png로 해서 보내도록 했다.
// #61 [08-07] 사진 정보는 스토리지 서버에 저장한다.
it('POST /board/:id/image', async () => {
	const board: CreateBoardDto = {
		title: 'test',
		content: 'test',
		author: 'test',
	};
	const newBoard = (
		await request(app.getHttpServer()).post('/board').send(board)
	).body;

	const image = Buffer.from('test');

	const response = await request(app.getHttpServer())
		.post(`/board/${newBoard.id}/image`)
		.attach('file', image, 'test.png')
		.expect(201);

	expect(response).toHaveProperty('body');
	expect((response as any).body).toHaveProperty('id');
	expect(response.body.id).toBe(newBoard.id);
	expect((response as any).body).toHaveProperty('filename');
});
앞서 구현한 인터페이스를 여기 맞춰서 조금 수정해줬다.
// board.controller.ts
@Post(':id/image')
@UseInterceptors(FileInterceptor('file', { dest: './uploads' }))
uploadFile(
  @Param('id') board_id: string,
  @UploadedFile() file: Express.Multer.File,
): Promise<Partial<Board>> {
  return this.boardService.uploadFile(+board_id, file);
}
// board.controller.ts
@Post(':id/image')
@ApiOperation({
  summary: '이미지 파일 업로드',
  description: '이미지 파일을 업로드합니다.',
})
@ApiParam({ name: 'id', description: '게시글 번호' })
@ApiOkResponse({ status: 200, description: '이미지 파일 업로드 성공' })
@ApiBadRequestResponse({
  status: 400,
  description: '잘못된 요청으로 파일 업로드 실패',
})
@ApiNotFoundResponse({ status: 404, description: '게시글이 존재하지 않음' })
@UseInterceptors(FileInterceptor('file', { dest: './uploads' }))
uploadFile(
  @Param('id') board_id: string,
  @UploadedFile() file: Express.Multer.File,
): Promise<Partial<Board>> {
  return this.boardService.uploadFile(+board_id, file);
}
API 어노테이션 추가해줬다.
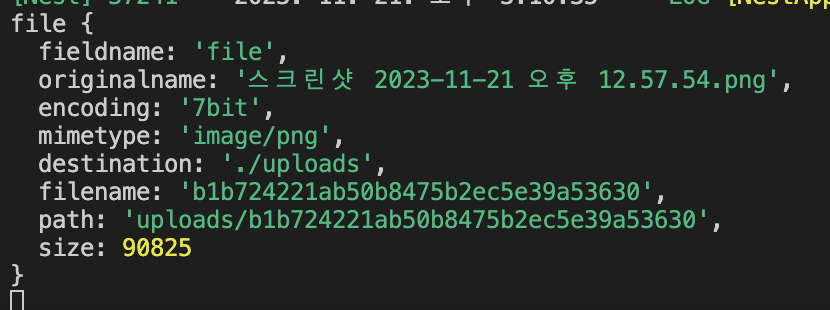
추가로 이 file 관련 데이터도 어딘가에 저장해주는 것이 좋겠다 싶어 file 엔티티를 만들고 저장해줬다.
// create-image.dto.ts
export class CreateImageDto {
	fieldname: string;
	originalname: string;
	encoding: string;
	mimetype: string;
	destination: string;
	filename: string;
	path: string;
	size: number;
}
Create DTO는 이렇게 Express.Multer.File과 호환되게 모든 타입을 넣어주고
// image.entity.ts
import {
	BaseEntity,
	Column,
	CreateDateColumn,
	Entity,
	PrimaryGeneratedColumn,
} from 'typeorm';

@Entity()
export class Image extends BaseEntity {
	@PrimaryGeneratedColumn()
	id: number;

	@Column({ type: 'varchar', length: 50, nullable: false })
	mimetype: string;

	@Column({ type: 'varchar', length: 50, nullable: false })
	filename: string;

	@Column({ type: 'varchar', length: 50, nullable: false })
	path: string;

	@Column({ type: 'int', nullable: false })
	size: number;

	@CreateDateColumn()
	created_at: Date;
}
Image Entity는 여기서 꼭 필요한 정보, 예를 들면 mimetype과 path, size 등만 선별적으로 추출했다.
// board.module.ts
@Module({
	imports: [TypeOrmModule.forFeature([Board, Image])],
	controllers: [BoardController],
	providers: [BoardService],
})
export class BoardModule {}
모듈에 등록하고
// board.controller.ts
uploadFile(
  @Param('id') board_id: string,
  @UploadedFile() file: CreateImageDto,
): Promise<Board> {
  return this.boardService.uploadFile(+board_id, file);
}
컨트롤러 단에서는 file 파라미터의 타입만 변경해줬다. id는 이제 path parameter로 넘어오므로 string으로 받아서 숫자로 변경 (아까 해줬었음)
...
@Injectable()
export class BoardService {
	constructor(
		@InjectRepository(Board)
		private readonly boardRepository: Repository<Board>,
		@InjectRepository(Image)
		private readonly imageRepository: Repository<Image>,
	) {}
  ...

	async uploadFile(board_id: number, file: CreateImageDto): Promise<Board> {
		...

		const { mimetype, filename, path, size } = file;
		const image = this.imageRepository.create({
			mimetype,
			filename,
			path,
			size,
		});
		const updatedImage = await this.imageRepository.save(image);

		board.image_id = updatedImage.id;
		const updatedBoard = await this.boardRepository.save(board);

		return updatedBoard;
	}
}
service에선 image repository를 추가하고, uploadFile 호출 시 image 레코드를 새로 생성한다.
board.filename 대신 board.image_id를 저장하여 image 테이블을 통해 접근할 수 있도록 한다. 추후 외래키 설정.
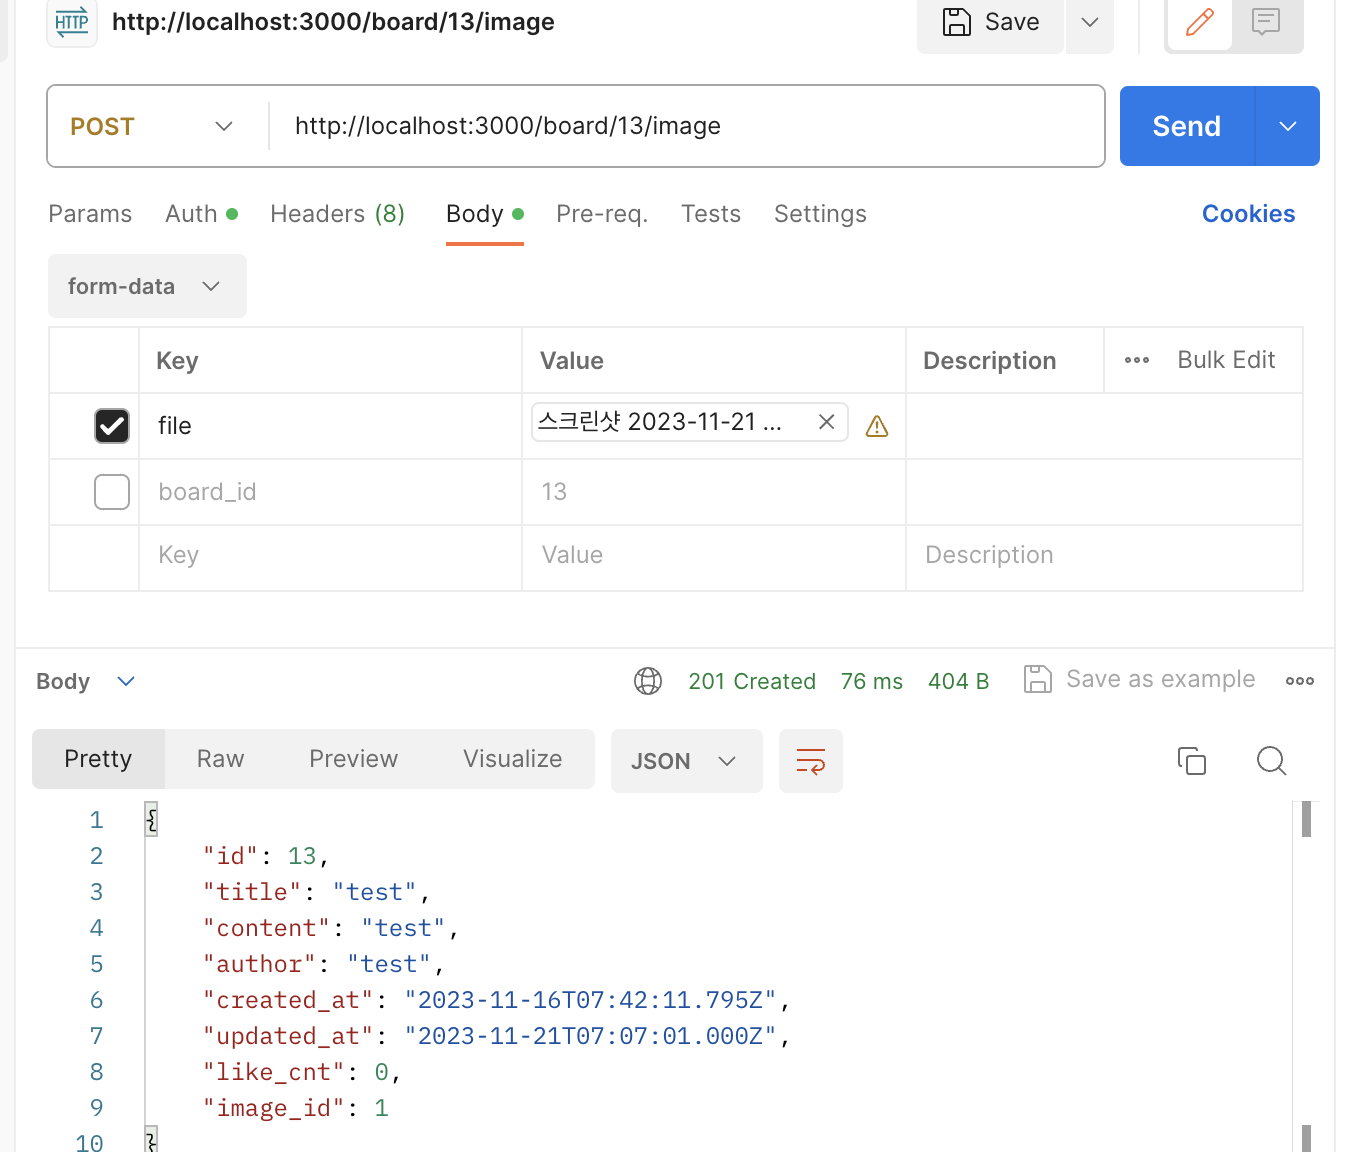

잘 저장됨
// board.controller.ts
@Post()
@UsePipes(ValidationPipe)
createBoard(@Body() createBoardDto: CreateBoardDto): Promise<Board> {
  return this.boardService.createBoard(createBoardDto);
}
@UsePipes(ValidationPipe) 등록해주고
// create-board.dto.ts
import { ApiProperty } from '@nestjs/swagger';
import { IsNotEmpty, IsString, Max, MaxLength } from 'class-validator';

export class CreateBoardDto {
	@IsNotEmpty({ message: '게시글 제목은 필수 입력입니다.' })
	@IsString({ message: '게시글 제목은 문자열로 입력해야 합니다.' })
	@MaxLength(255, { message: '게시글 제목은 255자 이내로 입력해야 합니다.' })
	title: string;

	@IsNotEmpty({ message: '게시글 내용은 필수 입력입니다.' })
	@IsString({ message: '게시글 내용은 문자열로 입력해야 합니다.' })
	content: string;

	@IsNotEmpty({ message: '게시글 작성자는 필수 입력입니다.' })
	@IsString({ message: '게시글 작성자는 문자열로 입력해야 합니다.' })
	@MaxLength(50, { message: '게시글 작성자는 50자 이내로 입력해야 합니다.' })
	author: string;
}
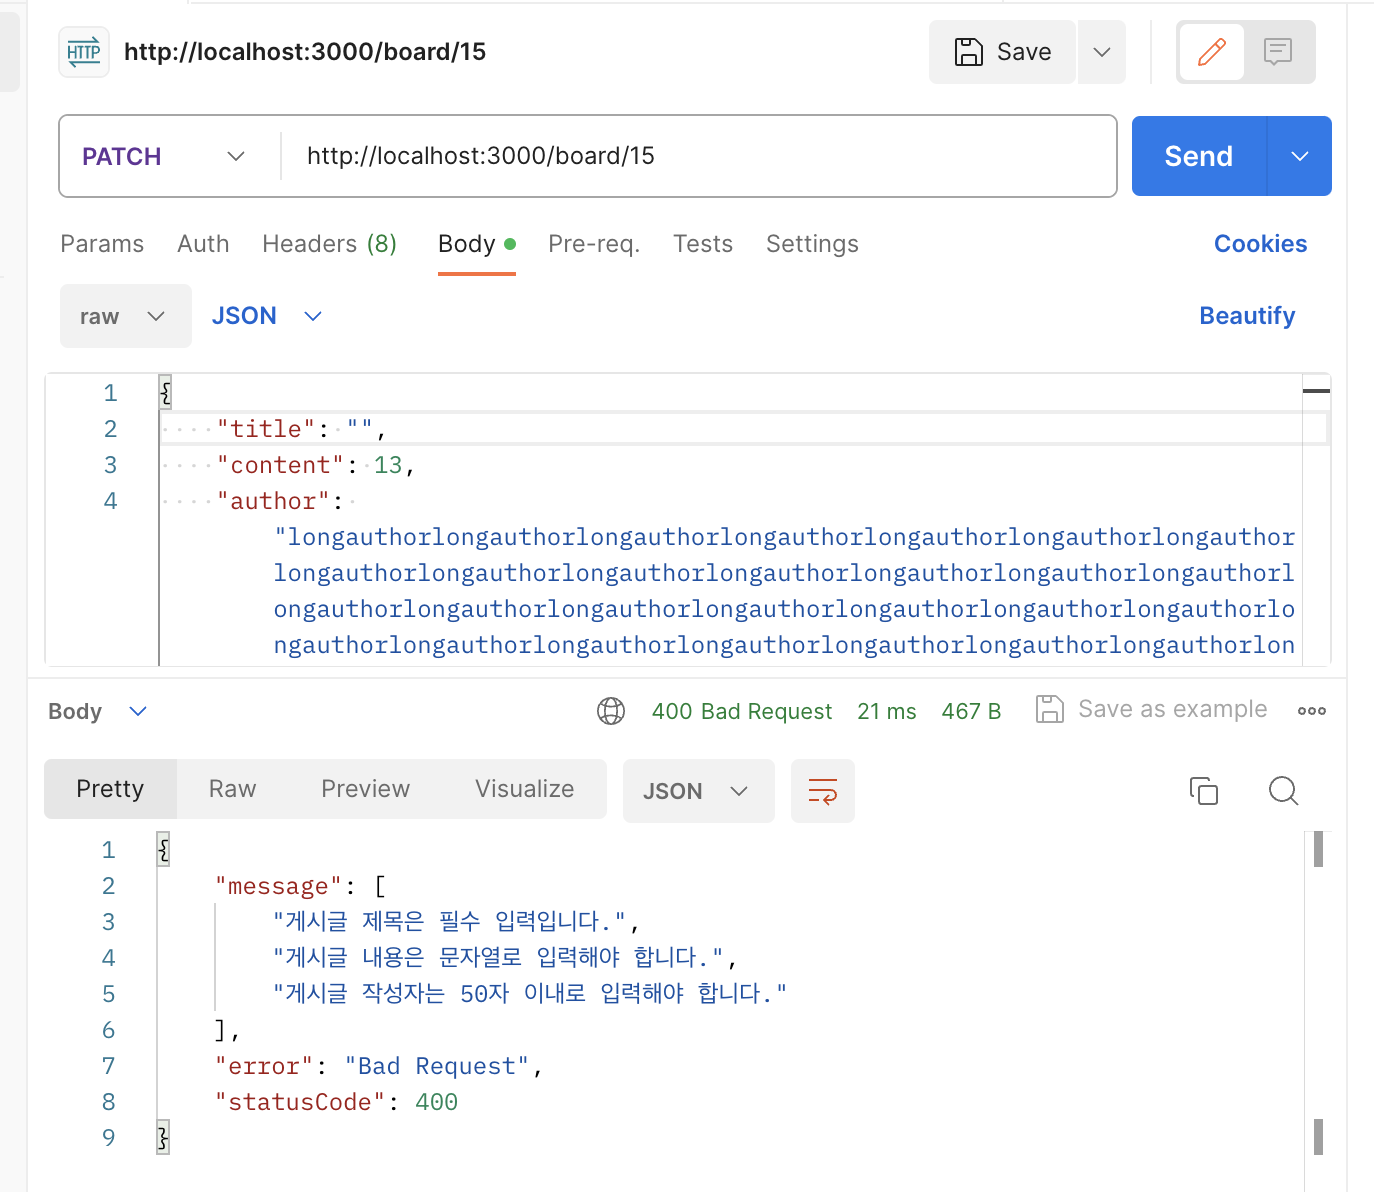
Entity의 제약사항에 맞게 Class-Validator 어노테이션과 에러 메세지를 적절히 작성해준다.
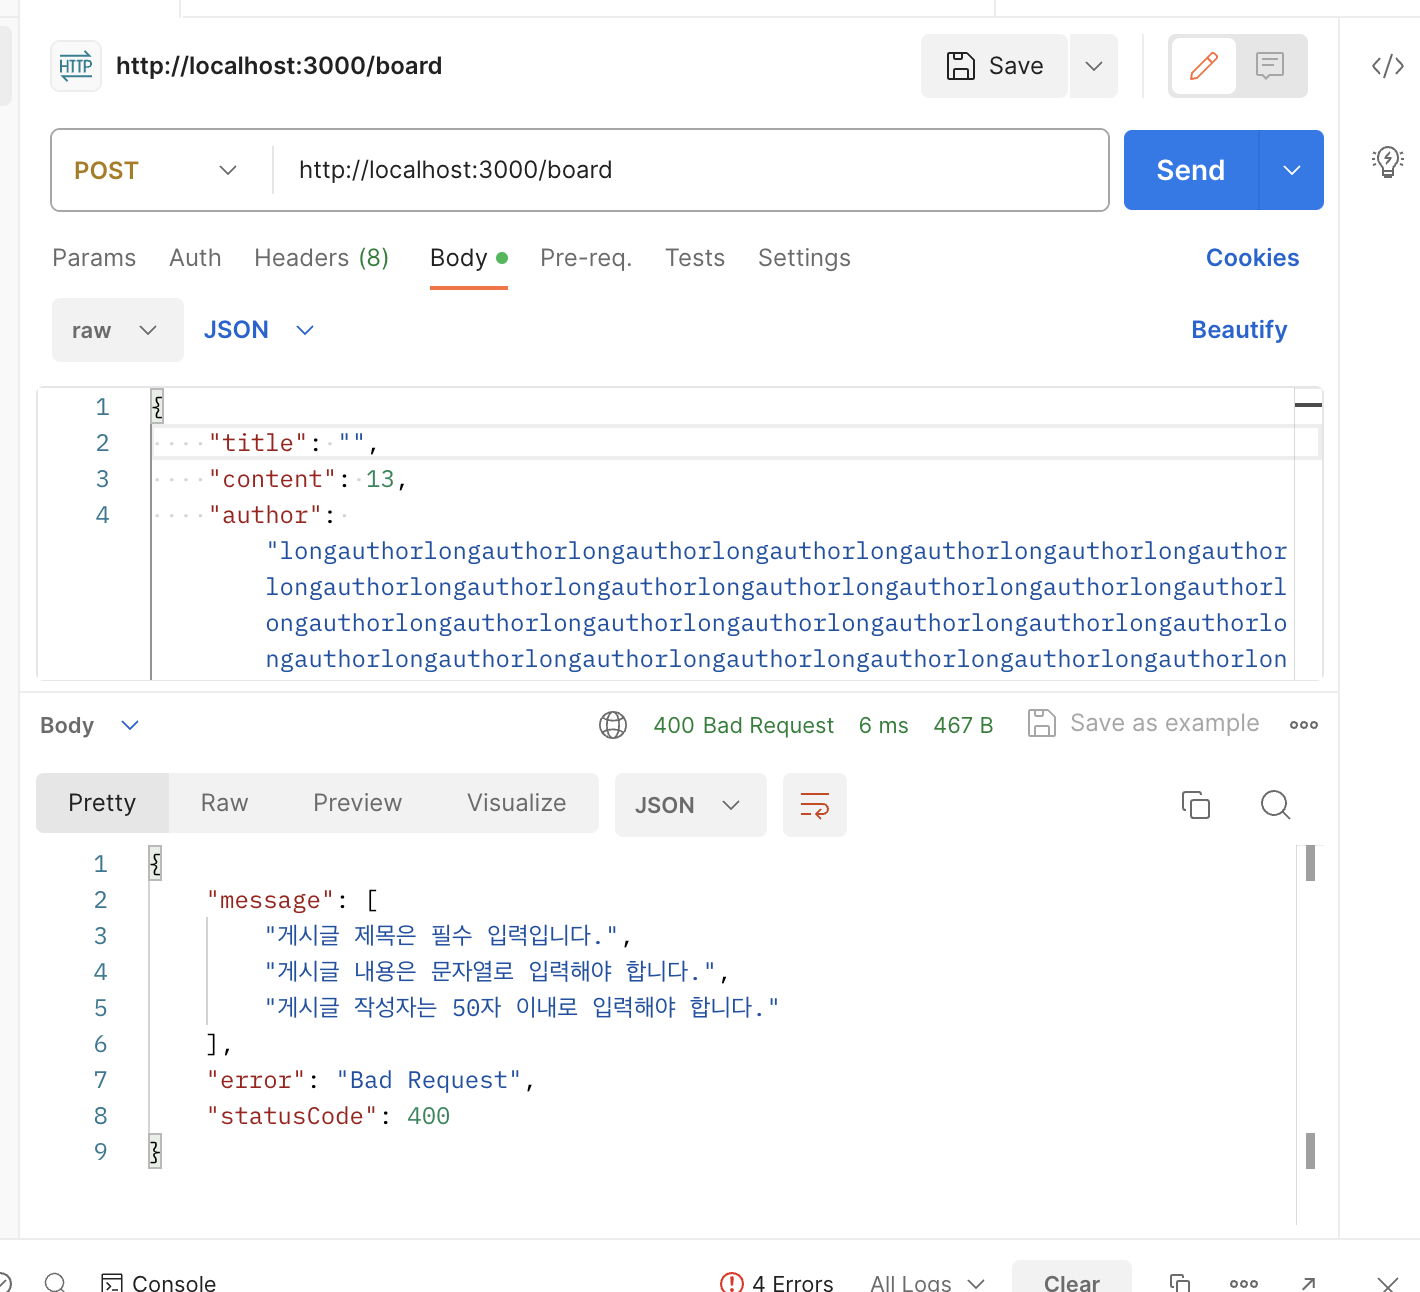
다양한 에러에 대한 처리를 유발시켜봤다. 잘 된다!
@Patch(':id')
@UsePipes(ValidationPipe)
updateBoard(
  @Param('id', ParseIntPipe) id: number,
  @Body() updateBoardDto: UpdateBoardDto,
) {
  return this.boardService.updateBoard(id, updateBoardDto);
}ParseIntPipe를 @Param 에 추가해서 +id 대신 숫자로 깔끔하게 처리해줬다.
:id가 사용되는 모든 부분에 적용하고 타입도 number로 변경 +id는 id로 변경.
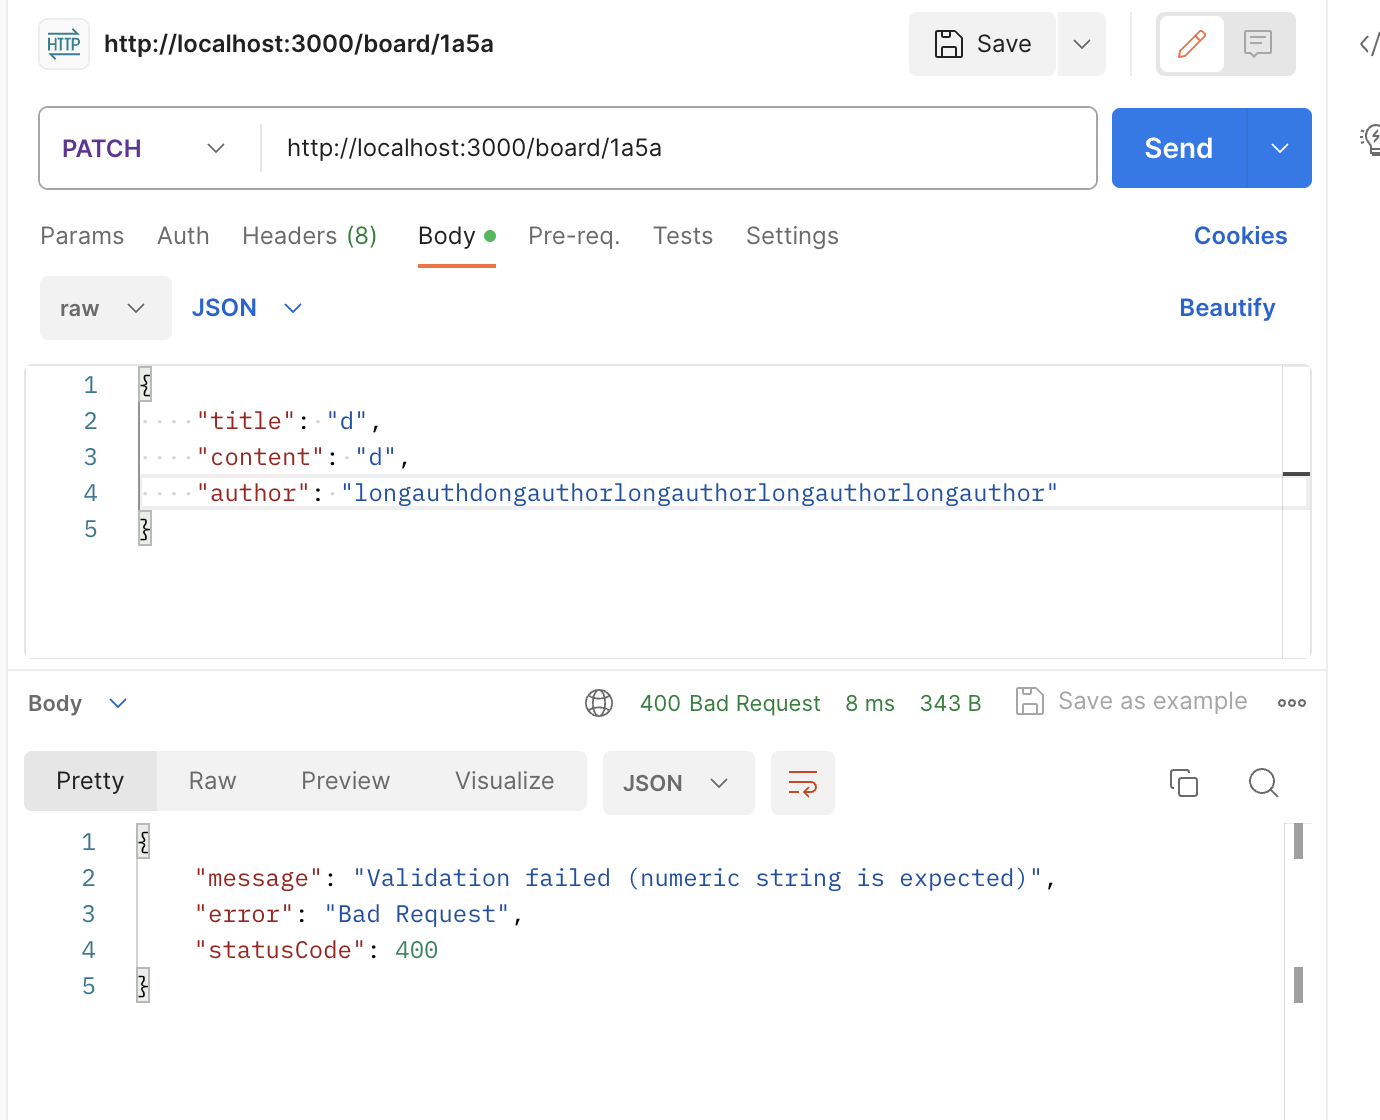
잘 적용된다.
@Patch(':id')
@UsePipes(ValidationPipe)
updateBoard(@Param('id') id: string, @Body() updateBoardDto: UpdateBoardDto) {
  return this.boardService.updateBoard(+id, updateBoardDto);
}
여긴 CreateBoardDto의 Partial 타입이라 별 거 없다. Pipe 데코레이터만 추가시켜주면 된다.
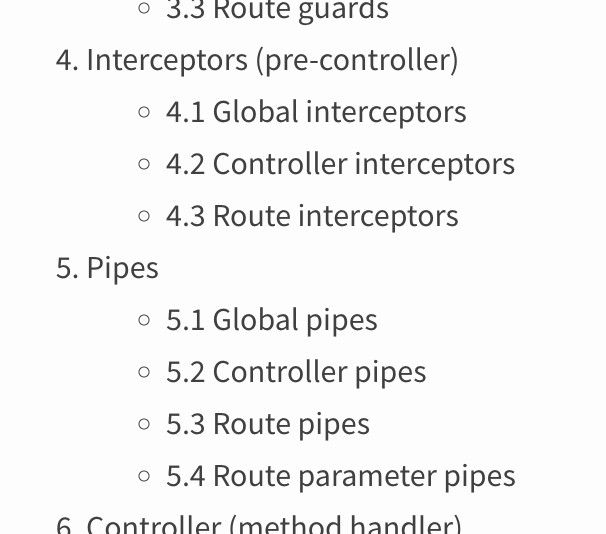
NestJS Request Lifecycle 공식문서를 확인해보면, Interceptor가 Pipe보다 먼저 와서, Interceptor 결과에 대한 유효성 검증이 가능함을 확인할 수 있다.
마음놓고 추가해주자.
@Post(':id/image')
@UseInterceptors(FileInterceptor('file', { dest: './uploads' }))
@UsePipes(ValidationPipe)
uploadFile(
  @Param('id', ParseIntPipe) board_id: number,
  @UploadedFile() file: CreateImageDto,
): Promise<Board> {
  return this.boardService.uploadFile(board_id, file);
}
// create-image.dto.ts
import { IsInt, IsNotEmpty } from 'class-validator';
export class CreateImageDto {
@IsNotEmpty({ message: 'fieldname이 누락되었습니다.' })
fieldname: string;
@IsNotEmpty({ message: 'originalname이 누락되었습니다.' })
originalname: string;
@IsNotEmpty({ message: 'encoding이 누락되었습니다.' })
encoding: string;
@IsNotEmpty({ message: 'mimetype이 누락되었습니다.' })
mimetype: string;
@IsNotEmpty({ message: 'destination이 누락되었습니다.' })
destination: string;
@IsNotEmpty({ message: 'filename이 누락되었습니다.' })
filename: string;
@IsNotEmpty({ message: 'path가 누락되었습니다.' })
path: string;
@IsNotEmpty({ message: 'size가 누락되었습니다.' })
@IsInt({ message: 'size는 숫자로 입력해야 합니다.' })
size: number;
}[NestJS] 파일 업로드하기 NestJS 기초 (14) 이미지 파일 업로드하기 How to unit test file upload with Supertest -and- send a token? NestJS 파일업로드 공식문서
NestJS에서 3가지 방법을 통해 S3 객체에 접근해보자! Nestjs에서 파일 업로드하는 방법 1편 - multer NestJS에서 AWS S3로 파일 업로드하기
네이버 NCP Object Storage 이미지 업로드 Object Storage 개요 SDK 가이드
[Redis] 우분투에 Redis 설치/접속/사용하기 Redis 외부접속 허용
NestJS Request Lifecycle 공식문서 만들면서 배우는 NestJS 기초 class-validator 사용법
© 2023 debussysanjang
- 🐙 [가은] Three.js와의 설레는 첫만남
- 🐙 [가은] JS로 자전과 공전을 구현할 수 있다고?
- ⚽️ [준섭] NestJS 강의 정리본
- 🐧 [동민] R3F Material 간단 정리
- 👾 [재하] 만들면서 배우는 NestJS 기초
- 👾 [재하] GitHub Actions을 이용한 자동 배포
- ⚽️ [준섭] 테스트 코드 작성 이유
- ⚽️ [준섭] TypeScript의 type? interface?
- 🐙 [가은] 우리 팀이 Zustand를 쓰는 이유
- 👾 [재하] NestJS, TDD로 개발하기
- 👾 [재하] AWS와 NCP의 주요 서비스
- 🐰 [백범] Emotion 선택시 고려사항
- 🐧 [동민] Yarn berry로 모노레포 구성하기
- 🐧 [동민] Vite, 왜 쓰는거지?
- ⚽️ [준섭] 동시성 제어
- 👾 [재하] NestJS에 Swagger 적용하기
- 🐙 [가은] 너와의 추억을 우주의 별로 띄울게
- 🐧 [동민] React로 멋진 3D 은하 만들기(feat. R3F)
- ⚽️ [준섭] NGINX 설정
- 👾 [재하] Transaction (트랜잭션)
- 👾 [재하] SSH 보안: Key Forwarding, Tunneling, 포트 변경
- ⚽️ [준섭] MySQL의 검색 - LIKE, FULLTEXT SEARCH(전문검색)
- 👾 [재하] Kubernetes 기초(minikube), docker image 최적화(멀티스테이징)
- 👾 [재하] NestJS, 유닛 테스트 각종 mocking, e2e 테스트 폼데이터 및 파일첨부
- 2주차(화) - git, monorepo, yarn berry, TDD
- 2주차(수) - TDD, e2e 테스트
- 2주차(목) - git merge, TDD
- 2주차(일) - NCP 배포환경 구성, MySQL, nginx, docker, docker-compose
- 3주차(화) - Redis, Multer 파일 업로드, Validation
- 3주차(수) - AES 암복호화, TypeORM Entity Relation
- 3주차(목) - NCP Object Storage, HTTPS, GitHub Actions
- 3주차(토) - Sharp(이미지 최적화)
- 3주차(일) - MongoDB
- 4주차(화) - 플랫폼 종속성 문제 해결(Sharp), 쿼리 최적화
- 4주차(수) - 코드 개선, 트랜잭션 제어
- 4주차(목) - 트랜잭션 제어
- 4주차(일) - docker 이미지 최적화
- 5주차(화) - 어드민 페이지(전체 글, 시스템 정보)
- 5주차(목) - 감정분석 API, e2e 테스트
- 5주차(토) - 유닛 테스트(+ mocking), e2e 테스트(+ 파일 첨부)
- 6주차(화) - ERD
- 2주차(화) - auth, board 모듈 생성 및 테스트 코드 환경 설정
- 2주차(목) - Board, Auth 테스트 코드 작성 및 API 완성
- 3주차(월) - Redis 연결 후 RedisRepository 작성
- 3주차(화) - SignUpUserDto에 ClassValidator 적용
- 3주차(화) - SignIn시 RefreshToken 발급 및 Redis에 저장
- 3주차(화) - 커스텀 AuthGuard 작성
- 3주차(수) - SignOut시 토큰 제거
- 3주차(수) - 깃헙 로그인 구현
- 3주차(토) - OAuth 코드 통합 및 재사용
- 4주차(수) - NestJS + TypeORM으로 MySQL 전문검색 구현
- 4주차(목) - NestJS Interceptor와 로거
- [전체] 10/12(목)
- [전체] 10/15(일)
- [전체] 10/30(월)
- [FE] 11/01(수)~11/03(금)
- [전체] 11/06(월)
- [전체] 11/07(화)
- [전체] 11/09(목)
- [전체] 11/11(토)
- [전체] 11/13(월)
- [BE] 11/14(화)
- [BE] 11/15(수)
- [FE] 11/16(목)
- [FE] 11/19(일)
- [BE] 11/19(일)
- [FE] 11/20(월)
- [BE] 11/20(월)
- [BE] 11/27(월)
- [FE] 12/04(월)
- [BE] 12/04(월)
- [FE] 12/09(금)
- [전체] 12/10(일)
- [FE] 12/11(월)
- [전체] 12/11(월)
- [전체] 12/12(화)