-
Notifications
You must be signed in to change notification settings - Fork 87
Boot: MMC SD
Most Ingenic-based devices will attempt to boot from alternative sources if the SoC chip fails to load the bootloader from the onboard flash memory (NOR or NAND).
This means that if your device's bootloader is damaged, you may be able to recover it using an SD card. Ingenic SoC devices are designed to search for a bootloader at a specific offset on the SD card. If a valid bootloader is found, it will load it automatically.
Important
On certain devices, including Wyze and Atom models, the SD card is powered via a GPIO switch. This requires activating a specific GPIO in U-Boot or the Linux system to supply power to the SD card. Without this step, you cannot use the SD card for recovery unless you make physical modifications to the hardware. If your device is configured this way, consider using an alternative recovery method.
To boot your device from an SD card, you'll need a U-Boot binary specifically built for your SoC using the msc profile. Prebuilt U-Boot binaries for Ingenic devices are available at u-boot-ingenic GitHub repository.
-
Insert the SD card into your PC.
-
Run
fdisk -lto identify the SD card. For example, you might see something like this:Disk /dev/sdb: 29.72 GiB, 31914983424 bytes, 62333952 sectors -
Ensure you have selected the correct device (
/dev/sdX) to avoid data loss on other drives. -
Use the following command to write the U-Boot binary to the SD card:
sudo dd if=./u-boot-isvp_t31_msc0_ddr128M.bin of=/dev/sdb bs=512 seek=34
This command writes the bootloader to the SD card at an offset of 34 KB from the start (0x0).
Caution
Double-check that /dev/sdX corresponds to your SD card to avoid overwriting data on other devices.
The CPU will boot from the SD card, so long as the on board bootloader is damaged, or if the flash chip is empty ( has been erased ).
- Insert the prepared SD card into your device.
- Power on the device.
- The device should attempt to boot from the SD card. If successful, it will load the bootloader from the card.
Important
When flashing a blank flash memory chip or if the bootloader is not installed, the Ingenic SoC will automatically enter "USB/MMC-Boot" mode, and shorting pins on the flash chip is not necessary. However, if the device is attempting to read from onboard flash, you may need to prevent this by either shorting specific pins on the flash memory or using the system to erase the chip beforehand.
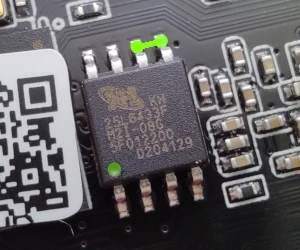
Locate the flash memory chip on the camera circuit board. Typically this is a square chip with 8 pins labeled 25Q64 or 25Q128, rarely 25L64 or 25L128. If you have trouble locating the chip, try taking some pictures of your board from both sides. You can then try and reach out to our community for further assistance.
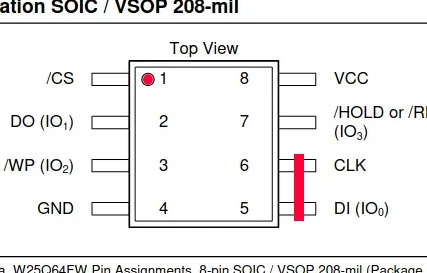
Pins 5 and 6 of the SOIC8 chip are on the opposite corner of pin 1, indicated by the embossed or drawn dot next to it.
Once you are ready to begin, short-circuit pins 5 and 6 of the flash chip with a small metal object, a screwdriver or tweezers.
Short pins 5 and 6 ON THE FLASH CHIP, not SoC or any other chip, use the photos as a reference, as described in this document.
Caution
Do not try to short-circuit any random chip! It will most likely burn your camera circuit.
While maintaining the short, power on the device, wait 5 seconds, then release the short. The device should have booted from the bootloader on the SD card.
This method provides a recovery path for devices with damaged onboard bootloaders. If it does not work, verify the GPIO power requirements or try alternative recovery methods.
The following devices are known to work with this installation method:
- Aoquee C1

