
![]()
![]()
![]()

JHipster blueprint
Documentation and information about JHipster.NET is available here
Full documentation and information about JHipster is available here
https://github.com/jhipster/jhipster-sample-app-dotnetcore
This is a JHipster blueprint, that is meant to be used in a JHipster application.
https://gitter.im/JHipster-NET/jhipster-dotnetcore
As this is a JHipster blueprint, we expect you have JHipster and its related tools already installed:
To install this blueprint:
npm install -g generator-jhipster-dotnetcoreTo update this blueprint:
npm update -g generator-jhipster-dotnetcoreTo install this blueprint:
yarn global add generator-jhipster-dotnetcoreTo update this blueprint:
yarn global upgrade generator-jhipster-dotnetcoreTo use this blueprint, run the below command
jhipster --blueprints dotnetcore✅ General App generation
jhipster --blueprints dotnetcore- JWT : ✅
- Oauth2 : ✅
✅ Entity generation
jhipster entity <entity-name>
✅ JDL Entity model support generation
jhipster import-jdl my_file.jdl
During development of blueprint, please note the below steps. They are very important.
- Link your blueprint globally
Note: If you do not want to link the blueprint(step 3) to each project being created, use NPM instead of Yarn as yeoman doesn't seem to fetch globally linked Yarn modules. On the other hand, this means you have to use NPM in all the below steps as well.
cd dotnetcore
npm link- Link a development version of JHipster to your blueprint (optional: required only if you want to use a non-released JHipster version, like the master branch or your own custom fork)
You could also use Yarn for this if you prefer
cd generator-jhipster
npm link

cd dotnetcore
npm link generator-jhipster- Create a new folder for the app to be generated and link JHipster and your blueprint there
mkdir my-app && cd my-app

npm link generator-jhipster-dotnetcore
npm link generator-jhipster (Optional: Needed only if you are using a non-released JHipster version)

jhipster -d --blueprint dotnetcore
- Build the Docker image of the app
docker build -f "[Dockerfile path]" -t [An image name]:[A tag] "[Application root path]"- Run your image in a Docker container
docker run -d -p [A host port]:80 [Image name]:[Image tag]- Open your favorite browser at
localhost:[Chosen host port]and enjoy ! 🐳
Docker compose file can be used to start the application with database as a service. To build images, run
docker-compose -f docker/app.yml buildTo start services, use
docker-compose -f docker/app.yml upIn case of Oracle database, see official documentation
You can use services to move business logic away from controllers. It also allows you to use DTOs.
You can generate services using the entity generator:
jhipster entity newentity
Or by using JDL:
service all with serviceImpl except Employee, Job
Notice that only the service with interface option (serviceImpl) is enabled on this generator.
One common use case is to customize service classes to suit different business needs. When using the jhipster generator to edit an existing entity or upgrading the generator's version, changes to the generated service classes might be overwritten. Altough it is possible to make changes directly to generated service classes, It might get tricky keeping track of changes.
Optionally, you can extend and customize service classes to avoid service class code overwriting.
Example:
Add an Author entity with service generation enabled by using the generator's cli.
Then create the following class named AuthorExtendedService.cs:
namespace MyCompany.Domain.Services {
    public class AuthorExtendedService : AuthorService, IAuthorService
    {
        public CountryExtendedService(ApplicationDatabaseContext applicationDatabaseContext) : base(applicationDatabaseContext)
        {
        }

        public override async Task Delete(long id)
        {
            // add custom business logic before delete
            await base.Delete(id);
        }
    }
}
AuthorExtendedService class will override one specific method of its base class (or more if you wish) adding custom business logic and AuthorExtendedService class will be automatically be registered with the dotnet container. Any code using the IAuthorService dependency will use this class for its implementation.
Currently the automatic registration strategy for class/interface is used only for service classes/interfaces and more details are explained below.
Under the hood this project uses reflection for assembly scanning to automatically register service classes/interfaces with dotnet's dependency injection container. Implementation details can be found at ServiceStartup.cs file located at src/ProjectName/Configuration/ folder.
The following steps are used to automatically register service classes and interfaces:
- Scan
ProjectName.Domain.Services.Interfacesnamespace (atProjectName.Domainassembly) for service interfaces andProjectName.Domain.Servicesnamespace (atProjectName.Domain.Servicesassembly) for service classes. - Find matching classes and its interfaces using the "I" prefix convention for interface name. This step registers the generated service classes/interfaces since they use "I" interface prefix convention, but user-defined services and interfaces can also be automatically registered using this convention. For example: JobService class matches IJobService interface, EmployeeService class matches IEmployeeService interface, MyNewService class matches IMyNewService interface, etc...
- Service class names ending with 'ExtendedService' have higher priority for registration on the DI container. This is useful to make sure that the class will be registered and will replace any existing DI registrations. For example: if JobExtendedService class is present and implements IJobService, then replace existing registrations.
Notice that this blueprint uses AutoMapper to handle dto conversion instead of Java's mapstruct.
Example using JDL:
dto * with mapstruct
See JHispter's documentation for more details about using DTOs.
If you had already run the application before creating your first migration, some database tables might be already created automatically on application startup. So you have the options of removing conflicting tables or editing the migration you just created. If you wish to automatically apply database migrations when the application is started replace method EnsureCreated() by Migrate() at DatabaseStartup.cs file. Be aware of the implications of doing so. Currently it is up to the user to create migrations.
- Add EF Core cli tools
With .net core 3.0 the cli tool for entity framework was removed from the core sdk so you need to install it globally. You only need to do this once. See Breaking changes included in EF Core 3.0 for reference.
dotnet tool install --global dotnet-efIf using Visual Studio follow the documentation on Entity Framework Core tools reference - Package Manager Console in Visual Studio
- Create the initial database migration
dotnet ef migrations add InitialCreate --project YourProject.csproj- Update the database
dotnet ef database update --project YourProject.csprojTips:
- Remember to change the connection string to point to your database at appsettings.json.
- It is a good practice to check your migration files and backup your database before running migrations.
-
Run Sonar in container :
docker-compose -f ./docker/sonar.yml up -d -
Wait container was up Run
SonarAnalysis.ps1and go to http://localhost:9001
-
Run Sonar in container :
docker-compose -f ./docker/sonar.yml up -d -
Install sonar scanner for .net :
dotnet tool install --global dotnet-sonarscanner
-
Run
dotnet sonarscanner begin /d:sonar.login=admin /d:sonar.password=admin /k:"YourProject" /d:sonar.host.url="http://localhost:9001" /s:"`pwd`/SonarQube.Analysis.xml" -
Build your application :
dotnet build -
Publish sonar results :
dotnet sonarscanner end /d:sonar.login=admin /d:sonar.password=admin -
Go to http://localhost:9001
-
Run container (uncomment chronograf and kapacitor if you would use it):
docker-compose -f ./docker/monitoring.yml up -d -
Go to http://localhost:3000 (or http://localhost:8888 if you use chronograf)
-
(Only for chronograf) Change influxdb connection string by
YourApp-influxdb -
(Only for chronograf) Change kapacitor connection string by
YourApp-kapacitor -
(Only for chronograf) You can now add dashboard (like docker), see your app log in Cronograf Log viewer and send alert with kapacitor
OAuth is a stateful security mechanism, like HTTP Session. Spring Security provides excellent OAuth 2.0 and OIDC support, and this is leveraged by JHipster. If you're not sure what OAuth and OpenID Connect (OIDC) are, please see What the Heck is OAuth?
Keycloak is the default OpenID Connect server configured with JHipster.
To log into your application, you'll need to have Keycloak up and running. The JHipster Team has created a Docker container for you that has the default users and roles. Start Keycloak using the following command.
docker-compose -f ./docker/keycloak.yml up
The security settings in appsettings.json are configured for this image.
appsettings.json:
  ...
"jhipster": {
    "Security": {
      "Authentication": {
        "OAuth2": {
          "Provider": {
            "IssuerUri": "http://localhost:9080/auth/realms/jhipster",
            "LogOutUri": "http://localhost:9080/auth/realms/jhipster/protocol/openid-connect/logout",
            "ClientId": "web_app",
            "ClientSecret": "web_app"
          }
Keycloak uses an embedded H2 database by default, so you will lose the created users if you restart your Docker container. To keep your data, please read the Keycloak Docker documentation. One solution, with keeping the H2 database, is to do the following:
- Add a volume that will be persisted:
./keycloak-db:/opt/jboss/keycloak/standalone/data - Change the migration strategy from
OVERWRITE_EXISTING, toIGNORE_EXISTING(in the command section)
In production, it is required by Keycloak that you use HTTPS. There are several ways to achieve this, including using a reverse proxy or load balancer that will manage HTTPS. We recommend that you read the Keycloak HTTPS documentation to learn more about this topic.
If you'd like to use Okta instead of Keycloak, you'll need to change a few things. First, you'll need to create a free developer account at https://developer.okta.com/signup/. After doing so, you'll get your own Okta domain, that has a name like https://dev-123456.okta.com.
Modify appsettings.json to use your Okta settings. Hint: replace {yourOktaDomain} with your org's name (e.g., dev-123456.okta.com).
appsettings.json:
  ...
"jhipster": {
    "Security": {
      "Authentication": {
        "OAuth2": {
          "Provider": {
            "IssuerUri": "https://{yourOktaDomain}/oauth2/default",
            "LogOutUri": "https://{yourOktaDomain}/oauth2/default/v1/logout",
            "ClientId": "client_id",
            "ClientSecret": "client_secret"
          }
Create an OIDC App in Okta to get a {client-id} and {client-secret}. To do this, log in to your Okta Developer account and navigate to Applications > Add Application. Click Web and click the Next button. Give the app a name you’ll remember, and specify http://localhost:[port]/login/oauth2/code/oidc as a Login redirect URI. Click Done, then edit your app to add http://localhost:[port] as a Logout redirect URI. Copy the client ID and secret into your application.yml file.
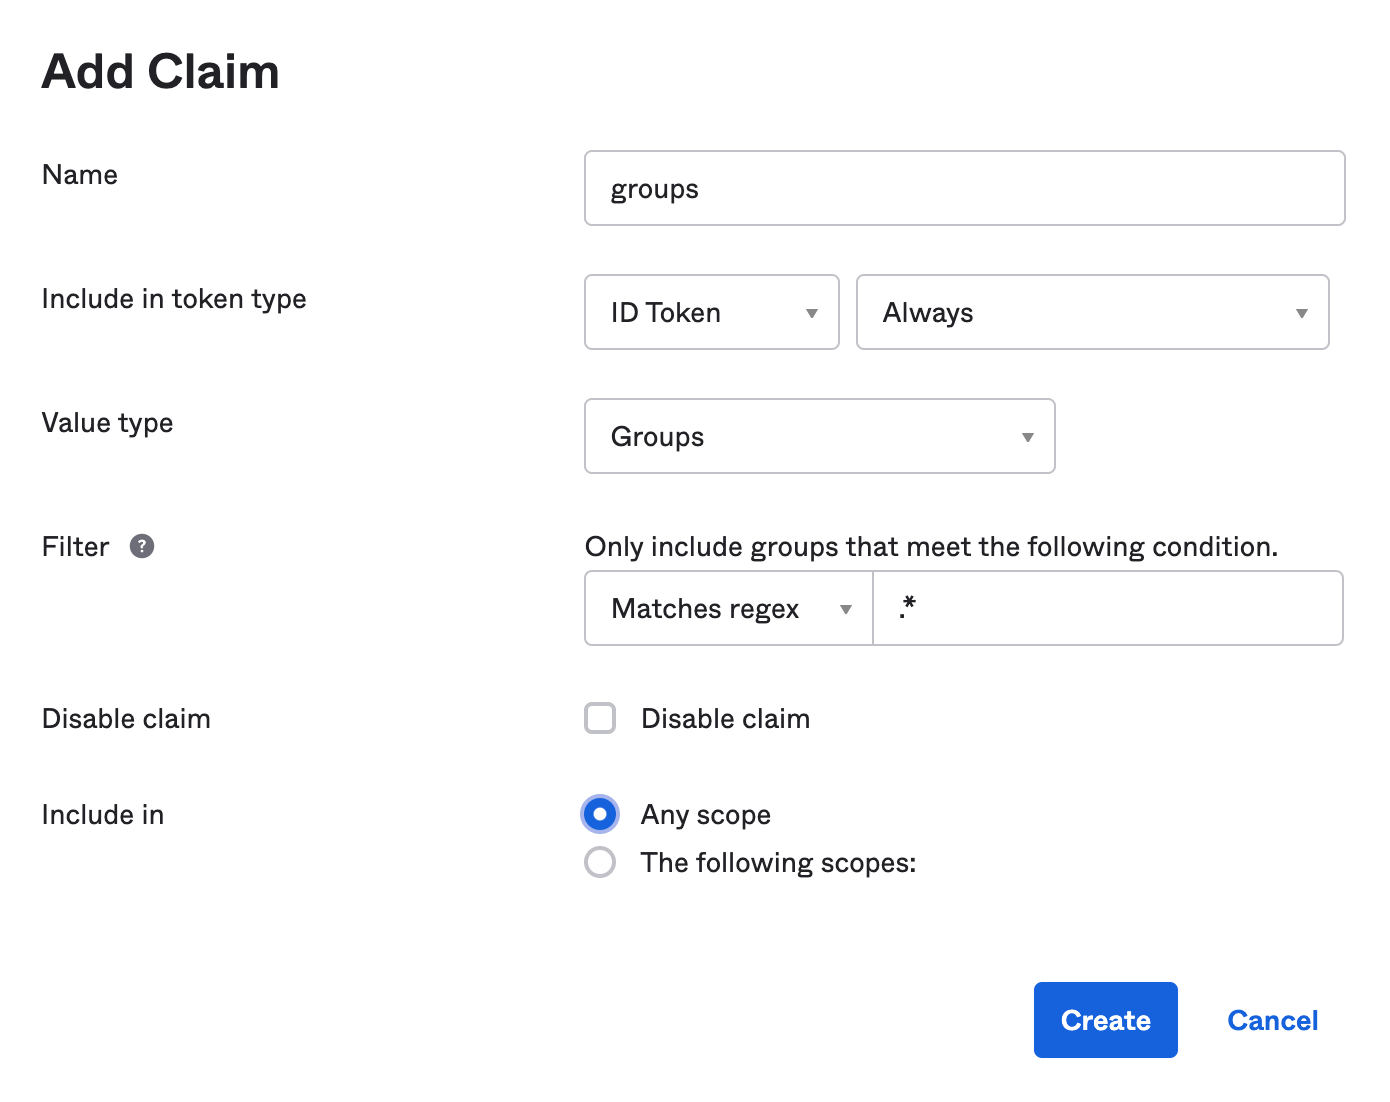
Create a ROLE_ADMIN and ROLE_USER group (Users > Groups > Add Group) and add users to them. You can use the account you signed up with, or create a new user (Users > Add Person). Navigate to API > Authorization Servers, and click on the default server. Click the Claims tab and Add Claim. Name it groups, and include it in the ID Token. Set the value type to Groups and set the filter to be a Regex of .*. Click Create.
Apache-2.0 © Daniel Petisme