A blender addon for exporting assets and scenes for use with the MTerrain addon for Godot.
This is still super experimental, and I haven't had time to write proper documentation, so I apologise if this guide isn't clear.
- LODs: store multiple meshes under a single object and quickly swap between them
- Material Sets: store multiple groups of materials under each mesh and quickly swap between them (see concepts for more details)
- Variation Groups: Quickly swap between objects that are functionaly interchangeable e.g. different trees, or different wall pieces that have the same size but different geometry
- Export assets with extra data needed for import into godot to use with mterrain
- Import/Export scenes composed of assets from other files with correct data for import into godot to use with mterrain. Load/Save dirrectly to/from .tscn files
- Autotile: draw floor plans and automatically convert them to 3d models using the asset system.
- Asset Shelf: drag and drop assets from other blend files and automatically create the correct overrides for use with the mterrain system
There are two modes for using this addon: Assets and Scenes
Assets are individual "items", that can have multiple material sets and multiple lods. A wall can be an item. A tree can be an item. These will all be imported as "assets" in godot mterrain.
Scenes are for when you want to combine multiple items into a single composed scene. Scenes must not have any original items, they must only reference "assets" from other blend files. In this mode, the UI changes to accomodate this.
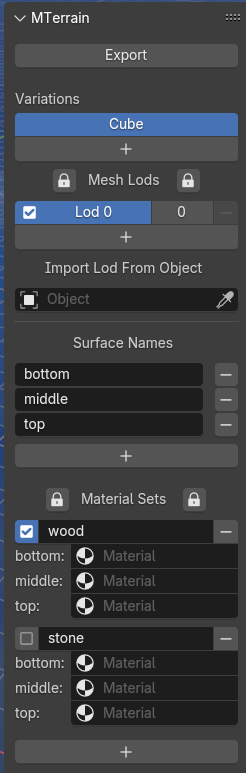
Material Sets are array of materials that allow you to quickly swap between multiple version of an asset. e.g. if you have a wall that uses 3 materials, one material set might be for a wooden wall, and another for a stone wall.
Surface Names are like material slots. When you switch material sets, each surface will be replaced by a new material. Surface names should describe where on the mesh the material exists e.g. Floor, wall, roof and material names should describe what the material looks like, e.g. stone, wood, plaster
Variation Groups are a collections of objects that are interchangeable in some way, which allows you to quickly swap between them. E.g. 5 similar sized trees, or 5 wall pieces that are the same "size" but have different geometry
Join(ed) Mesh is mesh that replaces all other meshes in the scene at a specific LOD. E.g. when you zoom out, a house can be replaced by a cube at lod 5 and then a billboard at lod 7.
Download the zip from this github repo. Open blender preferences/addons. Add the zip as an addon and activate it.
Create mesh objects. Rename them using the mterrain naming convetion. Export glb OR select all objects and click export under the N-panel / tool / mterrain.
e.g. 1 asset with 3 lods: Chair_lod_0, Chair_lod_1, Chair_lod_2.
When you import into godot's mterrain asset library it will be treated as a single object
You can create multiple LOD meshes and multiple "material sets" inside one blender "object". You can link multiple "objects" into variation groups for easy swapping.
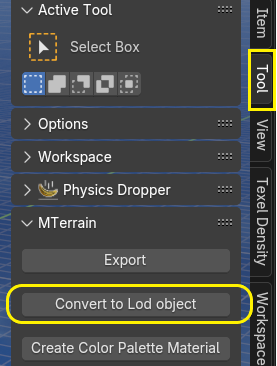
To do this, add a mesh object in blender and then convert to LOD object:
Now that it is an LOD object, press the + under "Mesh Lods". This will duplicate the mesh, and assign it to the next LOD.
If you click the eyedropper under "import lod from object", it will allow you to click on a mesh in the 3d vieport to replace the currently active lod with that mesh.
If you click the + under surface names, you can add another "surface" to this mesh.
If you click the + under "Material Sets" you can add another material set. When you activate a material set, each surface (aka material slot) gets populated with the corresponding material from the material set. This allows you to quicky swap between a group of materials.
Once you've created assets, you can use those assets to build "scenes".
First, open a .tscn file that is a baker scene (created with mterrain in godot). This will load all the assets in that baker scene into blender.
Now you can use the asset browser to add object as "linked" (not append) and the addon should automatically create the necessary overrides for you. If not, there is an operator "ross.library_override_selected" which will apply correct override.
In this mode, you cannot edit the meshes or material sets, but you can replace the object with any object from it's variation group, and you change location/rotation/scale/active material set.
If you add the suffix "_baker" to the root node, this will create a sub-baker scene.
If you add mesh objects that follow the "join mesh" naming convention, they will be imported as that baker's joined mesh when you open the baker in godot. Joined meshes should have the same object name as the baker, with suffix "_joined_mesh" followed by the lod at which they are active e.g. "_lod_5". which together makes e.g. My_Baker_Scene_joined_mesh_lod_5
When you click save, the changes will be saved to the original tscn file.
You can also try the asset shelf: Save the asset blend file and add it to the blender/preferences/paths as a library. Then start a new blend file, enable the asset shelf, and drag object from the asset shelf into the scene.