-
Notifications
You must be signed in to change notification settings - Fork 0
3. Heightmap
This tutorial covers single raster heightmap as per the kind you will find on opentopo here, I will detail steps for heightmaps spread across muliptle rasters in a further update to this tutorial. as they will require additional steps likely including Merge / Build Virtual Raster commands. This section does not cover any re scaling of heightmap, which I would recommend against anyway. Remember Grid size x Cell size should = the same size (meters) as your source heightmap selection.
Drag and drop your heightmap '.asc' into QGIS
If you do use opentopo for source of Heightmap, make sure extract both the .asc and .prj files before proceeding with below. They should both be in the zip file from opentopo.
Set QGIS to appropriate CRS for location of your HM
Clicking on the CRS section bottom right within QGIS -- will bring up the Project Properties for CRS
Select the CRS to match your real world data, in this example its ‘WGS 84 UTM zone 20N’ because the terrain is from the Montserrat in the Caribbean. See also UTM projection.
This will ensure your QGIS project space works appropriately with any other data you want to add - eg road shapefiles etc. Terrain Builder will only use UTM 31N but we'll get to that later.
Create shapefile & generate square feature using Advanced Digitizing panel
Top menu -- Layer > Create Layer > New Shapefile Layer
Save to project folder location
Change Geometry type to ‘Polygon’
Match CRS so it is the same as that just configured in above step
Right click on your shapefile in layers window & select ‘Toggle Editing’
From menu -- View → Toolbars → Advanced Digitizing Toolbar
Select ‘Add Polygon Feature’
Select Enable advanced digitizing tools
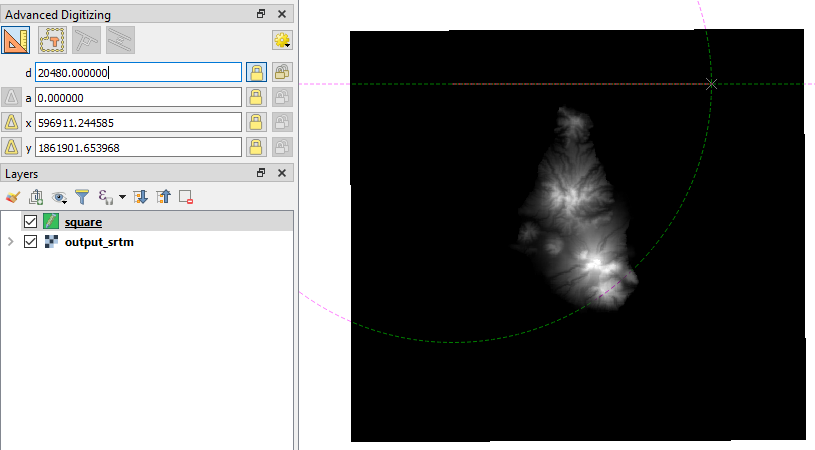
To create a perfect square, left mouse click for your top left starting point, move your mouse to the right a little, then press ‘d’ on keyboard, type in the exact width (distance) required (in this example ‘20480’) then immediately press Enter -- be careful not to move the mouse before pressing Enter or it will mess up the number. Press left mouse click and you will have drawn your first horizontal line which turns red. By default this tool snaps to 90 degree angles, making it easy to draw your lines. Now to draw the vertical line start moving mouse your down, press ‘d’ again and type in same figure as above, press Enter and another left mouse click, repeat the process for the last 2 lines of the square.
See a short video example using the Advanced Digitizing tool:
After the last left mouse click from the step above, the tool is still waiting to plot more points, so to finalise the square do a right mouse click
This will then bring up an attributes dialogue -- just type any number and Enter
Save the above edits to the shapefile by clicking on the layer & selecting ‘Toggle Editing’
Obtain extents from square feature
Activate the toolbox if it is not already available
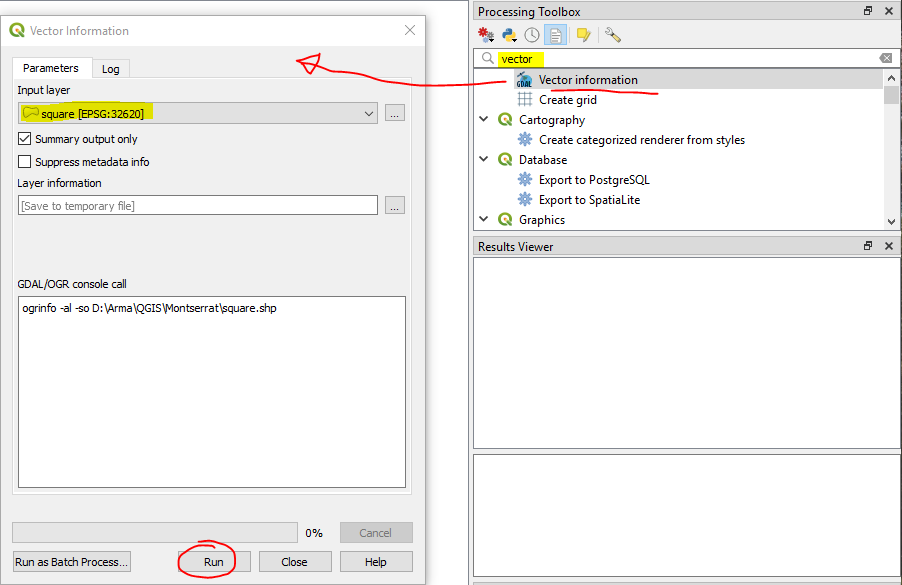
Start typing 'vector' in Processing Toolbox search bar, and you will see 'Vector information'
Double click it and make sure your square input layer is selected - then just click Run
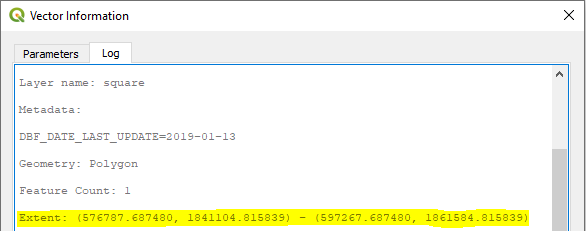
You will only need to copy the Extent figures, which we will use within the GDAL commands in the next step
Run the first GDAL command which will - set CRS, cell size and then clip to shapefile square extents
From menu - Plugins > Python Console
Click 'Show Editor'
The blank window on the right is where you will paste GDAL commands
Now you are ready to edit the command below to match your data - sections in bold are the parts to edit:
import os
os.system(r'''gdalwarp -t_srs EPSG:32620 -wo SOURCE_EXTRA=1000 -tr 5.0 5.0 -srcnodata ”-9999” -r cubic -ot Float32 -of GTiff -te 576787.687480 1841104.815839 597267.687480 1861584.815839 D:/Arma/Heightmaps/Opentopo/output_srtm.asc D:/Arma/QGIS/Montserrat/converted.tif''')
Some explanation of the key parameters:
-t_srs EPSG:32620
CRS to match where the heightmap is from in the world.
-tr 5.0 5.0
The desired resolution of your heightmap, match with Cell size set within your Mapframe properties in Terrain Builder:
-te 576787.687480 1841104.815839 597267.687480 1861584.815839
The 4 long figures represent the extents of your square, and should be replaced with your own figures obtained in previous step.
Input:
D:/Arma/Heightmaps/Opentopo/output_srtm.asc
Output:
D:/Arma/QGIS/Montserrat/converted.tif
Update the paths to match where you've stored your source heightmap, and where you want the output tif saved to.
You will have to wrap your paths with quotation marks "..path.." if it contains any blanks (spaces), or just remove blanks entirely to avoid the confusion.
Run second GDAL command - converting tif from above step to a Terrain Builder friendly .asc
Remember to change the paths in below command to match where your files are located
import os
os.system(r'''gdal_translate -of AAIGrid D:/Arma/QGIS/Montserrat/converted.tif D:/Arma/QGIS/Montserrat/final.asc''')


