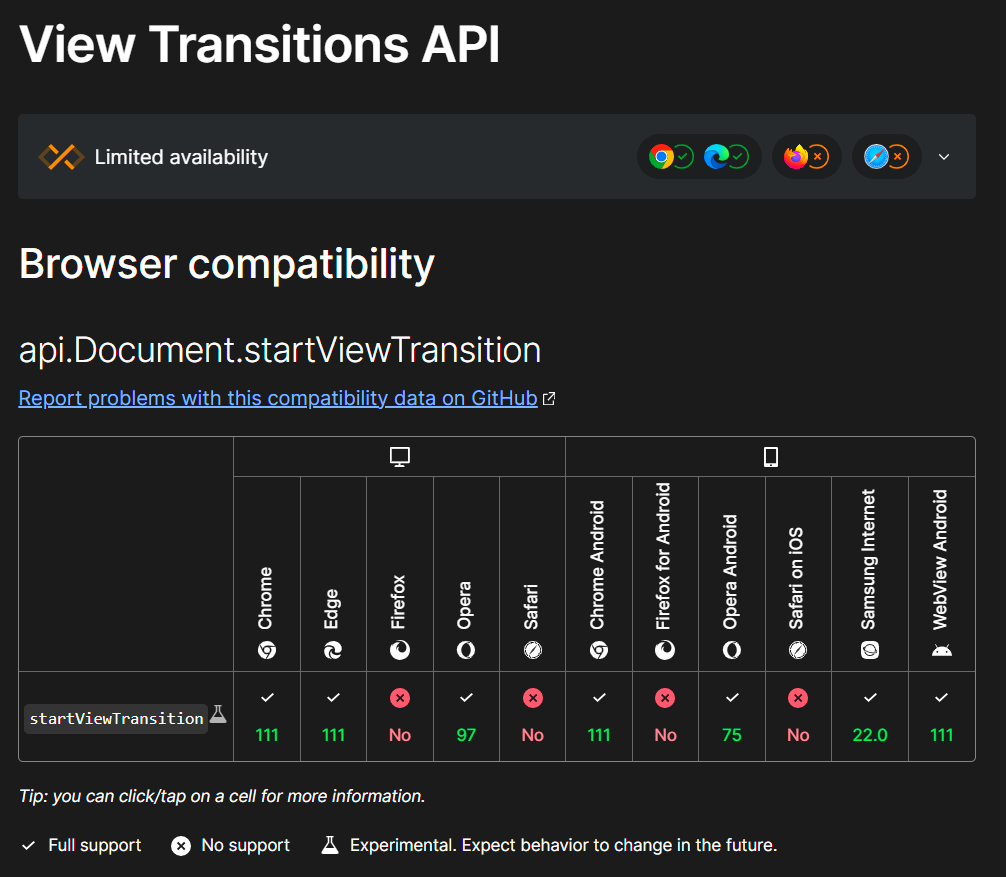
Before diving into how to make this, it's important to note that the View Transitions API is not yet fully supported in all browsers. At the time of writing, Firefox and Safari do not fully support this API. For users on unsupported browsers, we will provide a fallback method to ensure a consistent experience across different platforms.
Let's start by setting up the HTML structure for our tabs. It is a simple navigation bar with buttons:
<nav>
  <button> Explore </button>
  <button> Discover </button>
  <button> Navigate </button>
  <button> Journey </button>
  <button> Quest </button>
</nav>Next, we'll add some CSS to style our navigation and create the tabbed interface. We'll use flexbox to organize the buttons horizontally and apply a custom underline effect.
The underline is actually a :after pseudo-element that gets applied to a element that have a .active class.
button {
  background: none;
  border: none;
  color: #fff;
  cursor: pointer;
  position: relative;
  font-size: 24px
}

/*  This is the underline element */
button.active:after {
  content: '';
  position: absolute;
  inset: 0 0 -8px 0;
  top: unset;
  height: 3px;
  background: #fff;
}Now, let's add some JavaScript to handle button click events and update the active tab accordingly:
const buttons = document.querySelectorAll('button');

buttons.forEach(button => {
  button.addEventListener('click', e => updateView(e))
});

const updateView = ({ target }) => {
  // Remove the .active class of all elements
  buttons.forEach(button => button.classList.remove('active'));
  // Add the .active class only to the clicked element
  target.classList.add('active');
}
If we run the project, we have this:

We are almost there 😅
Here comes the wizardry 🧙
The view-transition-name property expects a string, any value that don't start with a number will do the job.
button.active:after {
  /* ... */
  view-animation-name: my-custom-transition; // unique name
}Here comes the wizardry² 🧙
The startViewTransition() method expects a callback function to make some good stuff:
- Handle the loading and positioning of the old and new content.
- Animate the old and new states to create the transition.
- Stop accidental user interactions with the old content from causing problems.
- Remove the old content once the transition is complete.
const buttons = document.querySelectorAll('button');

buttons.forEach(button => {
  button.addEventListener('click', (e) => {
    // Fallback, in case your browser
    // doesn't support startViewTransition
    if (!document.startViewTransition) {
      updateView(e);
      return
    }
    // tada 🪄
    document.startViewTransition(() => updateView(e))
  })
});

const updateView = ({ target }) => {
  buttons.forEach(item => item.classList.remove('active'));
  target.classList.add('active');
}With the View Transitions API, we can create seamless animations between different views or states of your web application, enhancing the overall user experience.