Jul 19 · 17 min read
One of the most impressive and rewarding tools for data science and machine learning is RStudio Shiny. Shiny allows you to prototype the graphical user interface (GUI) of an R application in matter of minutes, and scale it up relatively quick in hours to days. At the end of the day, it will all depend of the ambition and size of the project, as well as how far you are willing to hand-holding your application before you release it to software engineering.
In this particular case, I am talking from the vantage point of a Domain Expert — specifically, Petroleum Engineering. So, some philosophical debate may arise on some sensible spots: if the domain expert should be coding in the first place; if the domain expert should let the project go to software experts for production; or rather, why not sub-contract the whole enterprise to an outside vendor. In fact, there is no universal truth written in stone on the subject. Flexibility seems to be name of the game nowadays.
One of the last applications I coded using a traditional GUI was a multi well scanning tool written in Python with PyQt5. If you are an engineer like me, and also code, then you know there is a delicate balance between the degree of involvement with the intricacies of low-level software development: the generation of executables, taking care of libraries and dependencies for the operating system, the deployment cycle, unit testing, debugging, version control, and so on. How much and how long we keep extending our reach of knowledge, start resonating stronger with tones of guilt as we further leave away our boundaries. One of those areas is the development of graphical user interfaces or GUIs. In some way, we have to demonstrate the navigational features and friendliness of our app while solving an engineering problem, otherwise loses part of its appeal and harder to sell it to management. Don’t get me wrong here. I need a simple way of expressing a GUI -but not simpler; I want a professional look — not a Frankenstein-like mix of buttons, panels and windows. The problem with advanced GUI frameworks such as Qt5 is that they do provide high quality visualization products but at the same time it takes good portion of your time learning it. As a domain expert, should I? And I am talking about at prototyping level - not production class. There is this equilibrium phase of domain expertise, data science and software engineering.
And then, the eternal question still lingers: would there be a way that using the same programming language that I use to code algorithms and scientific functions, could be used to design the graphical user interface?
And then read something about RStudio Shiny, which contributed somewhat a bit for me switching from Python to R.
R Shiny was that prototyping and scaling up tool I was looking for as a practical day-to-day problem solving engineer. And ShinyProxy the easiest, flexible and affordable way of deploying R applications using Docker containers in the best reproducible way.
In this case, we are trying to demonstrate that a Shiny application packaged as a container can be started, controlled and stopped from ShinyProxy as is being run directly from the host. Although, ShinyProxy can be run also from a container, I will start explaining running it from the physical machine or host. Both work similarly. Maybe a couple of differences: the settings of ShinyProxy in the file application.yml, and the peace of mind of not having to install anything else than Docker in your machine.
I assume that:
- You have some knowledge of Docker and have Docker installed in your machine either in Windows, Mac OS or Linux.
- Although it helps to know R, to run this example you really don’t need to. The code is encapsulated in a container, and the application itself is very simple. In fact, this example may convince you to start coding also in R.
- You know how install and run Java applications. ShinyProxy is
jarfile and runs with Java. But if it is containerized is one thing less to worry about. - You know how to clone a repository from GitHub.
- You are familiar with VS Code. Know how open project folders, how to start a terminal in a folder or sub-folder, and run basic commands from the terminal.
- If you are a Windows user you already have a Unix terminal available via
msys2, orcygwin, or the terminal that comes with Git for Windows, the program for version control. - Although Windows and Mac OS have their own virtualization kits, if you have trouble enabling them or installing them, I would recommend installing VirtualBox as the virtualization tool. From the Docker point of view, it will be referred to as the
docker-machine. I fell in love with Docker when I was a Windows 7 user.
To accompany this article, I have created a repository in GitHub with the necessary code, aids and files to run this in a reproducible way. You can find the links to the repositories at the end of this article.
I will be showing three examples: the first, with a simple Shiny app encapsulated in a container controlled by ShinyProxy installed in your machine. The second, two Shiny apps inside a R package plus ShinyProxy installed and working inside a container. And third, an example demonstrating how to add an additional standalone Shiny in a third container.
We start with the repository shinyproxy-host-euler. which means “ShinyProxy will be installed and run from your physical machine to run the Shiny app Euler.
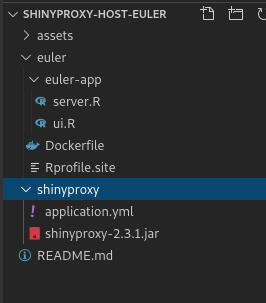
In this repo folder there are two sub-folders:
euler:contains a Dockerfile and everything required to build an image and run a container with a Shiny app;shinyproxy: that contains the Java executableshinyproxy-2.3.1.jaralong with a configuration fileapplication.yml.
These two folders serve two different purposes: build the container with the Shiny app euler as a fully running GUI application;shinyproxy will be a sort of container manager of the euler Shiny application in its own container. ShinyProxy, besides starting this Euler Shiny app and administering it, leaves the door open to control more Shiny applications running in containers as well.
The first step is creating a Docker image that will provide the source for a running container hosting the Shiny app euler. To do this, we switch to the folder euler and build the image with:
docker build -t euler-img .
We wait few minutes for the image to build. If you take a look at the file Dockerfile under the folder euler you will see several commands. What these commands do is creating a small operating system with all libraries, files, and dependencies required to run a Shiny app on its own. This is not related to your operating system; it is a totally independent application with its own operating system.
The other three files are the Shiny application server.R, ui.R, and a tiny settings file for handling the web port for Shiny to run in a browser Rprofile.site. These three files will be copied to the Docker image that contains that small operating system we mentioned before. if you are curious and want to know the size of that small OS with the Shiny app you will be glad to know it is approximately 900 MB.
Output of the creation of the Shiny app image
If you want to know the size of the image we just built, type this in your terminal:
docker images | grep euler-img
Size of the Shiny app euler-img
After the Docker image is built we can spin a container out of it and take a look at the GUI of the euler Shiny app. If we want to run a container from the euler-img image run the following command in your terminal:
docker run -it                  `# interactive mode` \
    --rm                        `# remove container after use` \
    -p 3838:3838                `# assign web port for the app` \
    --name euler-k              `# name of the container` \
    euler-img                   `# name of the image`
You get an output like this:
A running container euler-k
Which is telling you Shiny is awaiting for a command in your browser at your local host at port 3838. Run this from your browser:
http://127.0.0.1:3838/
Which will produce this output:
Shiny app Euler running from container euler-k
This means that the Shiny app is running as intended via the Shiny port 3838.
But this is not what we are looking for.
Our aim is at controlling the Shiny application from shinyproxy. Why? Because it will give us more power and granular control over this and several other Shiny applications from a common interface, or as most call it these days, a dashboard.
For the moment, close the Shiny app running on port 3838 with Ctrl-C in the terminal.
Stop euler-k container with Ctrl-C
So far we’ve got a Shiny app that is running from a container. Nothing surprising here.
As engineers and data scientists we may tempted to raise these questions:
- (i) what if we have more Shiny applications we want to run?
- (ii) what if we have few users in our group we want to share our Shiny apps with for testing and experimentation of the application prototype?
- (iii) what if we want data generated by the applications stored by the user that is using it?
- (iv) what if we want a control panel or dashboard where we have a menu of the Shiny apps for the project?
- (v) what if we want to run the Shiny apps independently -on demand, when needed- and avoid running a gigantic application?
- (vi) what if we want to allocate one or several Shiny applications in one or different Docker containers because they have their own specific scientific libraries requirements?
ShinyProxy gives us those features.
To run shinyproxy we need to run the Java application
shinyproxy-x.y.z.jar from the terminal. if you have cloned this repository, you will find ShinyProxy under the folder shinyproxy, along with a configuration file application.yml. The configuration file is very important because it tells ShinyProxy where the Shiny apps containers are residing, users and passwords, the port for the browser, the network, and the name of the application you want showing on the dashboard. Besides other advanced settings waiting for the moment you decide to scale up your R Shiny applications.
Note. You may need to indicate a common port for Docker and ShinyProxy to communicate. See the references at the end of this document.
We assume you already have a running Java in your machine. Two ways of knowing you have a running Java:
java -version
And for the Java Development Kit (JDK):
javac -version
With Java installed in your host or physical machine then it would be now time to check the shinyproxy configuration file. It looks like this:
proxy:
    port: 8080
    authentication: simple
    admin-groups: admins
    users:
    - name: jack
      password: password
      groups: admins
    - name: jeff
      password: password
    docker:
      internal-networking: false
    specs:
    - id: euler
      display-name: Euler's number
      container-cmd: ["R", "-e", "shiny::runApp('/root/euler')"]
      container-image: euler-img

logging:
  file:
    shinyproxy.log
There are three key parts for this example to work. The port (8080), the network characteristics (internal-networking: false) and the image name (container-image: euler-img).
Note*. Be warned: the tutorials and instructions on* ShinyProxy in the web do not mention the setting
*internal-networking: false*. I struggled for few hours to make*shinyproxy*communicate with the Shiny container. So, this networking setting is key.
Now, let’s switch to the shinyproxyfolder. To run ShinyProxy, we will run the command:
java -jar shinyproxy-2.3.1.jar
Under the shinyproxy folder
This is a very verbose output:
Output when running ShinyProxy
Now it is time head up to our browser and enter this address:
127.0.0.1:8080
This is the login page:
Browsing ShinyProxy
Enter a user name and a password of those available in the file application.yml, that we listed above. I will use jack and password. And then we see the dashboard:
ShinyProxy dashboard
In the dashboard we can only see one application, “Euler’s number” because that is all we have set up in application.yml configuration file.
Before I click on “Euler’s number” link, I want to show you how I know ShinyProxy is starting the container. I use a small monitoring tool called csysdig for Docker containers.
It is empty because I haven’t pressed on the application link yet.
Now, I just clicked the link of the app. What ShinyProxy is doing is launching the Euler app container. It will take few seconds the first time, then it will remain in the cache memory.
ShinyProxy spinning the Euler container
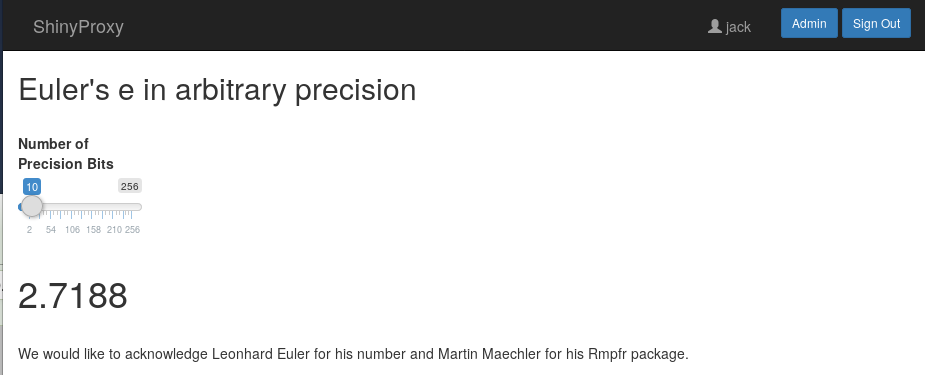
After few seconds, the Shiny app appears:
Euler app started
We move the slider a bit:
Slider moved to 100 precision bits
Let’s check csysdig. There is one active container derived from the image euler-img. The container ID is a random number under the column ID with an also random generated name under the column NAME.
The container will remain there while the Euler app is in use. Now, let’s see what happens when we stop ShinyProxy.
When I stop ShinyProxy with Ctrl-C, it will send stop signals to all the containers that are part of its network. This is a portion of the log when ShinyProxy is interrupted:
And now we observe in csysdig the container for the Euler app has disappeared from the list of active containers. Which is expected and also awesome.
To see the real impact of using the ShinyProxy approach we have to add more Shiny applications as containers. In a separate repository I am including all the files necessary to reproduce this new case. Find the links to the three repos at the end of this article.
The build files will be located in the folder shinyapps-build. Originally this was a ShinyProxy demo but the names were little bit confusing so I renamed the package from shinyproxy to shinyapps, the Shiny applications, loaded different Shiny demos, used different names for the image and the R package itself. I hope this example is clear enough to understand running multiple containers from ShinyProxy.
Again, I will be using VS-code as my editor and terminal provider. There are three important folders:
euler: the previous containerized Shiny applicationshinyapps-build: a R package with two Shiny apps that will be containerizedshinyproxy-container: ShinyProxy Java executable that will be containerized as well
The R package shinyapps contains two small Shiny apps: run_07_widgets() and run_04_mpg(), both come with the Shiny package as examples. This is the R code for both apps:
The code is available in the repository. Pasting the image here looks better than pasting the code as text.
Right-click on the folder shiny-apps-build and open a terminal. See the image below.
The Dockerfile looks like this:
FROM openanalytics/r-baseMAINTAINER Tobias Verbeke "tobias.verbeke@openanalytics.eu"RUN apt-get update && apt-get install -y \
    sudo \
    pandoc \
    pandoc-citeproc \
    libcurl4-gnutls-dev \
    libcairo2-dev \
    libxt-dev \
    libssl-dev \
    libssh2-1-dev \
    libssl1.0.0# packages needed for basic shiny functionality
RUN R -e "install.packages(c('shiny', 'rmarkdown'), repos='https://cloud.r-project.org')"# install shinyapps package with demo shiny application
COPY shinyapps_0.0.2.tar.gz /root/
RUN R CMD INSTALL /root/shinyapps_0.0.2.tar.gz
RUN rm /root/shinyapps_0.0.2.tar.gz# set host and port
COPY Rprofile.site /usr/lib/R/etc/EXPOSE 3838CMD ["R", "-e", "shinyapps::run_07_widgets()"]
Build the image with:
docker build -t shinyapps-img .
We can quick test the container with:
docker run -it --rm -p 3838:3838 --name shinyapps-k shinyapps-img
And watch one of the apps in the browser:
Interrupt the container with Ctrl-C in the terminal. Although, we see one application here, this package contains two Shiny apps. We just can’t see them here until we launch ShinyProxy.
Next, we add these two Shiny apps to the ShinyProxy applications file application.yml.
Now, let’s right-click on the folder shinyproxy-container in vscode and open a terminal. See the image below:
Open the file application.yml and see how we added the two Shiny apps:
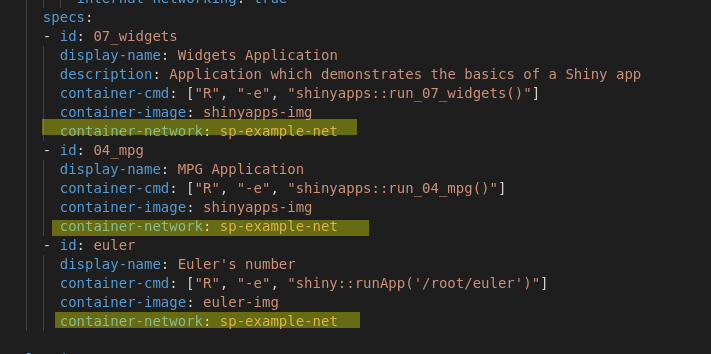
Also observe that there are two significant changes compared with the first example: we have internal-networking: true, and we added a network for the containers container-network: sp-example-net. This how Docker commands get passed between ShinyProxy and the containers.
Another thing that will be different is that we will be containerizing ShinyProxy; it will not run from the host or physical machine but from a container based on the following image Dockerfile:which is very simple: its function is provide a Java environment to be able to run the ShinyProxy jar file from within.
Let’s build the image with:
docker build -t shinyproxy2-img .
Note. I am using the number 2 in shinyproxy2-img to mean that it will be handling 2 Shiny apps.
Now, it’s time to see all these containers working together. We run the ShinyProxy container with:
docker run --rm \
    -v /var/run/docker.sock:/var/run/docker.sock \
    --net sp-example-net \
    -p 8080:8080 \
     shinyproxy2-img
ShinyProxy is up and running now in its own container:
We go see check csysdig and we found one container running:
Let’s open a browser with:
127.0.0.1:8080
We now see two applications in the dashboard:
We launch one of the apps MPG Application:
From csysdig we now can see two active containers; one based on the image shinyapps-img, and the second from shinyproxy2-img.
Let’s stop everything by interrupting ShinyProxy with Ctrl-C. Back to csysdig, all the containers have been stopped.
Our last example will add the Euler Shiny app to the set of applications administered by ShinyProxy. I will be copying this repo and creating a new one where I change the configuration for the 3 applications instead of 2.
The changes I have to make are two: (1) add the new app to application.yml located in the folder shinyproxy-container; (2) and then build a new image that takes these changes. I will not reuse the same image names; I will be creating new ones so the example is very clear.
From the top (the first example), I copy+paste the section for the Euler app and inserted at the end of application.yml:
- id: euler
      display-name: Euler's number
      container-cmd: ["R", "-e", "shiny::runApp('/root/euler')"]
      container-image: euler-img
And save the modified application.yml:
proxy:
  port: 8080
  authentication: simple
  admin-groups: admins
  users:
  - name: jack
    password: password
    groups: admins
  - name: jeff
    password: password
  docker:
      internal-networking: true
  specs:
  - id: 07_widgets
    display-name: Widgets Application
    description: Application which demonstrates the basics of a Shiny app
    container-cmd: ["R", "-e", "shinyapps::run_07_widgets()"]
    container-image: shinyapps-img
    container-network: sp-example-net
  - id: 04_mpg
    display-name: MPG Application
    container-cmd: ["R", "-e", "shinyapps::run_04_mpg()"]
    container-image: shinyapps-img
    container-network: sp-example-net
  - id: euler
    display-name: Euler's number
    container-cmd: ["R", "-e", "shiny::runApp('/root/euler')"]
    container-image: euler-img
    container-network: sp-example-netlogging:
  file:
    shinyproxy.log
You see only a minor change: we added the container network sp-example-net for the Euler app. All the containers must belong to the same network.
Let’s build the new image for the three applications from the folder shinyproxy-container with:
docker build -t shinyproxy3-img .
And launch the new container:
docker run --rm \
    -v /var/run/docker.sock:/var/run/docker.sock \
    --net sp-example-net \
    -p 8080:8080 \
    shinyproxy3-img
Note that we are now adding two new parameters:
-v /var/run/docker.sock:/var/run/docker.sockto create a volume, and--net sp-example-netto connect to a shared network..
Open the browser at 127.0.0.1:8080
There are three applications now. It will take few seconds to start the container and launch the Shiny app from the third container:
Finally, our third application powered by the third container:
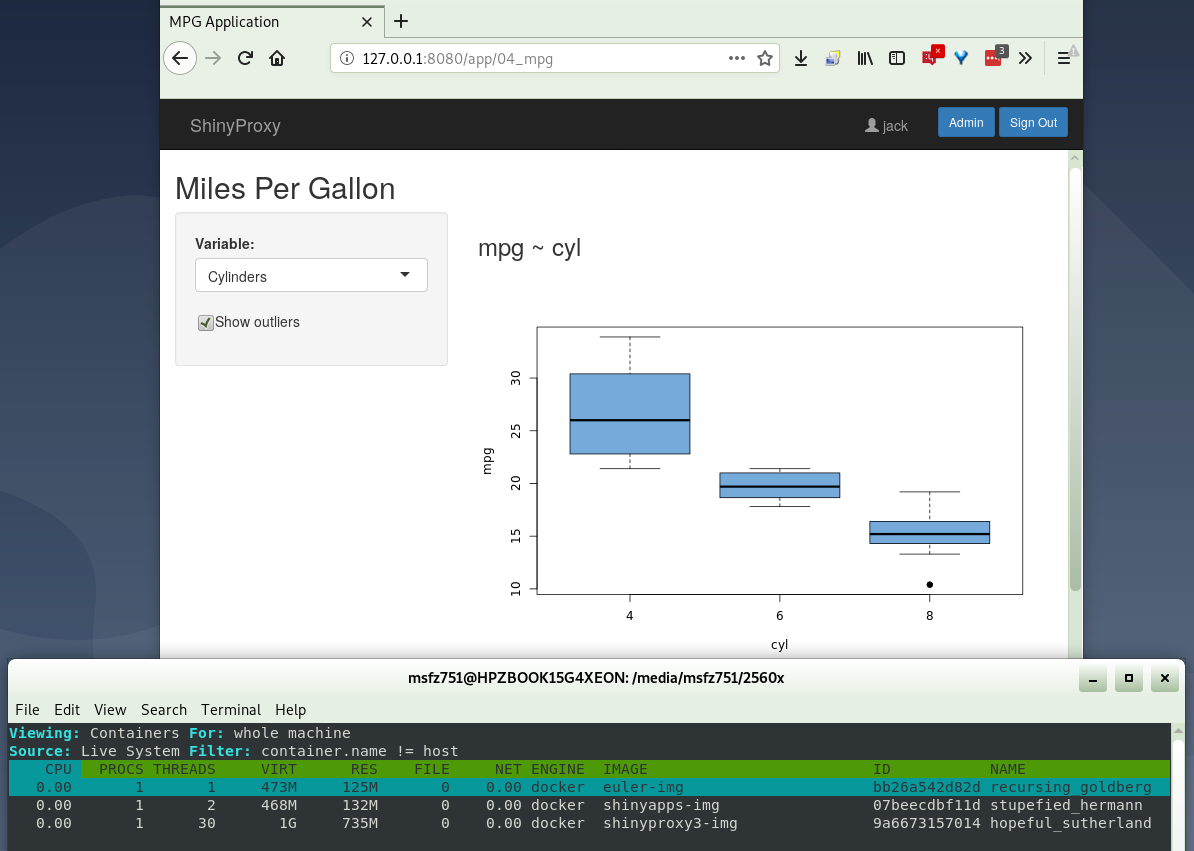
And we launch the “MPG App”. In csysdig we see now the three containers that were spun off from the images euler-img, shinyapps-img, and shinyproxy3-img.
If you have reached the end of the story, you may be thinking about all the possibilities. That you could combine Shiny apps inside packages, standalone Shiny apps, with the potential of splitting the applications in several containers depending of their requirements and complexity.
We haven’t explored other advanced features of ShinyProxy that involve sharing data among users, or make compartmentalized data stores. Or make applications available to certain user or groups. There is plenty more to learn.
One important aspect of data science, we didn’t talk much about in this article, is reproducibility. Docker containers contribute to that area enormously because they go to the point of replicating the exact condition of the operating system, packages, libraries, settings, software versions, of the machine where you originally run the experiments or developed an analysis. This makes the effort of learning containers worth it.
To let ShinyProxy communicate with Docker we need to establish the port 2375. The details for setting this up are provided here: https://www.shinyproxy.io/getting-started/. This is only required if we run ShinyProxy directly from the host or physical machine. If you are using ShinyProxy from within a container, you don’t need to worry about this because the network between containers and the ShinyProxy container is created brand new and shared for this exclusive purpose.
If you are running the ShinyProxy jar file from a container you have to make sure that internal-networking: true, and that each of the containers declared in application.yml contains a line sharing an exclusive network. Like this:
You can see this small difference from the configuration file we used for the Euler application: we are indicating a shared network with container-network: sp-example-net. This network sp-example-net is created in advance with Docker with only one line:
docker network create sp-example-net
- Repository for the first example: https://github.com/og-analytics/shinyproxy-host-euler
- Repository for the second example: https://github.com/og-analytics/shinyproxy-multicontainer-shiny
- Repository for the third example: https://github.com/og-analytics/shinyproxy-multicontainers-shiny-3


