Deploying the project
- 4 CPUs
- 10 GB of RAM
- 50 GB of Disk
- CentOS 7 (not 8!)
- Docker and docker-compose must be installed
- public IP address
First clone the deployment repository with the following command:
git clone https://github.com/micado-eu/micado_deploymentcd micado_deployment
After that create some required directories and files using the following commands (you might need sudo for some of these commands):
mkdir -p db_data weblate_data redis_data identity-server_data/deployment identity-server_data/tenants shared_imageschmod 777 shared_imagestouch traefik/traefik-acme/acme.jsonchmod 600 traefik/traefik-acme/acme.json
Edit the .env file with the configuration you need (mainly the hostnames). Given a target domain <MY_DOMAIN> the hostnames that should be created are:
- migrants.<MY_DOMAIN>
- pa.<MY_DOMAIN>
- ngo.<MY_DOMAIN>
- gateway.<MY_DOMAIN>
- dashboard.<MY_DOMAIN>
- upload.<MY_DOMAIN>
- api.<MY_DOMAIN>
- identity.<MY_DOMAIN>
- monitoring.<MY_DOMAIN>
- translate.<MY_DOMAIN>
- git.<MY_DOMAIN>
- portainer.<MY_DOMAIN>
- admin.<MY_DOMAIN>
- admin2.<MY_DOMAIN>
- smtp.<MY_DOMAIN>
Create a prod.env file with the following content (contains passwords so change them accordingly):
WSO2_API_ADMIN_PWD=secretpassword1
WSO2_IDENTITY_ADMIN_PWD=secretpassword2
WSO2_IDENTITY_PWD=secretpassword3
WSO2_SHARED_PWD=secretpassword4
WSO2_API_PWD=secretpassword5
MICADO_DB_PWD=secretpassword6

PGADMIN_DEFAULT_PASSWORD=secretpassword7

# -------- DATABASE PART --------
POSTGRES_PASSWORD=secretpassword8

# -------- WEBLATE PART ----------
# Weblate setup
WEBLATE_ADMIN_PASSWORD=secretpassword9

# PostgreSQL setup
WEBLATE_POSTGRES_PASSWORD=secretpassword10
WEBLATE_EMAIL_HOST_PASSWORD=secretpassword11
GITEA_DB_PWD=secretpassword12
MICADO_GIT_URL=http://xxxxx%40csi.it:pwd@git:3000/micadoadmin/backend.git

# ------- ENV vars for javascript apps
MICADO_API_KEY=api_key
ROCKETCHAT_ADMIN_PWD=xxx
ROCKETCHAT_USER=rasa_bot
ROCKETCHAT_PASSWORD=micadobot
RESPOND_TO_LIVECHAT=true
After that you can run the following commands to start deploying the backend.
(set -a; source prod.env; set +a; docker-compose -f docker-compose.yml up -d micado_db mongodb balancer)
(set -a; source prod.env; set +a; docker-compose -f docker-compose.yml up -d mongo-init-replica)
(set -a; source prod.env; set +a; docker-compose -f docker-compose.yml up -d git weblate cache)
Before continuing, you have to configure weblate to enable translations. You can learn how to configure Weblate here: Configure Weblate
Then run the following commands to start the backend services:
The identity server contains the information needed to enable users to login and a set of keys needed in the frontend so also this component has to be configured before starting the applications since some information will have to be placed in the prod.env file before starting the containers.
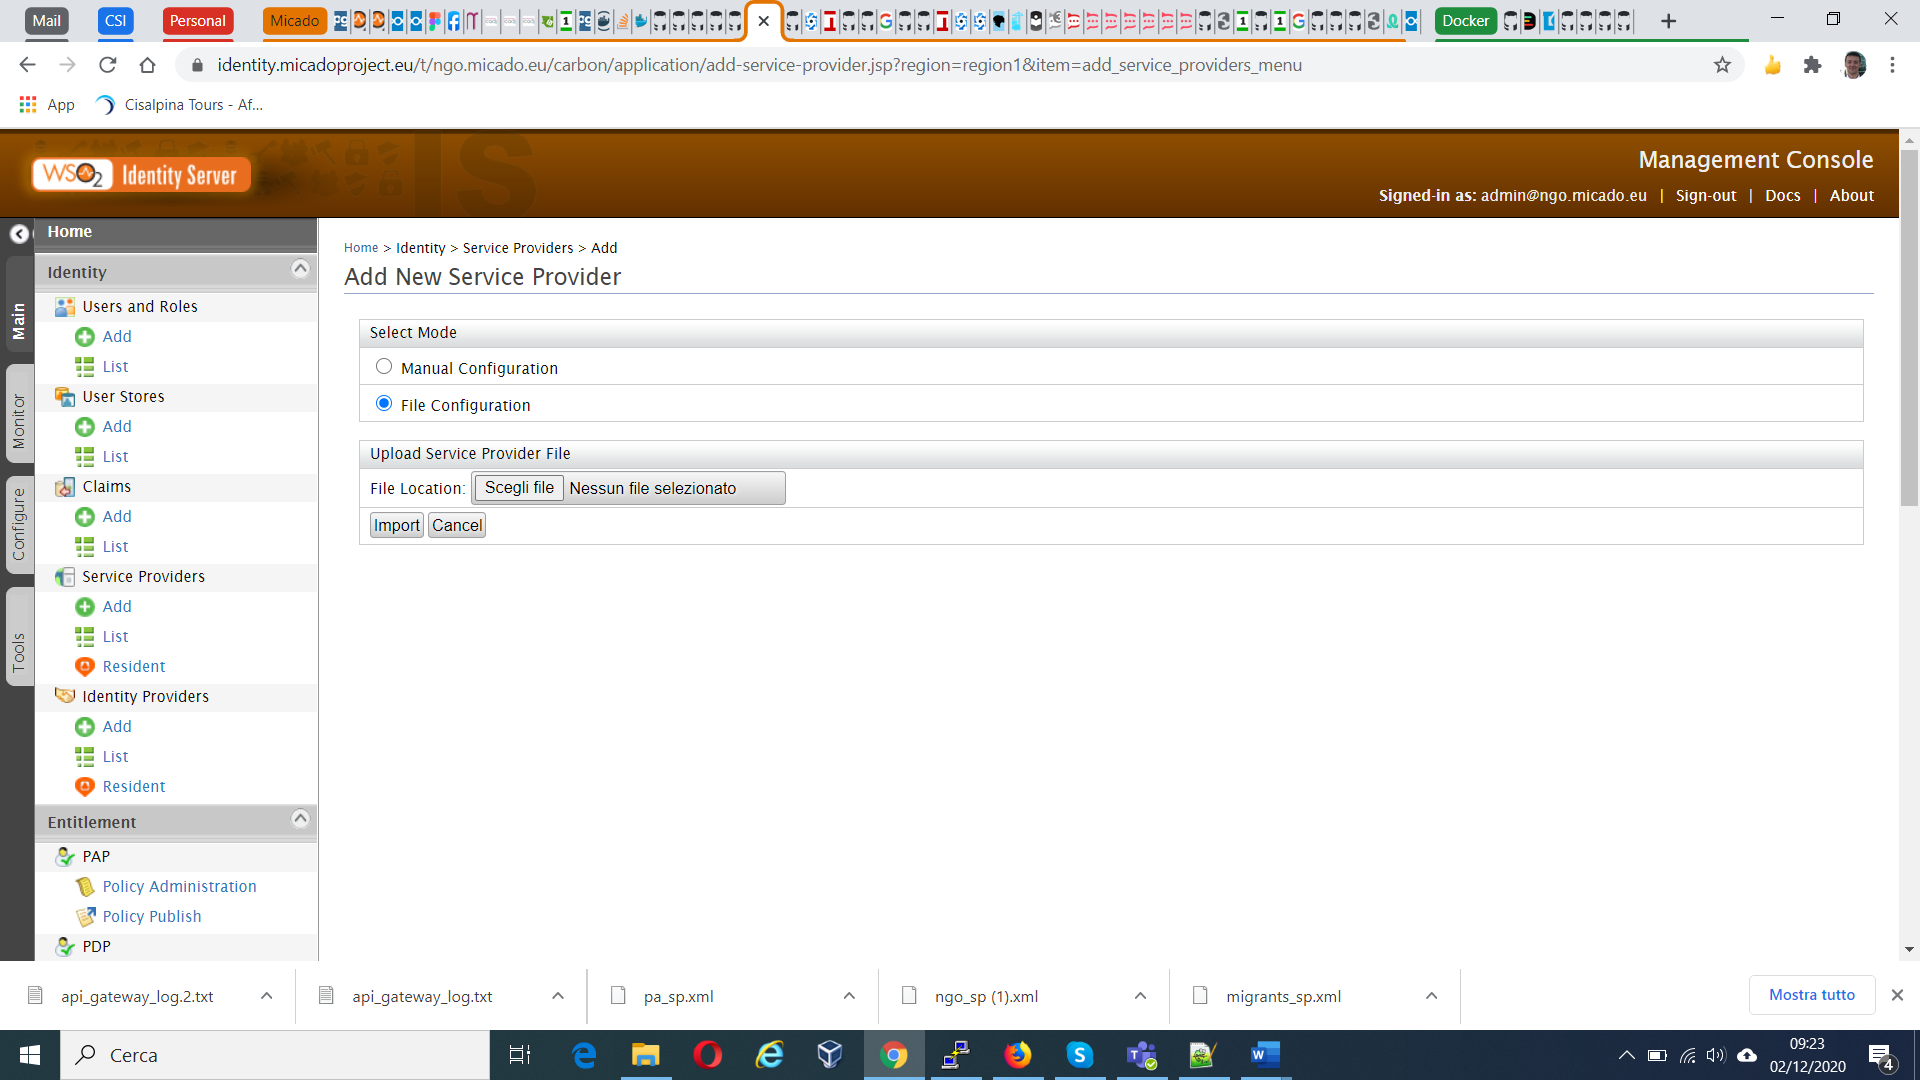
The migrant users need to be able to login so we need to add a Service Provider in the main tenant of the Identity Server. This is done importing the migrants_sp.xml file.
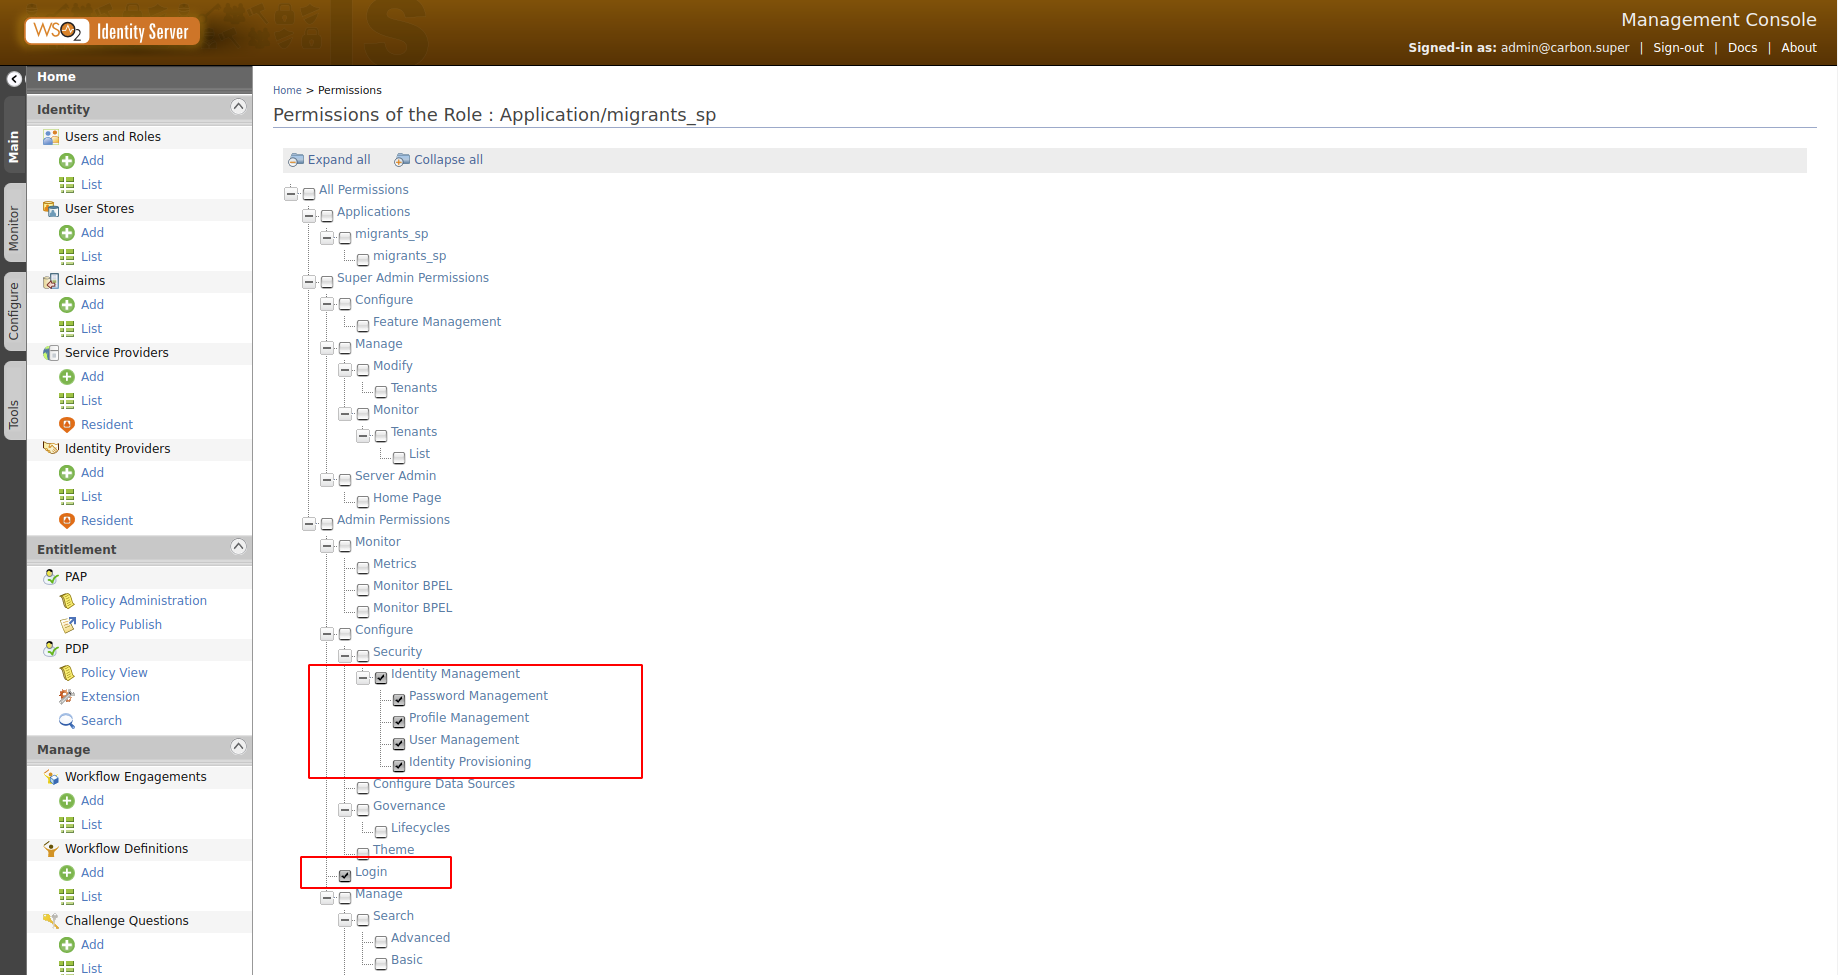
The migrants_sp.xml file has created a Application/migrants_sp role for us. Now we need to add permissions to the role.
First click on permissions for Application/migrants_sp in the list of roles.
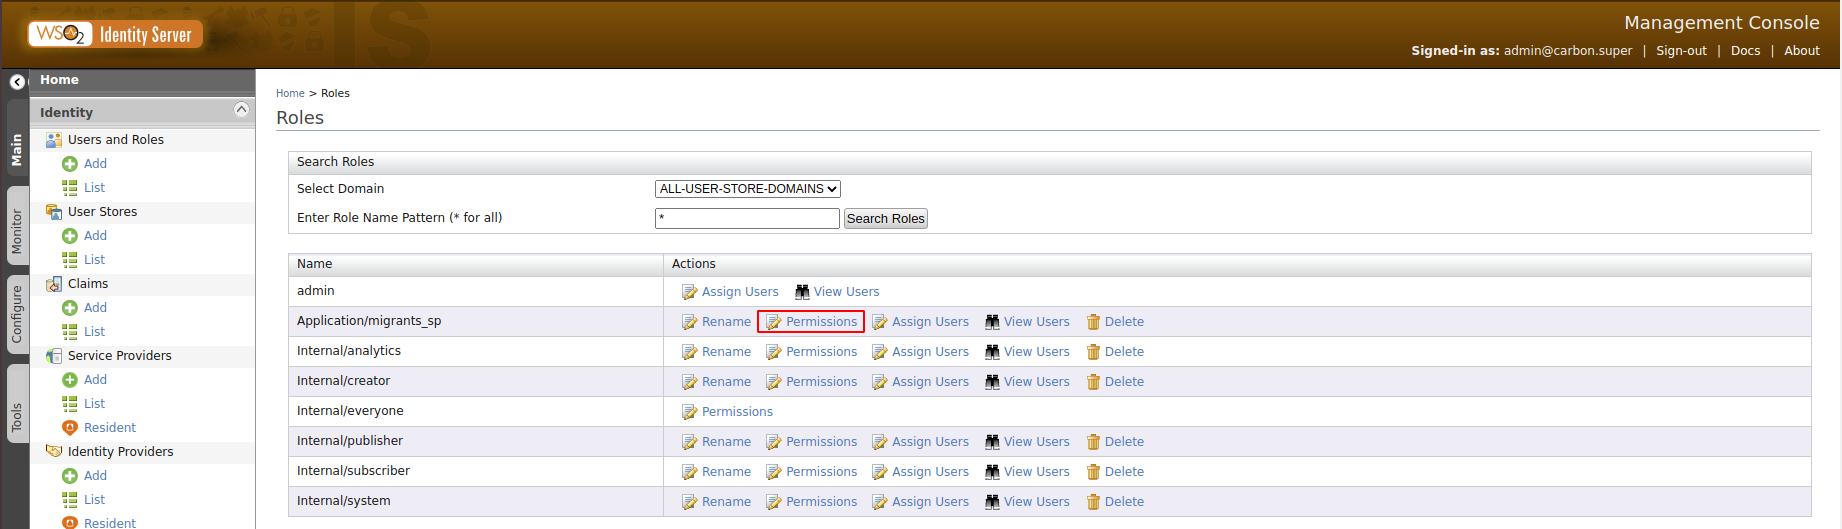 Then select the items shown below and click save.
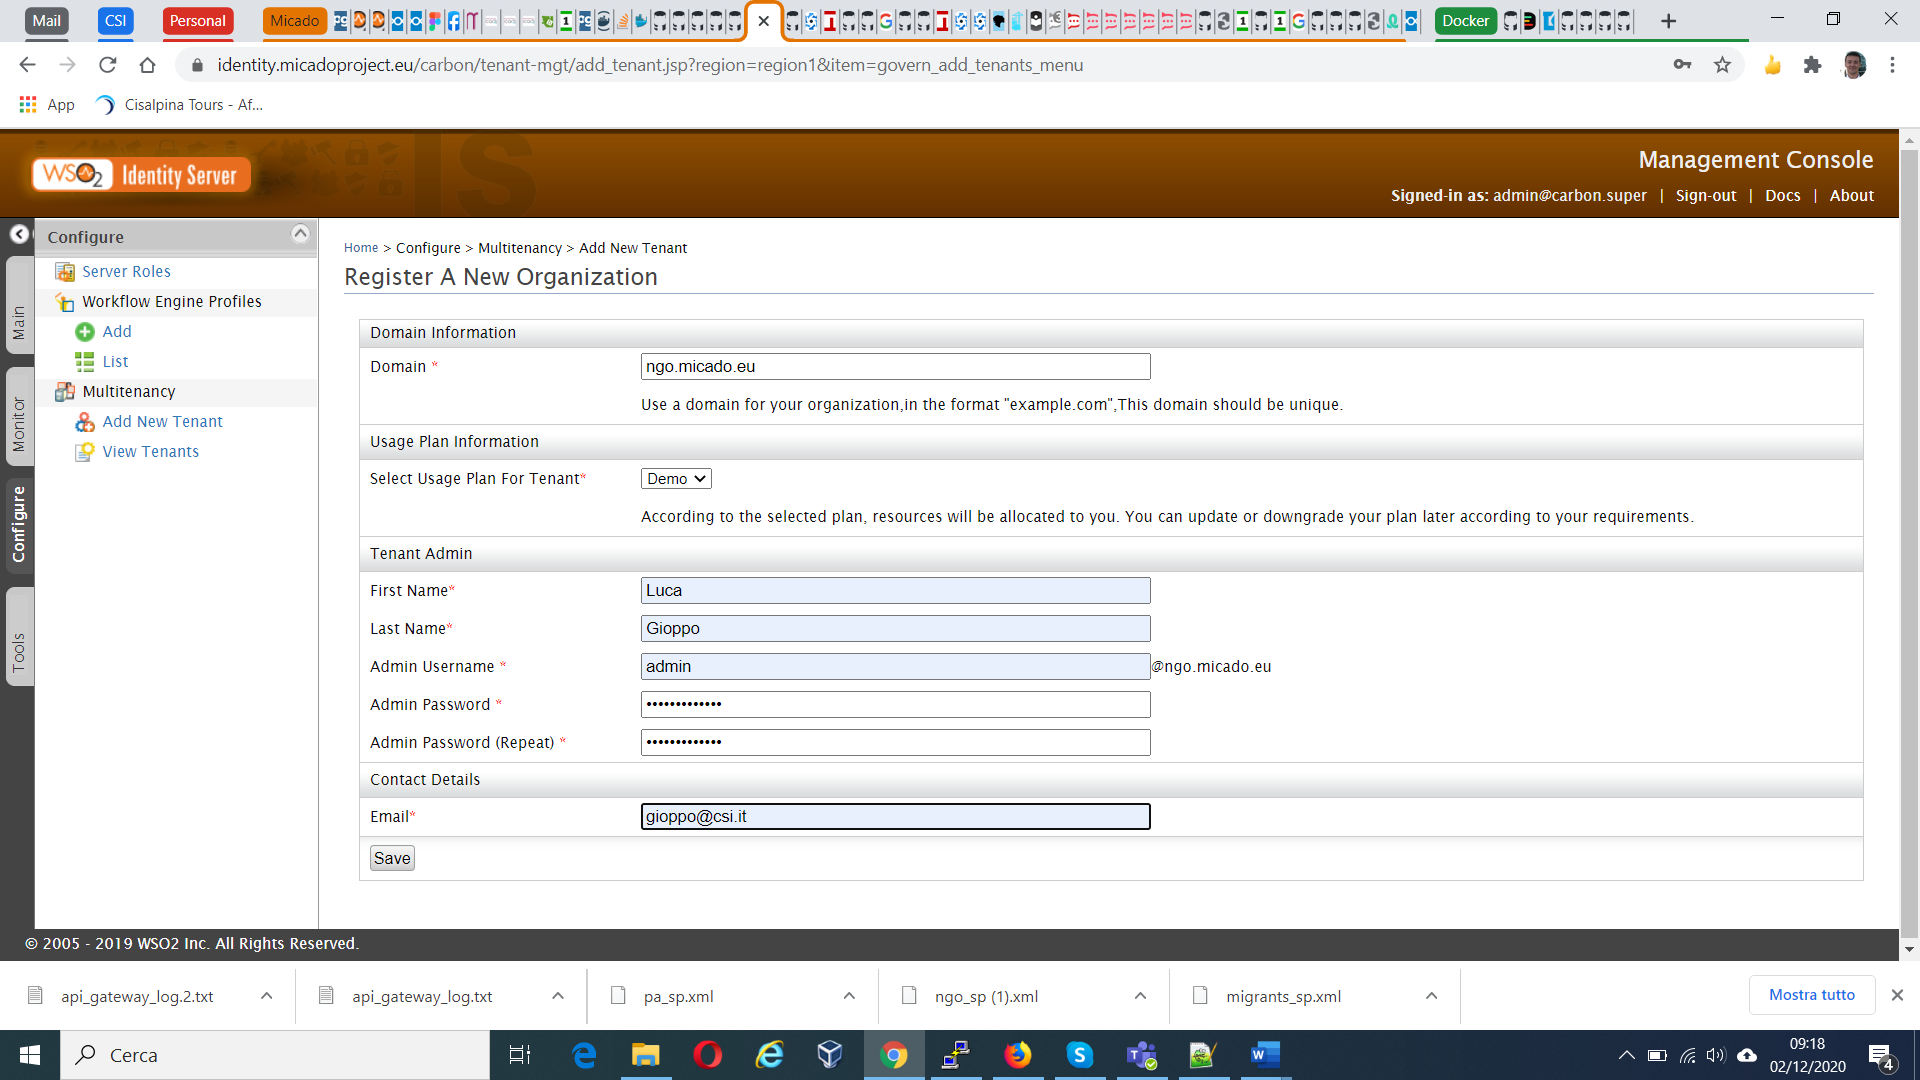
MICADO needs to have a tenant for the PA so the admin needs to create this in the Identity Server. This is done as shown in the picture below.
The PA needs to have its own tenant to separate users from the users of the migrant app so the admin needs to create a Service Provider as done for the migrants. This operation needs to be done by the admin of the PA tenant and NOT by the admin of the Identity Server. So after logging as PA tenant admin the pa_sp.xml file has to be imported.
The pa_sp.xml file has created a Application/pa_sp role for us. Now we need to add permissions to the role.
The actions to take here are exactly the same as those in step 7.2.
The PA application has its own roles:
- micado_superadmin
- micado_migrant_manager
- micado_admin
To add roles the PA tenant admin has to go to the Add Role page and add the three above like in the picture below
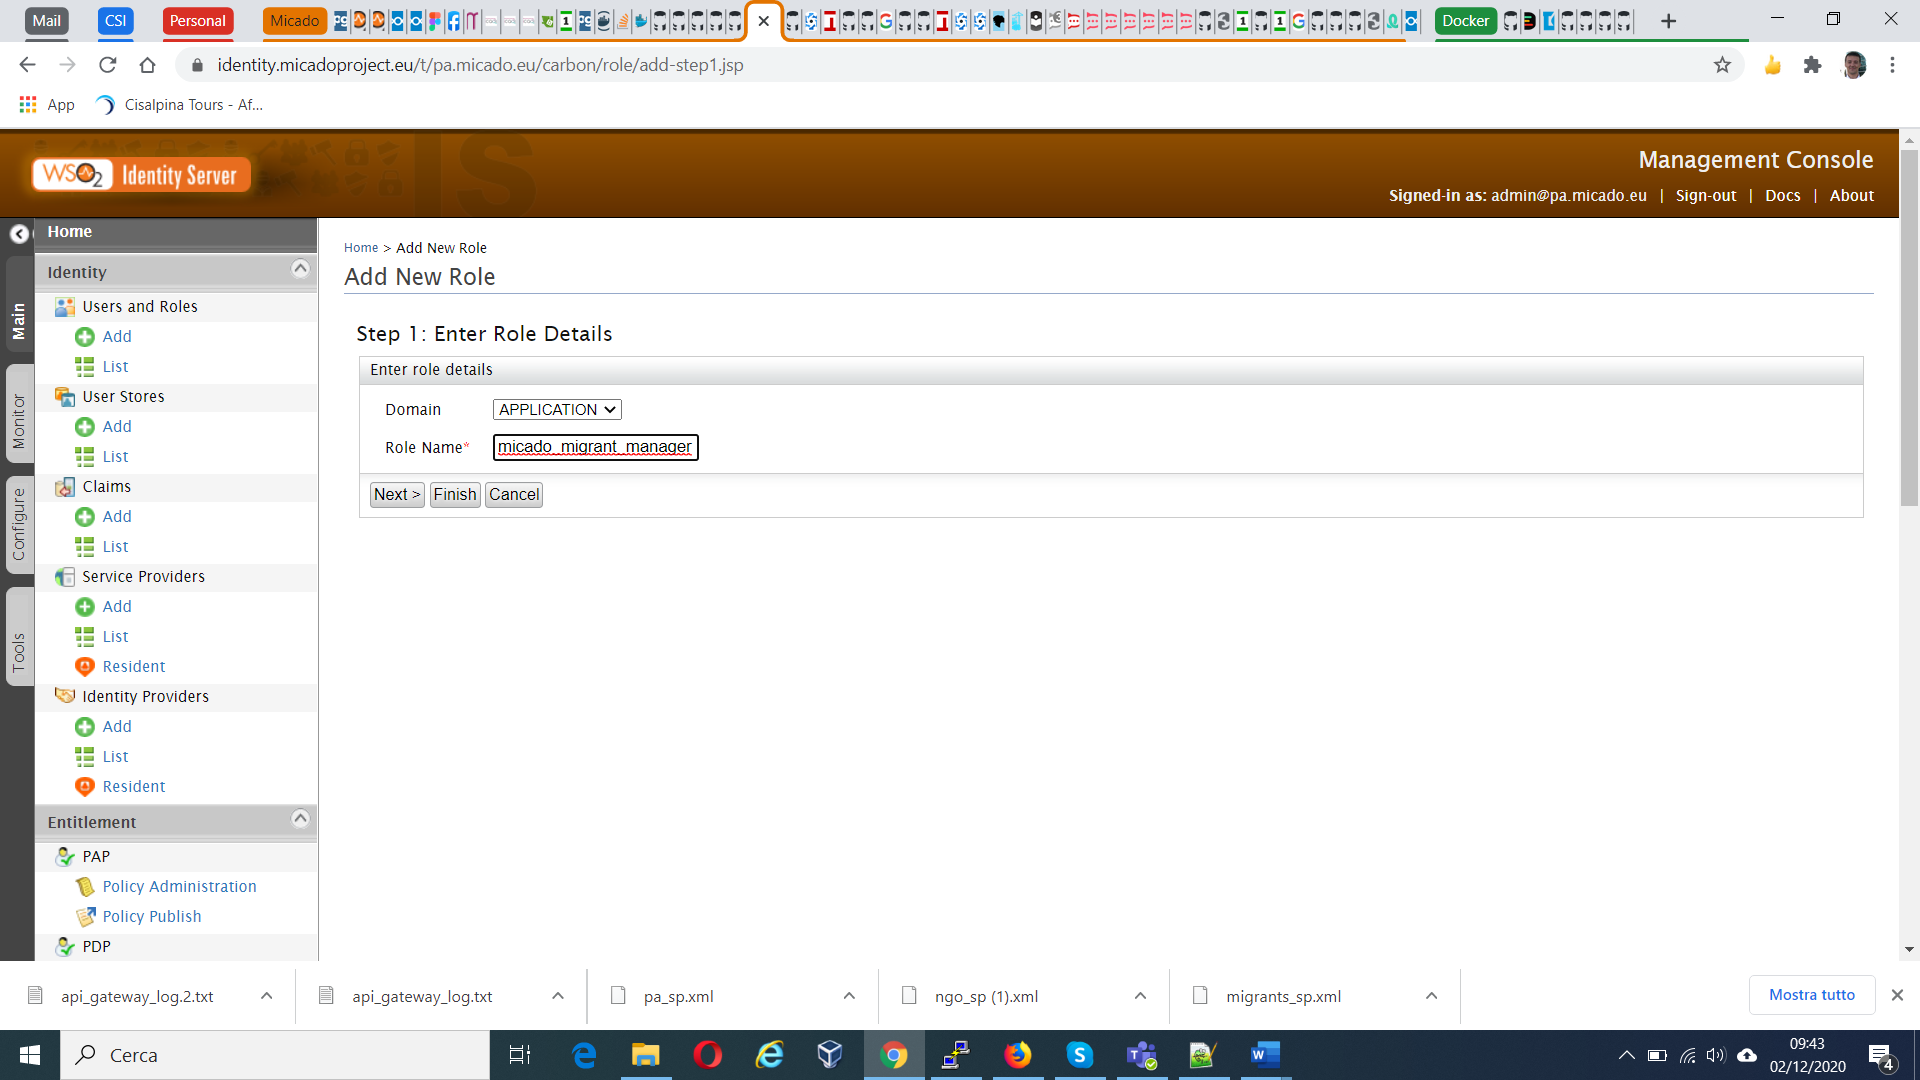
Mind that the role has to be added as APPLICATION and then press finish.
Repeat this operation for all roles, the result should be like the following image.

Then the admin of the tenant MUST be assigned all roles created above:

When everything is up, access the gateway (gateway.<MY_DOMAIN>) to configure the backend.
Login and after that press the create API button -> Existing REST API.
In the new page select OpenAPI URL and add the following text in the text field:
http://backend:3000/openapi.json
Go to the next page and fill the text fields with the following (in the name and business plan fields you can choose the name and business plan that you want):
- Context: /backend
- Version: 1.0.0
- Endpoint: http://backend:3000
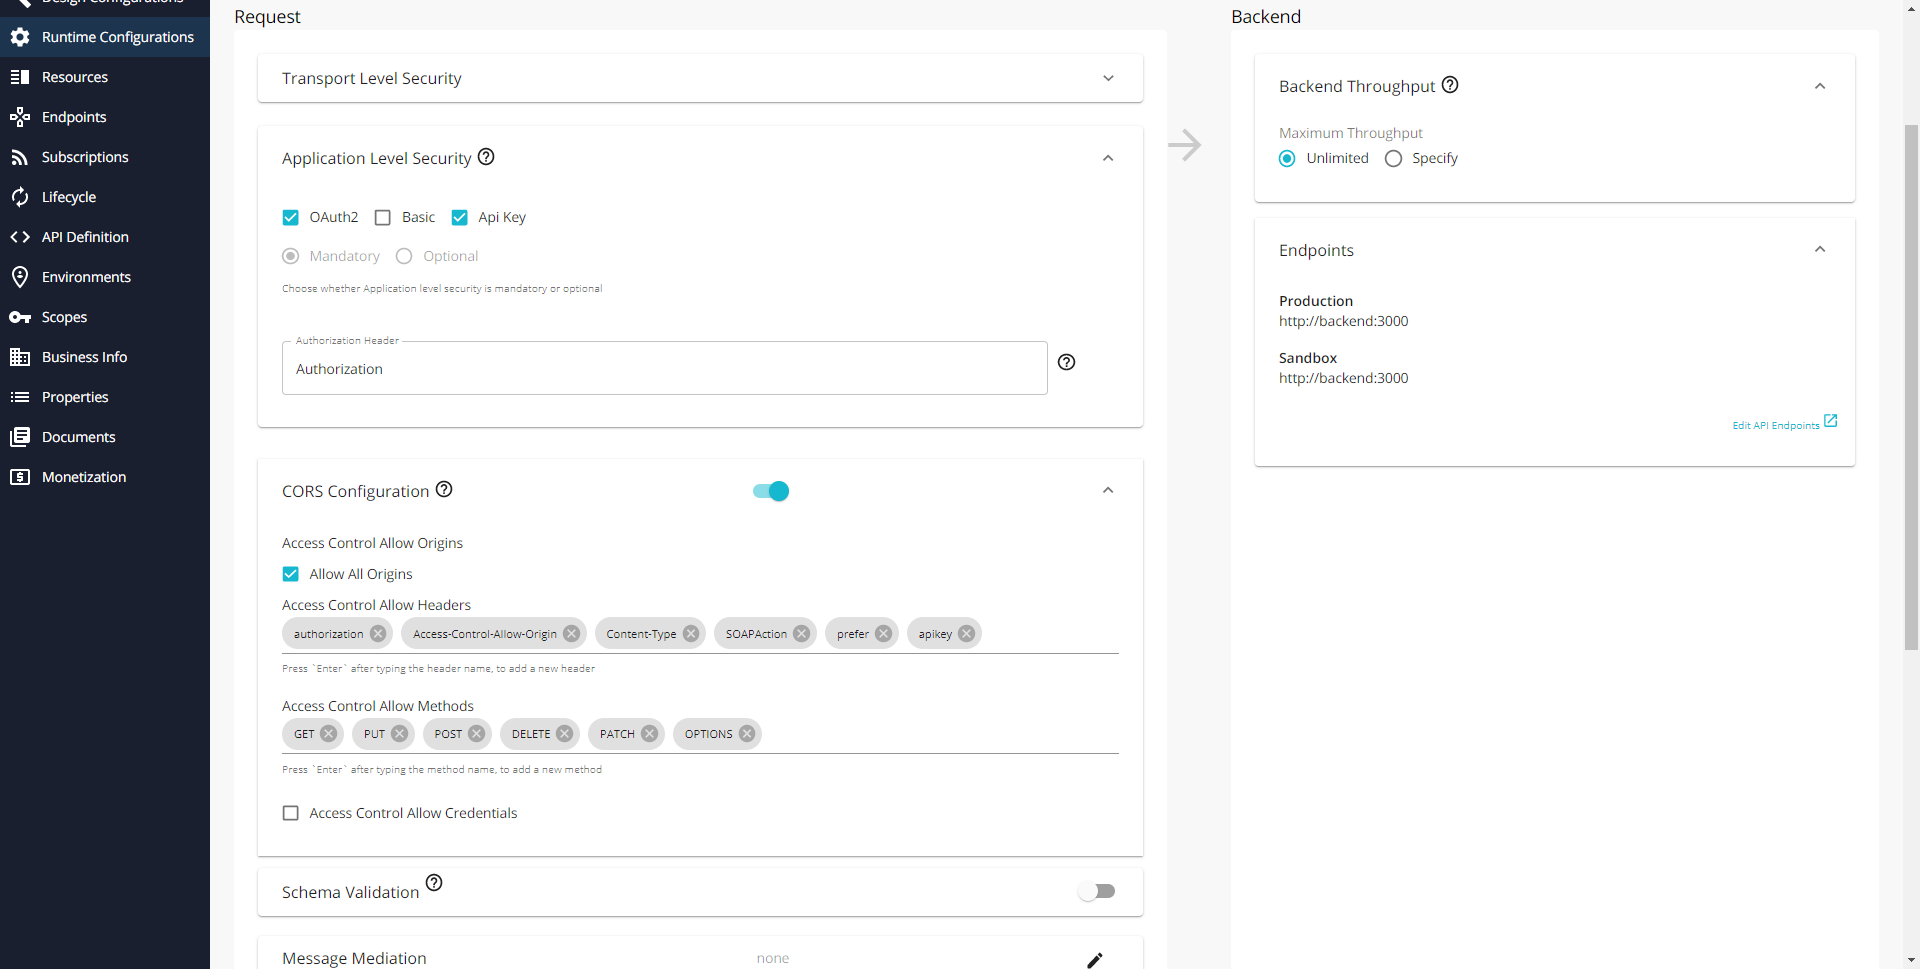
Then in Runtime Configuration you have to set the CORS and Application Level Security properties of the API as shown in the picture below.
After saving go to Lifecycle and click on Publish.
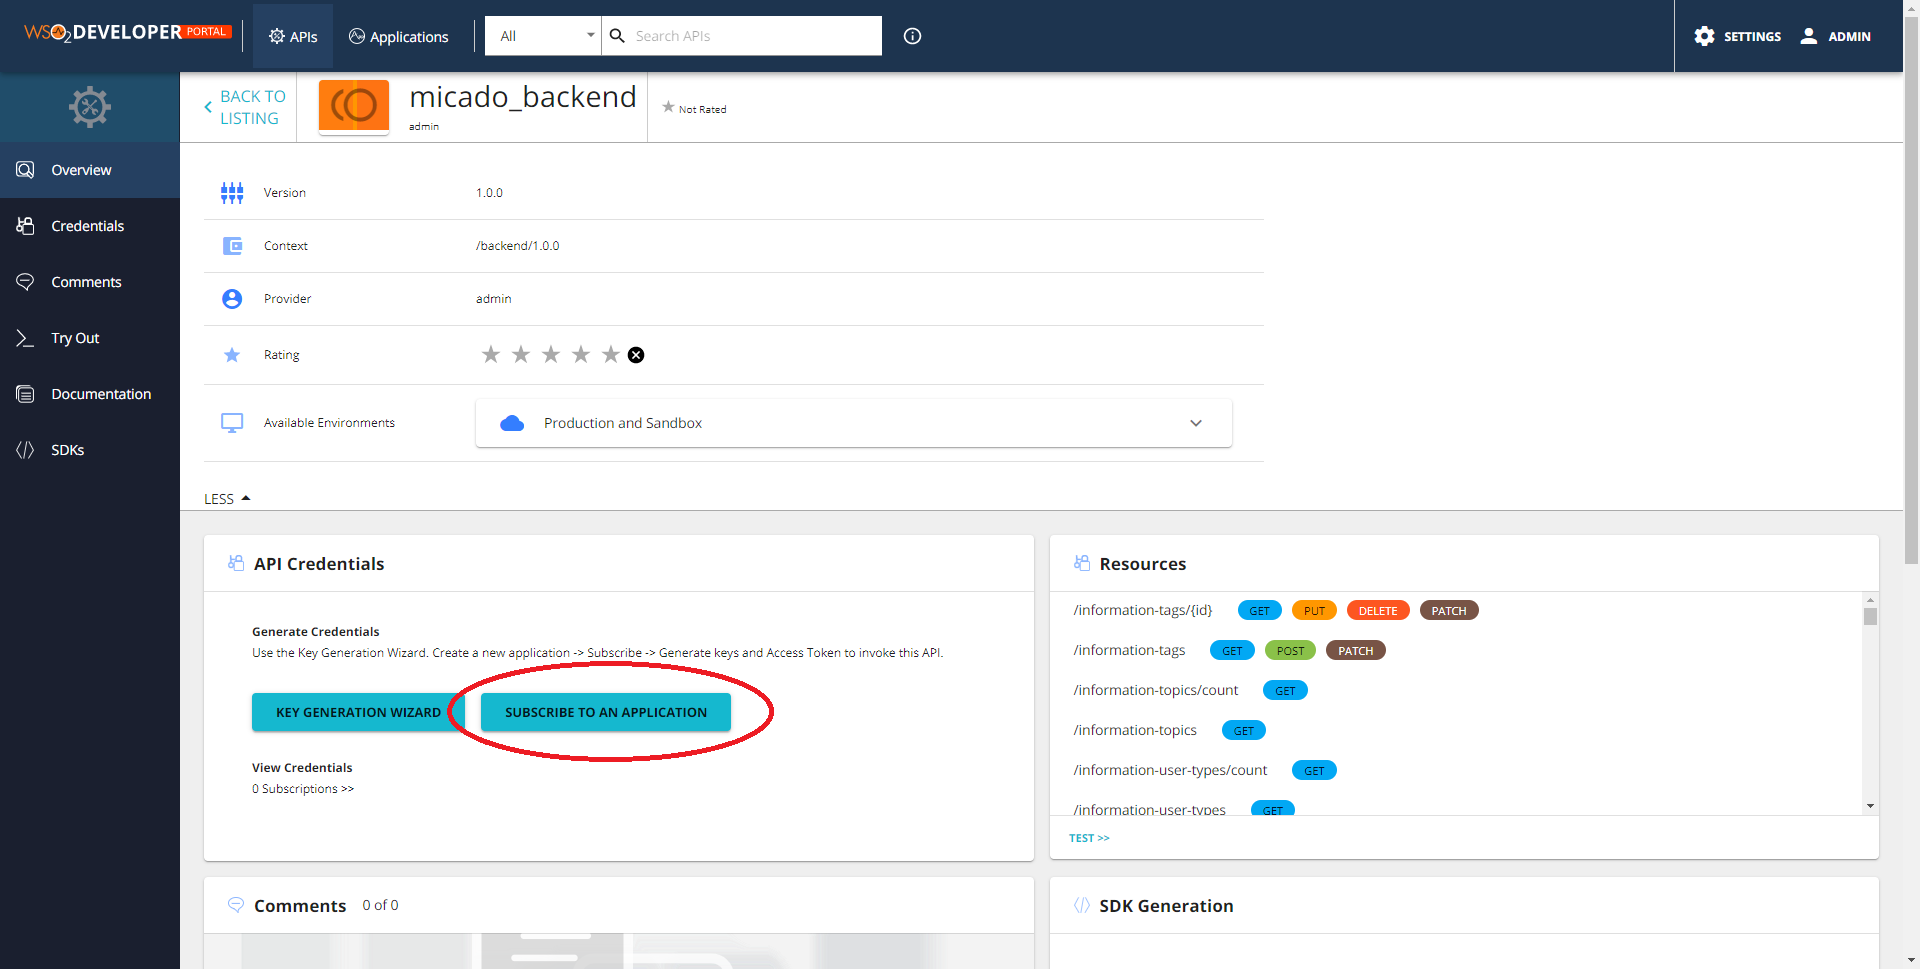
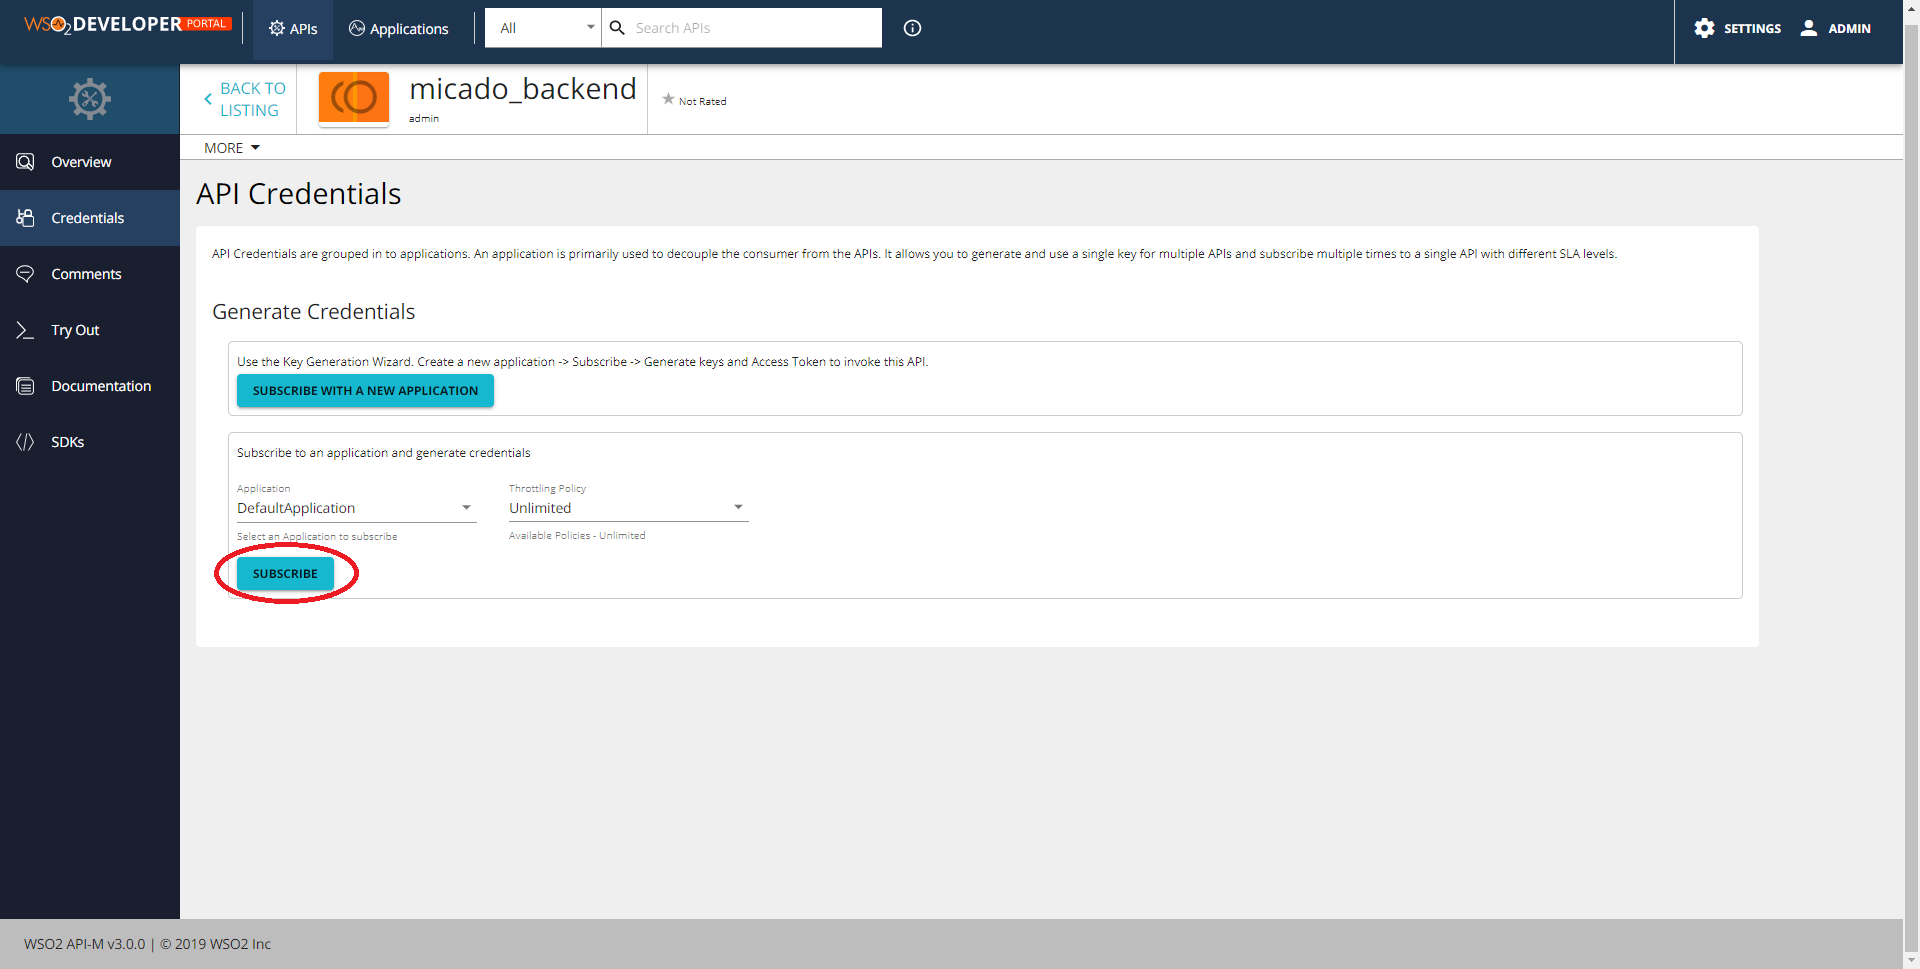
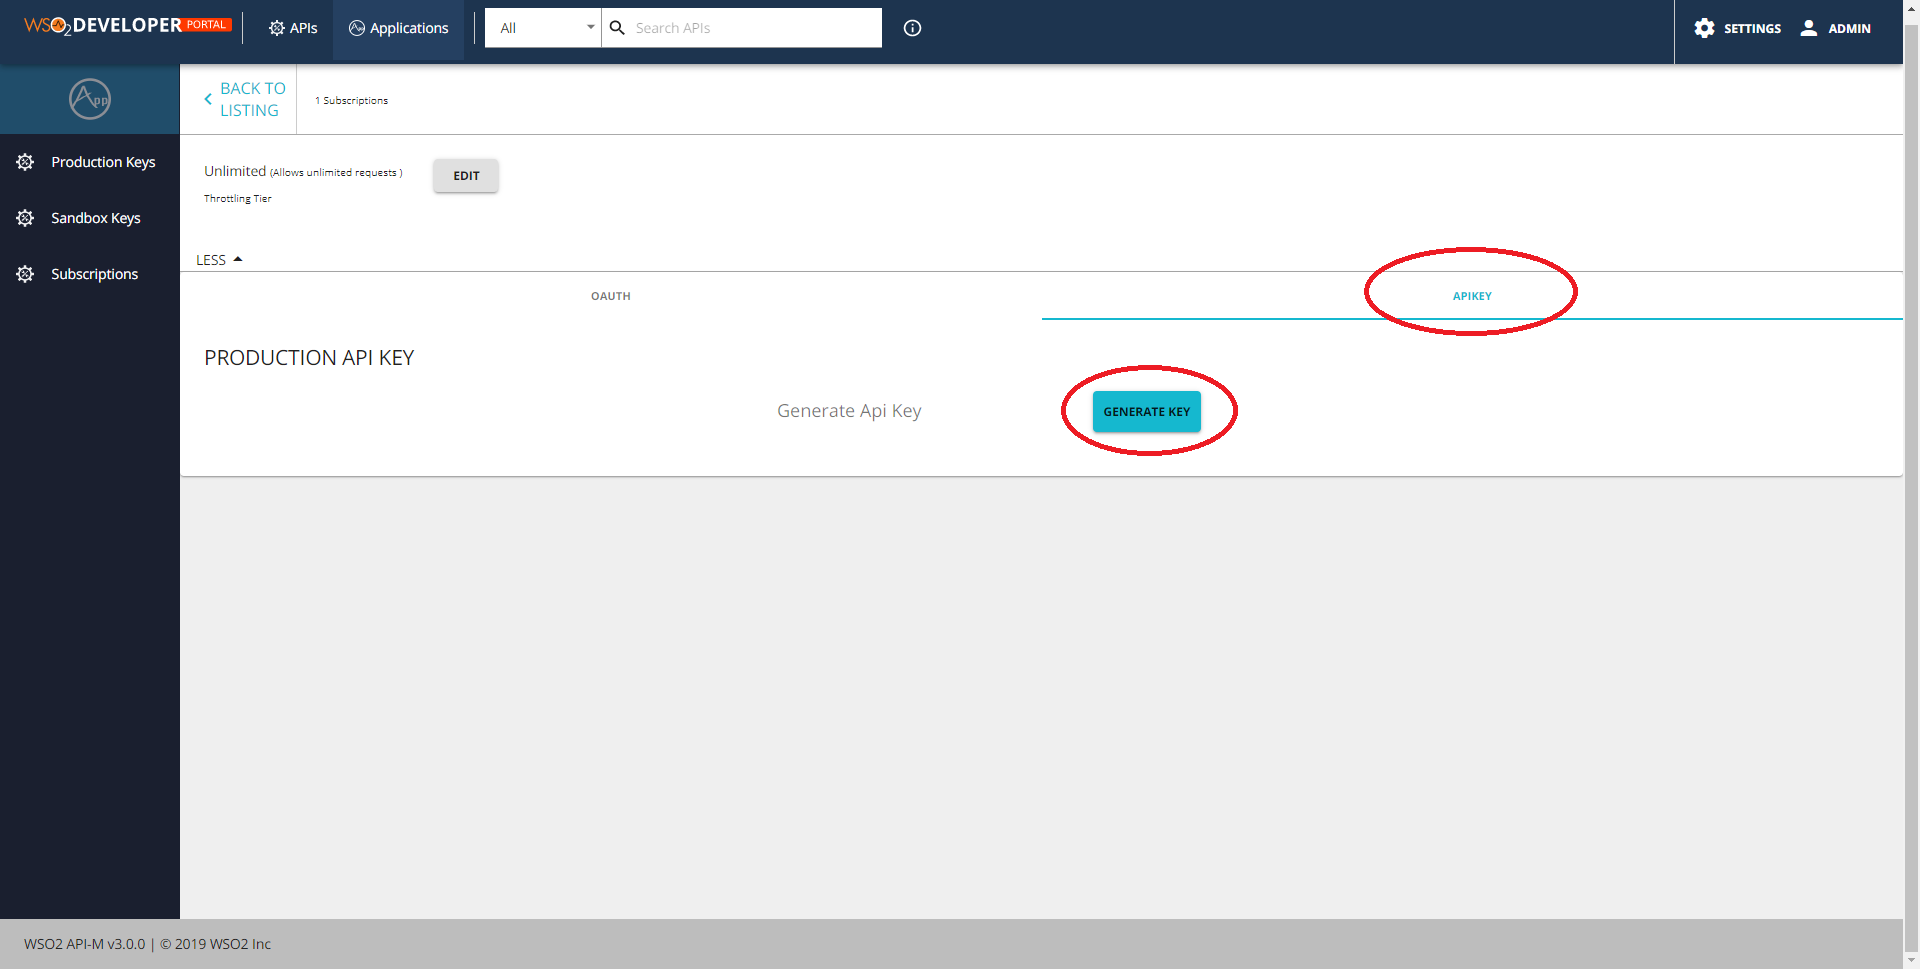
You can then get the API key by going to the dev portal (gateway.<MY_DOMAIN>/devportal/apis), choose the API and click on Subscribe to an application -> Subscribe -> Manage App -> Api Key -> Generate.
Sometimes the SUBSCRIBE TO AN APPLICATION button doesn't appear in the APIs page. Click on Applications at the top and make sure you have a DefaultApplication in the list, and click back to APIs page. The button should reappear.
 Once obtained edit the prod.env file, changing the MICADO_API_KEY variable with the new key.
Then run the following commands to deploy the frontend:
(set -a; source prod.env; set +a; docker-compose -f docker-compose.yml up -d nginx data_migrants data_pa data_ngo)
(set -a; source prod.env; set +a; docker-compose -f docker-compose.yml up -d dashboard)