Guide into creating a solar and battery powered tap water system, allowing for remote commanding via GSM (2G) network.
This project may be useful to someone trying to solve some of the challenges of this problem. In fact, the tap system was the most trivial part of the project while the GSM communication and battery operation where the most difficult ones.
This type of systems may be needed in rural areas, where no AC current, wifi or broadband communication systems are available.
-
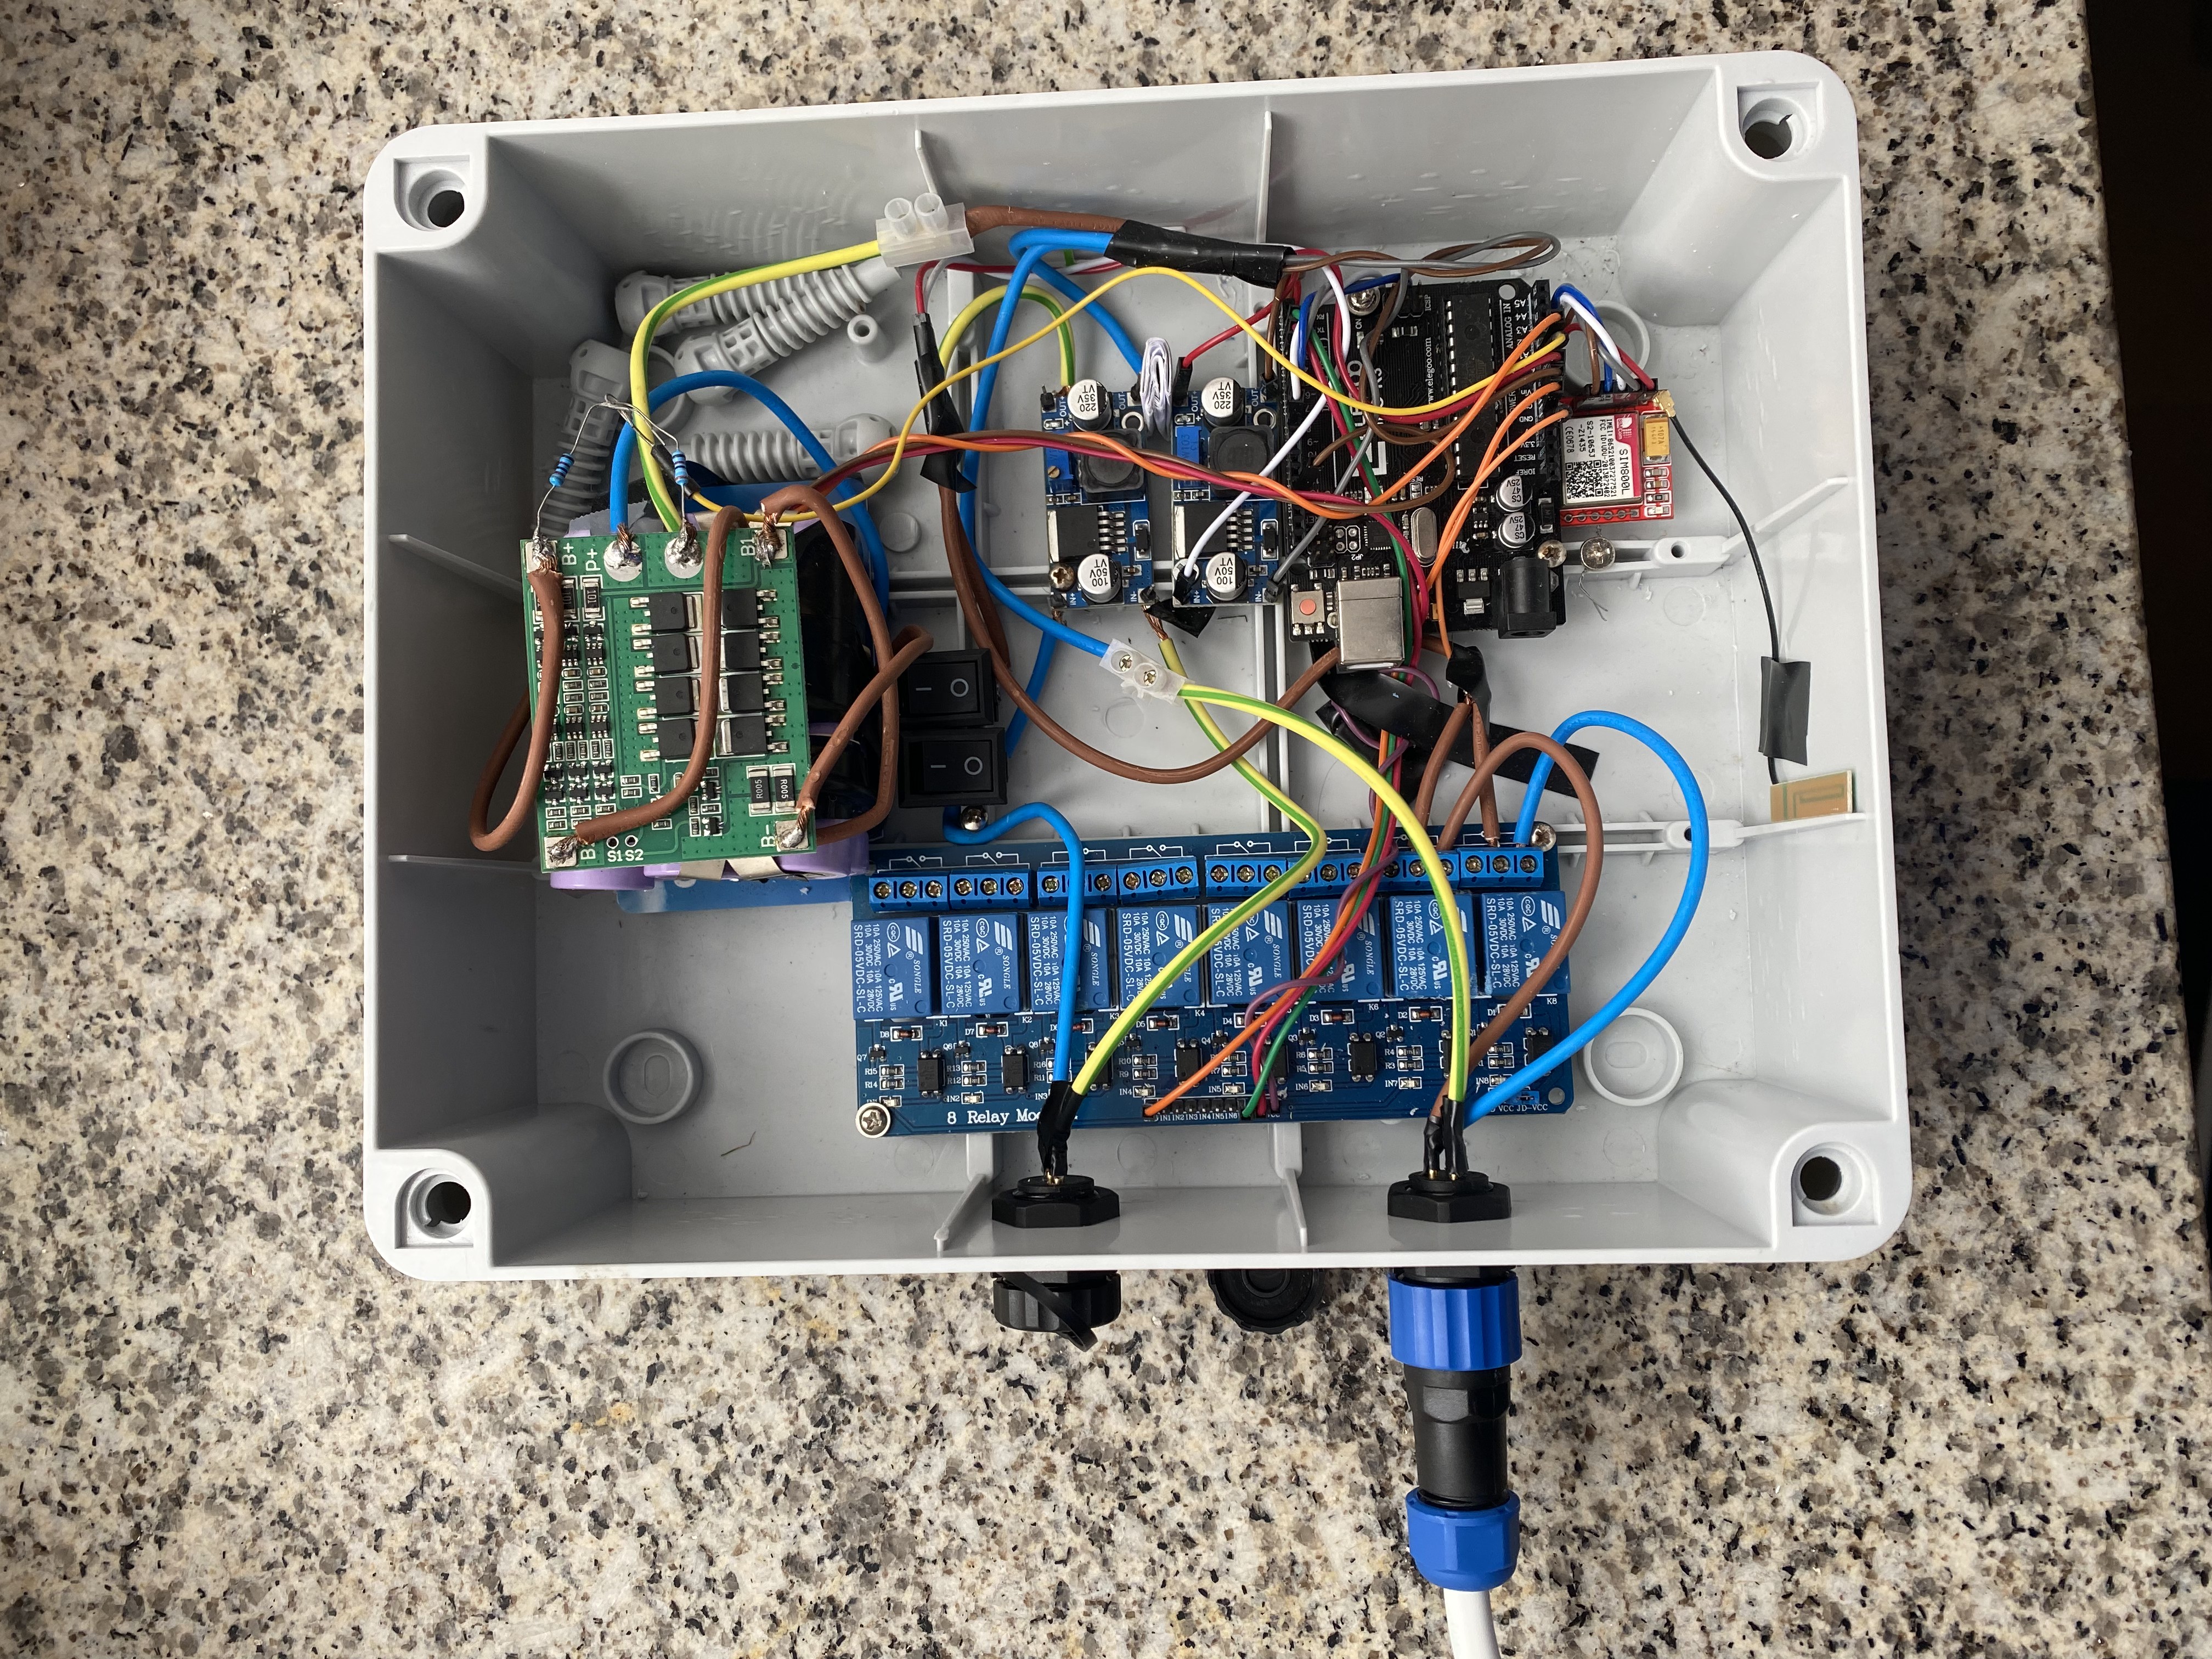
Arduino UNO.
-
Relay Module (x2).
-
GSM SIM800L module.
-
DC-DC Buck converter module (x2).
-
10W 21V solar panel.
-
LiPo 18650 batteries (x6).
-
3S BMS Lithium battery protection PCB.
-
40kΩ and 80kΩ resistors.
-
LM35 temperature sensor.
-
12V 3/4" DC electric ball valve.

I chose a 3 series 18650 battery cell configuration, that gives us 8 to 12V and 6600mAh of power. Each 18650 cell gives between 2.5 and 4.2V and 3350mAh, so 3 in series to have enough voltage and 2 in parallel to have enough capacity seem a reasonable choice. To recharge the batteries, I use a small 10W solar panel that gives 21V to 12V with daylight. Keep in mind that your solar panel should be reverse current protected so it doesn't draw current from the batteries when it can't provide enough voltage.
The buck converter is used to stabilise the voltage from the solar panels and also to limit the charge capacity of the cells to around 90% (12V instead of 12.6V).
Make sure you buy trusted 18650 power cells and not some Chinese fake clone from AliExpress. A good reliable source of batteries is nkon.nl. Thanks to @Charlio99 for helping me with the power setup.
To read the battery charge status, one must know the voltage of the battery. It's oscillating between 7.5V when fully discharged and 12.6V when fully charged. To maximize the batteries lifespan, we will try to keep them between 8 and 12V.
The Arduino board has analog input pins that read voltage from 0 to 5V. We need to convert the 7.5 to 12.6V to something below 5V, so the Arduino can read it. For that, we use a voltage divider with 2 resistors, we need that 15V become 5V:

You can choose whatever resistor values you have available, given R1=2R2. The higher the value, the less current it will consume. But also, do not exceed 100kΩ since you will not get accurate readings of the voltage, for a reason I still do not understand.
The water tap is essentially a DC motor that works with the 12V from the batteries. I just connect the ground to the batteries and I open or close the tap by switching the correct wire to 12V with the relays. Turning the relay module on or off is as simple as writing high or low value to a digital output pin with the Arduino.
The LM35 temperature sensor just needs a 5V input and it will output a 0-5V analog voltage value that represents the current temperature. That will be useful since the system will be enclosed in a waterproof environment and batteries are very sensitive to temperature. We can also shut down operation or send an alert if a battery malfunctions and heats up the system.
The SIM800L module enables us to send and receive data from a server. It requires a 3.4-4.4V input, so we can't use the 5V or 3.3V ports of the Arduino and we need a DC-DC buck converter to get a stable, well regulated 4V power supply.
It communicates with the Arduino via serial interface. We could use the dedicated 0 and 1 pins, but since we need that pins for debugging speed is not key for us, we will be using a software emulated serial interface with the digital pins 7 and 8.
The software must handle lots of different things.
- Monitor the temperature and charge level of the battery.
- Abstract the state of the water tap to ON and OFF, while turn on means "open first relay 10s" and turn off "open second relay 10s". Save the state of the tap into non volatile memory.
- Send to the server the state of the water tap and readings from temperature and battery. Get from the server the desired state of the tap valve and the amount of time to sleep between server checks.
- Sleep while not checking the server to save battery.
The code to read analog inputs is very similar:
float getTemp(){
  int value = analogRead(A1);
  float millivolts = (value / 1023.0) * 5000;
  float celsius = millivolts / 10;
  return celsius;
}

float getVoltaje(){
  int value=analogRead(A0);
  for(int i=0;i<9;i++){
    value+=analogRead(A0);
  }
  value/=10;
  return (value*5.0/1023.0)/0.3269550749;
}
0.3269... is the constant I calculated using the upper formulas to translate my voltage divider read value to the real 7.5-12V value of the battery.
First, we need to store in the EEPROM whenever we change the state of the valve. Secondly, we need to code the transition between states:
void changeState(){
  if(estadoRelay==0){//if tap is closed, we open it
    digitalWrite(openPin, ON);
    delay(10000);
    digitalWrite(openPin, OFF);
    relayState=1;
  }else{ //tap open, we close it
    digitalWrite(closePin, ON);
    delay(10000);
    digitalWrite(closePin, OFF);
    relayState=0;
  }
  EEPROM.write(0, relayState); //write to EEPROM address 0 the new state
}We will be using the GSMSim library. We initialise the GPRS module when booting the Arduino:
void initGprs(){
  GPRSserial.begin(57600); //init serial comm with the device
  while(!GPRSserial) {
      ; // wait for module to connect.
  }
  gprs.reset();
  gprs.init();
  gprs.setPhoneFunc(1)
  if(!gprs.isConnected()){
    gprs.connect();
  }else{
    connectionFail=false;
  }
}
If we couldn't connect to the GPRS network, we set a flag so we can retry later.
Now we need to code the way to send and retrieve the data from the server:
String syncServerData(){
  String response= gprs.post("example.com/script.php", String("v=")+getVoltage()+"&e="+relayState, "application/x-www-form-urlencoded", true).substring(21);
  if(response.substring(0,3).equals("200")){
    response=response.substring(18,response.length());
    return response;
  }else{
    Serial.print("ConnErr:");
    Serial.println(response);
    connectionFail=true;
    return "0|10"; //If we are offline, we turn off the tap and we sleep a some time
  }
}
The response from the library is something like: METHOD:POST|HTTPCODE:200|LENGTH:3|DATA:data. We only care about the 200 status code and the data from the server.
We need to write a server script to handle the incoming data, something like:
<?php
if ($_SERVER["REQUEST_METHOD"] == "POST") {
  $voltaje = floatval( $_POST['v'] );
  $estado = intval( $_POST['e'] );
  $temp = floatval( $_POST['t'] );
  if($temp>25.0){
    sendTemperature($temp);
  }
  $sleep=-1;
  $estadoNuevo=0;
  updateDB($voltaje,$estado);
  if ($voltaje < 8.0) {
	  echo "0|".$sleep;
  } else {
	  echo $estadoNuevo."|".$sleep;
  }
}
function updateDB($v, $e)
{
	global $sleep, $estadoNuevo;
	try {
		$mng = new MongoDB\Driver\Manager("mongodb://....");
		$filter = [ '_id' => 1 ];
		$queryEstado = new MongoDB\Driver\Query($filter);
		$estadoNuevo = $mng->executeQuery("blabla.state", $queryEstado)->toArray()[0]->estado; //obtenemos el estado de la bd

		$querySleep = new MongoDB\Driver\Query([ '_id' => 2 ]);
		$sleep = $mng->executeQuery("blabla.state", $querySleep)->toArray()[0]->sleep; //obtenemos el sleep de la bd

		$bulk = new MongoDB\Driver\BulkWrite;
		$doc = ['_id' => new MongoDB\BSON\ObjectID, 'time' => new MongoDB\BSON\UTCDatetime, 'voltage' => $v, 'estado' => $e];
		$bulk->insert($doc);
		$mng->executeBulkWrite('blabla.history', $bulk); //escribimos los nuevos datos en la bd

	} catch (MongoDB\Driver\Exception\Exception $e) {...}
}
?>
And you must also write a mechanism to update the state and sleep values in the server.
We will try to be as power efficient as possible. The setup() method will be as follows:
void setup() {
  Serial.begin(115200);
  initGprs();
  pinMode(openPin, OUTPUT);
  pinMode(closePin, OUTPUT);
  digitalWrite(openPin, OFF);
  digitalWrite(closePin, OFF);
  relayState=EEPROM.read(0);
}
Serial setup will be removed in the production version, it's just useful for debugging.
In the loop we will be sleeping by default using the LowPower Arduino library. It will shutdown Arduino's chip buses and systems and setup a clock interruption in 8s (the longest period available). This allows to reduce Arduino's current from 0.044A to 0.029A. The rest of the current comes mostly from the linear voltage regulators, which are really inefficient. A further optimization would be to swap the main regulator of the Arduino for a nearly 100% efficient buck converter.
So we are sleeping 8s a fixed amount of times:
void loop() {
  if(currentCiclo<ciclosSleep){
    currentCiclo++;
    LowPower.powerDown(SLEEP_8S, ADC_OFF, BOD_OFF);
    return;
  }
When we exit the loop, we check for new data: the server will provide a new amount of rounds of sleep and a new state for the water tap.
  if (connectionFail) initGprs();
  String s = syncServerData();
  int newState = s.charAt(0) - '0';
  ciclosSleep = s.substring(2).toInt();
  if(newState!=relayState) changeState();
  currentCiclo=0;
}
And that's it. Our new autonomous water tap is now fully working!!