This example scenario provides a walkthrough of configuring an Application Gateway with multi-site listeners and a wildcard certificate with end-to-end TLS. Application Gateway is a web traffic (HTTP/HTTPS) load balancer and web application firewall that can be used as an ingress solution for a variety of web application backends, including virtual machines.
This example scenario is an automated implementation of Walkthrough: Configuring end-to-end TLS with Application Gateway and Internet Information Services
To deploy this example scenario, the following is necessary:
- Azure Subscription
- Custom Domain Name
- DNS
- Wildcard Certificate (PFX)
This example scenario requires an Azure Subscription, and it supports Pay-As-You-Go, Enterprise, and MSDN/Visual Studio Subscriptions. The resources in this sample do incur charges, but some resources may be deallocated to save on costs.
This example scenario requires a custom domain name which will be used as the host name in the Azure Application Gateway Listener and the Internet Information Services Site Binding Host Name.
This example scenario requires access to DNS hosting services for the custom domain name. After deployment, it is necessary to create A Records for the two websites created.
This example scenario utilizes a Wildcard SSL Certificate to secure the Azure Application Gateway Listener and the Internet Information Services Site Binding Host Name. The Wildcard PFX must have a password set. There are multiple online services, such as Let's Encrypt, that provide free and low-cost SSL Certificates.
To deploy this example scenario, clone the repository to your local machine using Git. From the local repository folder, execute the Deploy-EndToEndSslVm.ps1 file, and enter the parameter values requested. You will be prompted for the following parameter values at the time of deployment:
| Parameter | Type | Description |
|---|---|---|
location |
string | Azure Region for deployment Environment (e.g. eastus) |
resourceGroupName |
string | Name of the Azure Resource Group for deployment (e.g rg-end2endsslvm) |
keyVaultName |
string | Name of the Azure Key Vault (e.g. kv-end2endsslvm)* |
$managedIdentityName |
string | The name of the Azure User-Assigned Managed Identity (e.g. id-end2endsslvm) |
pfxCertificatePath |
string | The path to the PFX Certificate (e.g. C:\certificates\wildcard.pfx) |
certificatePassword |
secureString | The password to the PFX certificate (e.g. P@ssword123) |
base64Path |
string | The path to the Base64 Certificate export (e.g. C:\certificates\wildcard.txt) |
adminPassword |
secureString | The password to the Virtual Machine Administrator account (e.g. P@ssword123) |
adminUserName |
string | The name of the Administrator user (e.g. resourceadmin |
domainName |
string | The name of the Custom Domain (e.g. mydomain.com |
*Note: Some Azure Resources, such as Key Vault, require globally unique names across the Azure Namespace. Using the example name provided will most likely result in a failed deployment. Customize the name of the Azure Kay Vault.
This example scenario requires post-deployment configuration of Internet Information Services. After successful deployment, perform the following:
- Install the PFX Certificate
- Create HTTPS Bindings
- Set default document
- Update index.html
To install the PFX Certificate to the Internet Information Server:
-
Open a Remote Desktop Connection (RDP) to the server
-
Copy the PFX Certificate to the server
-
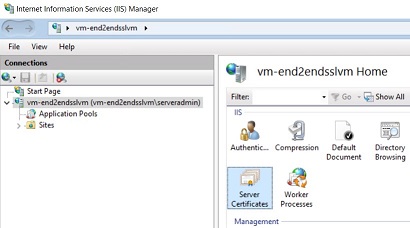
From Windows Administrative Tools, open Internet Information Services (IIS) Manager
-
Select the IIS Server, vm-end2endsslvm, and open the Server Certificates Feature
-
From the Server Certificates Feature, click Import
-
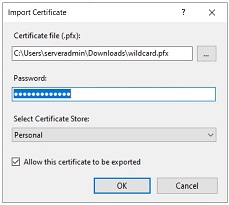
From the Import Certificate window, select the Certificate file, enter the password, and click OK
To create the HTTPS Bindings for the Web Applications:
-
Open a Remote Desktop Connection (RDP) to the server
-
From Windows Administrative Tools, open Internet Information Services (IIS) Manager
-
Expand Sites and select webApp1
-
From Actions, select Bindings
-
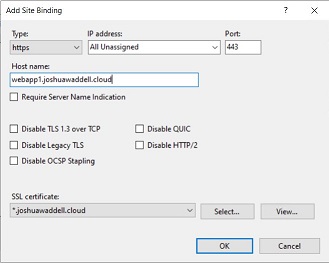
From the Site Bindings window, click Add
-
From the Add Site Binding window:
-
Repeat these steps for webApp2
-
Open a Remote Desktop Connection (RDP) to the server
-
From Windows Administrative Tools, open Internet Information Services (IIS) Manager
-
Expand Sites and select webApp1
-
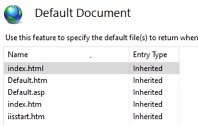
Select Default Document
-
From the Default Document Feature, select Index.html
-
From Actions, select Move Up
-
A message window will appear regarding the list order. Click Yes
-
From Actions, select Move Up until index.html is at the top of the list
-
Repeat these steps for webApp2
-
Open a Remote Desktop Connection (RDP) to the server
-
Open File Explorer and navigate to C:\inetpub\wwwroot\webapp1
-
Right-click index.html, select Open with, and select Choose another app
-
From the How do you want to opn this file window, select More apps, select Notepad, and click OK
-
Copy the following code to Notepad:
<!DOCTYPE html>
<html>
    <body>
    <h1>webApp1</h1>
    <p>Welcome to webApp1!</p>
    </body>
</html>
-
From Notepad, select File, and click Save
-
Repeat these steps for webApp2
This example scenario requires post-deployment configuration of DNS. After successful deployment, perform the following:
- Log in to the Azure portal
- In the Search bar, search for the Application Gateway (e.g. appGw-end2endsslvm-01), and select it
- From the Overview blade, make note of the Frontend public IP address
- From your DNS hosting provider create two A record entries for:
- webapp1.mydomain.com pointing to the Application Gateway public IP address
- webapp2.mydomain.com pointing to the Application Gateway public IP address


