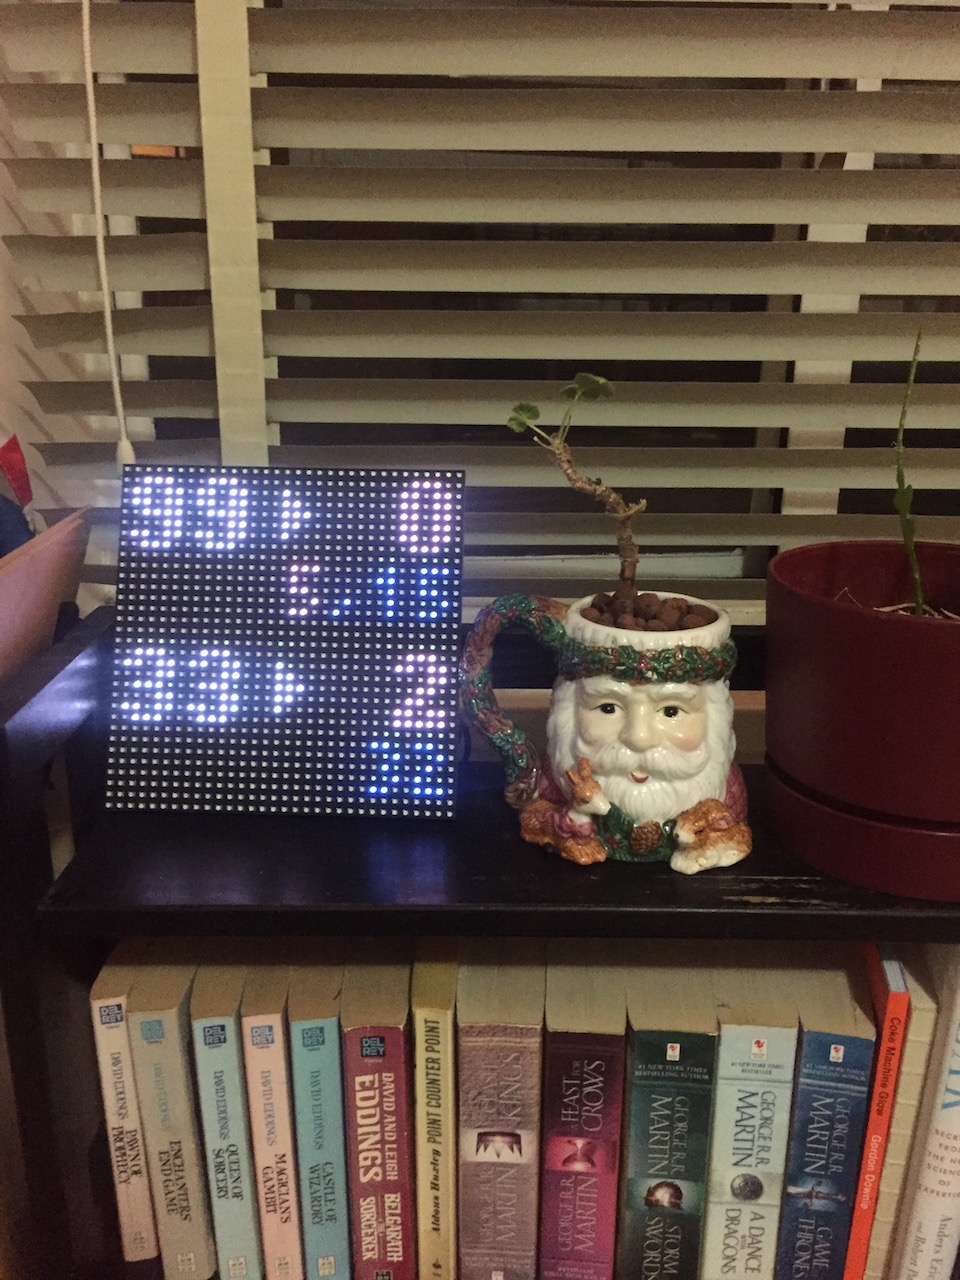
lebus (light emiting bus whatever the name is dumb shut up!!) is a simple Python library for pulling real-time schedules from Translink (Vancouver BC) and displaying them on a 32x32 LED matrix. There's not a heck of a lot of features yet, but maybe that will change in the author's interest.
 (the image rotation information isn't coming through, wut?)
This project was inspired by the MLB LED Scoreboard project, which has a lot of useful information that is related to setting up these sorts of devices.
I used the Python bindings of the RPI RGB LED Matrix library. Again, lots of good things to dig into there.
Finally, Adafruit (where I purchased all the hardware from) has a pretty good setup guide as well.
Adventurous folks can choose their own path, but here's what I used to build by transit clock. All my parts were ordered from Adafruit, and I've included the price I paid at the time (Jun 30, 2018 in USD).
- Adafruit RGB Matrix Bonnet for Raspberry Pi [ID:3211] = $14.95
- 32x32 RGB LED Matrix Panel - 6mm pitch [ID:1484] = $39.95
- MicroUSB to 5.5/2.1mm DC Barrel Jack Adapter [ID:2789] = $1.95
- 2-Way 2.1mm DC Barrel Jack Splitter Squid [ID:1351] = $2.95
- Raspberry Pi Zero WH (Zero W with Headers) [ID:3708] = $14.00
- 5V 10A switching power supply [ID:658] = $25.00
- 8GB SD Card w/ Stretch Lite [ID:2820] = $9.95
Note that you it's a good idea to be able to write to the Micro SD card from your normal computer if something goes wrong. In that case, a USB MicroSD Card Reader ($5.95) is a good investment.
These parts from to about $110 USD before shipping and taxes. For a Canadian like me, once you've factored in duty, shipping, taxes, and the dollar, it came out to just under $200 CAD.
So, uh, make sure this is something that's really going to change your life, 'cause your phone probably does this for free.
Note that I obviously used a Raspberry Pi to power this, but I don't see why you couldn't do the same with an Arduino board.
You need to register at https://developer.translink.ca/ to receive an API key (it will display in the top-right corner after you log-in, and will be a jumble of 20 characters or so).
From there, you need to identify bus numbers and stops that you want to display by pulling the number from the stop itself, or searching for the stop at translink.ca.
e.g. The UBC 99 B-Line stop is at stop #61935, so the 3-digit bus number is 099 and the stop is 61935.
Note that a stop can have multiple buses, but at this point in time you need to specify each individually (i.e. the software 'as is' will not parse the list of buses for a particular stop -- you also need to supply a specific bus number as well).
- Bake Raspbian Stretch Lite (November 2018) to SD card via Apple Pi Baker
- Setup Pi as desired
> sudo raspi-config- Connect to wifi network
- Enable SSH server
- Change password
- Change hostname
- Disable built-in audio (see https://www.instructables.com/id/Disable-the-Built-in-Sound-Card-of-Raspberry-Pi/)
cd /etc/modprobe.dsudo vi alsa-blacklist.conf- Enter the line
blacklist snd_bcm2835 - Ctrl-x to save the file
- Reboot with
sudo reboot
- Setup rgb-matrix software (see: https://learn.adafruit.com/adafruit-rgb-matrix-plus-real-time-clock-hat-for-raspberry-pi/driving-matrices)
curl https://raw.githubusercontent.com/adafruit/Raspberry-Pi-Installer-Scripts/master/rgb-matrix.sh >rgb-matrix.shsudo bash rgb-matrix.sh- Continue?
y - Interface board type:
1. (Adafruit RGB Matrix Bonnet) - Quality vs Convenience:
2. Convenience (sound on, no soldering) - Continue?
y - Reboot?
y
- Edit lib Makefile to point to adafruit-hat
cd ~/rpi-rgb-led-matrix/libnano Makefile- Edit line 27 to be
ARDWARE_DESC?=adafruit-hat - Ctrl-x to save Makefile
make cleanmake
- Test demos in
~/rpi-rgb-led-matrix/examples-api-usesudo ./demo -D [0-11] (ok!)
- Compiling led-image-viewer in
~/rpi-rgb-led-matrix/utils(see: https://github.com/hzeller/rpi-rgb-led-matrix/tree/master/utils)sudo apt-get updatesudo apt-get install libgraphicsmagick++-dev libwebp-dev -yHARDWARE_DESC=adafruit-hat make
- Install python, pillow, and python bindings:
sudo apt-get update && sudo apt-get install python2.7-dev python-pillow -ymake build-pythonsudo make install-python
- Install git and pull this code:
sudo apt-get install gitgit clone https://github.com/johnlarusic/lebus.gitgit config credential.helper store
- Set the date/time:
sudo dpkg-reconfigure tzdata - Edit
lebus_config.jsonto your liking (see more details below)- You are going to need to supply the API key Translink provided you in the
api_keyfield - Of course, the stops you wish to display need to be provided in the
stopsarray - Finally, if you want this to actually send to the LED display, you'll need to flip
send_to_ledtotrue
- You are going to need to supply the API key Translink provided you in the
- Set up a systemd service to run on startup:
- Edit
lebus.serviceas desired sudo cp lebus.service /lib/systemd/system/sudo systemctl enable lebus.servicesudo service lebus start [restart|stop]
- Edit
- (optional) Use crontab to start and stop the LED from running between midnight at 6am:
crontab -eand then enter the following lines:0 0 * * * sudo service lebus stop0 6 * * * sudo service lebus start
Boo JSON for lack of comments, so here's an annotated version of the config file...
    "api_key": "123456789ABCDEFGHIJK",  // API key supplied by Translink
    "refresh_rate": 5,                  // Rate at which you want everyting to refresh (in seconds)
    "send_to_led": false,               // Set to true to have the LED receive the generated image
    "send_to_file": true,               // Set to true to have the generated image saved to disk
    "default_image_file": "sched.png",  // If send_to_file is true, this is the filename written
    "led": {
        "width": 32,                    // LED width
        "height": 32,                   // LED height
        "brightness": 20                // LED brightness value (100 is the max)
    },
    "data_pull_timer": {                // As you have max 1,000 data pulls/day, adjust these to stay in your limit!
        "min": 2,                       // Minimum time between new data pulls for stop
        "max": 5                        // Maximum time between new data pulls for stop
    },
    "stops": [
        {
            "bus": "099",               // 3-digit bus identifier
            "stop": "61935",            // 5-digit stop identifier
            "display_bus": "99",         // Display name
            "display_direction": "E",   // Display direciton (N,S,E,W)
            "tminus_warning": 8,        // Times at/below this value will be coloured 'warnings'
            "tminus_critical": 3        // Times at/below this value will be coloured 'critical'
        },
        ...
        // One definition per bus and stop
    ],
    "colours": {                        // All in RGBA format!
        "background": "0,0,0,255",      // Graphic background
        "text": "255,255,255",          // Text for stop displays/direction
        "time_default": "77,148,255",   // Default stop time text colour
        "time_warning": "255,255,153",  // Colour 'warning' times
        "time_critical": "255,204,204"  // Colour for 'critical' times
    }
}
Time/interest permitting, the author would like to explore...
- Add an actual clock display
- Pull weather data and display that at the same time.
- Add in Blue Jays baseball scores 'cause why not.
Copyright (c) 2019 Johnny LaRusic
Permission is hereby granted, free of charge, to any person obtaining a copy of this software and associated documentation files (the "Software"), to deal in the Software without restriction, including without limitation the rights to use, copy, modify, merge, publish, distribute, sublicense, and/or sell copies of the Software, and to permit persons to whom the Software is furnished to do so, subject to the following conditions:
The above copyright notice and this permission notice shall be included in all copies or substantial portions of the Software.
THE SOFTWARE IS PROVIDED "AS IS", WITHOUT WARRANTY OF ANY KIND, EXPRESS OR IMPLIED, INCLUDING BUT NOT LIMITED TO THE WARRANTIES OF MERCHANTABILITY, FITNESS FOR A PARTICULAR PURPOSE AND NONINFRINGEMENT. IN NO EVENT SHALL THE AUTHORS OR COPYRIGHT HOLDERS BE LIABLE FOR ANY CLAIM, DAMAGES OR OTHER LIABILITY, WHETHER IN AN ACTION OF CONTRACT, TORT OR OTHERWISE, ARISING FROM, OUT OF OR IN CONNECTION WITH THE SOFTWARE OR THE USE OR OTHER DEALINGS IN THE SOFTWARE.