![DIYino demo of Neopixel lightsaber blade with LSOS] (http://img.youtube.com/vi/lyk8riXgIzM/0.jpg)![DIYino prototype demo with LSOS by neskweek - Swings] (http://img.youtube.com/vi/tU3GZzV9I6E/0.jpg)![Motion Detection Demo (made under v1.0 RC5)] (http://img.youtube.com/vi/wY8BSSEyYLY/0.jpg)![Quick tour (made under v1.0 RC4)] (http://img.youtube.com/vi/mc8scn_qyFM/0.jpg)
- Simple modular systems (you can choose to remove some systems from your final compilation)
- Swing detection
- Blade Clash detection
- Wrist movement detection
- Full gapless sound playing with "Hum Extended" soundfiles (see below)
- Blaster Shot deflect
- Blade Lockup (long press on Aux switch. Plays until release of the button)
- Accent LED
- Flash-on-Clash LEDString
- Multiple ignition/retractation/flickering effects
- Config Menu to modify some features without wiring the device to your PC/Mac
- EEPROM load/save of your config preferences
- Soundfont adding supported (not automatic, you'll have little work to do ;) )
- Low battery level warnings
- Shutdown on critical battery level
- Automatic Powersaving mode when idle
- Java Runtime Environment 8
Download the right file for your architecture - Arduino IDE (advised for end user)
OR
Arduino Eclipse v3.0 (advised for developpers)
Again, download the right files for your architecture - my new DFPlayer library (Included in zip file)
- I2Cdev and MPU6050 (Included in zip file)
- EEPROMex9.1 (Included in zip file)
- [OneButton (Included in zip file)] (https://github.com/mathertel/OneButton)
- [LinkedList (Included in zip file)] (https://github.com/ivanseidel/LinkedList)
- Wire (Included in Arduino Eclipse)
Designed to be used on Arduino Nano (ATmega328 processors)
- IMU (accelerometer + gyroscope) modules :
- MPU6050
- Soundplayer modules:
- DFPlayer Mini
- Blade module:
- homemade LEDstrings
- RGB LEDs (Luxeon/Cree styled)
- Single LED
I would be glad to see other modules added. If you're interested to make your device compatible, please contact me.
For people who don't want to use Eclipse Arduino, and prefer use Arduino IDE (which is really simpler if you don't plan to code) you can jump off to project setup section.
LSOS is now fully compatible with Arduino IDE thanks to [Pert (per1234)] (https://github.com/per1234)
- Download and install Java Runtime Environment 8
Download the right file for your OS - Download Arduino Eclipse v3.0
Again, download the right file for your OS - Uncompress this archive inside c:\Program Files
- Start C:\Program Files\eclipseArduino\eclipseArduinoIDE.exe
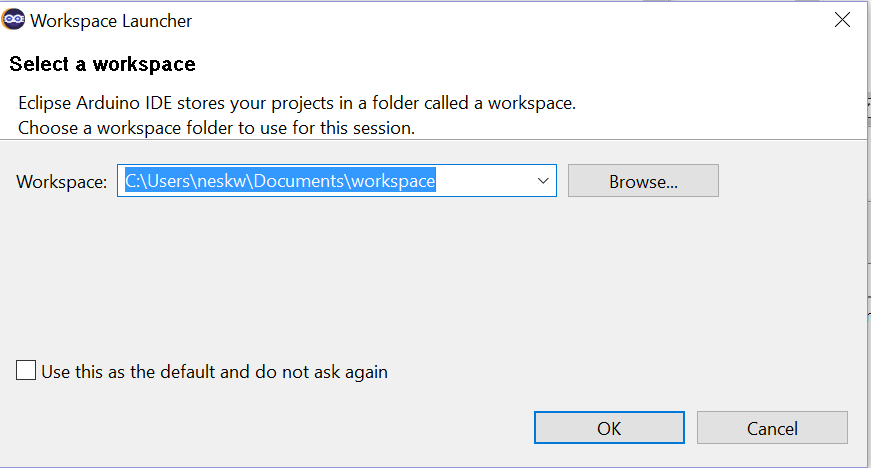
On first start up you will be ask where to put your prject workspace.
I advise you to put it there (off course replace "neskw" by your username) :
On first startup it will download a bunch of stuff related to Arduino Libraries.
Wait until it finishes - Go to Windows > Preferences
- Select Arduino and set "Build before upload ?" to "Yes" and press OK
- Plug in your Arduino device
It would be best that you always use the same USB port for future use - Go to File > New > Arduino sketch
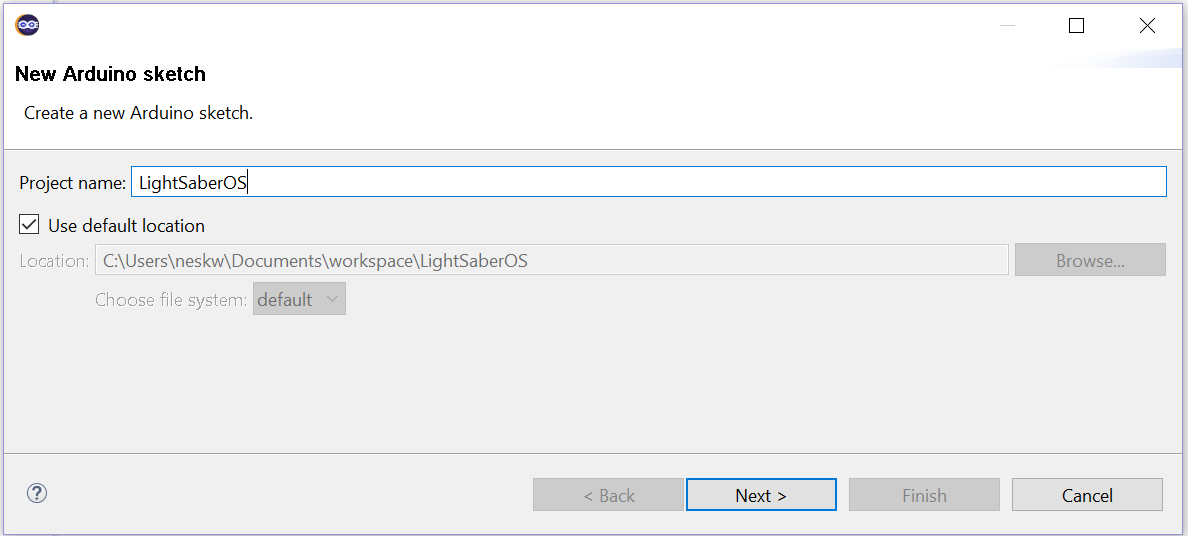
Then press next

COM port may be different on your PC. It depends on USB port you plugged it in.
Then press next
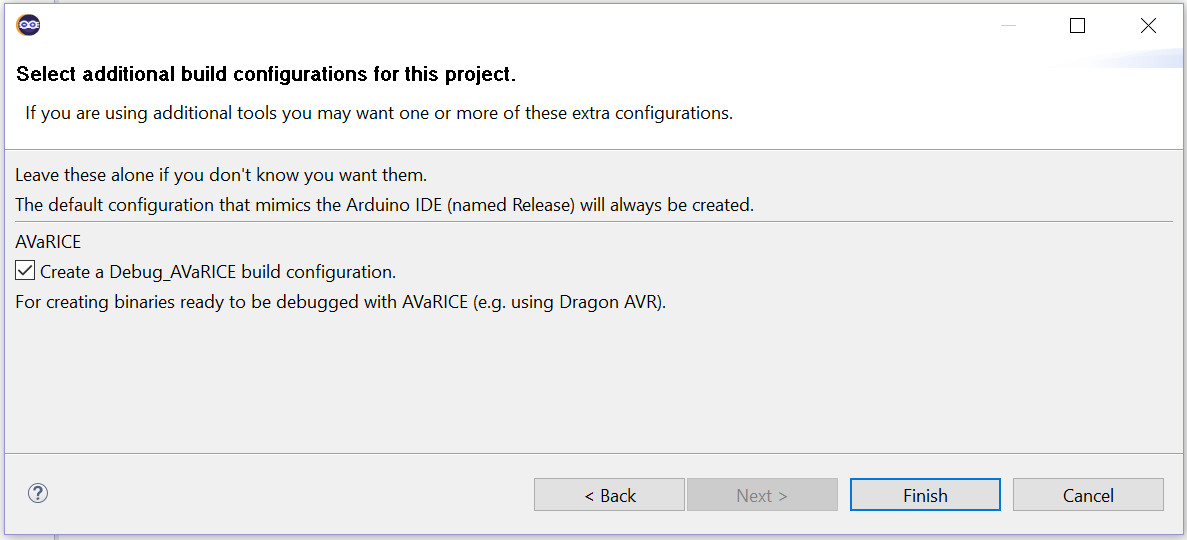
Here Checking AVaRICE is optional
Then press Finish - Delete LightSaberOS.ino file
- Uncompress LightSaberOS-master.zip archive
- If not already done create this directory : C:\Users__[YOUR USERNAME]__\Arduino
- Copy and Paste LightSaberOS-master\Libraries directory inside C:\Users__[YOUR USERNAME]__\Arduino
- Inside Eclipse Right click on LightSaberOS project > Import
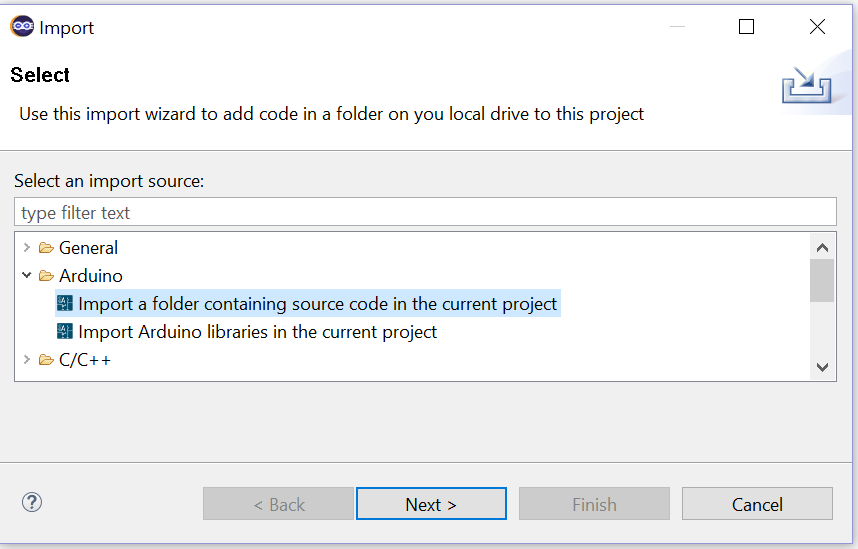
Then press Next
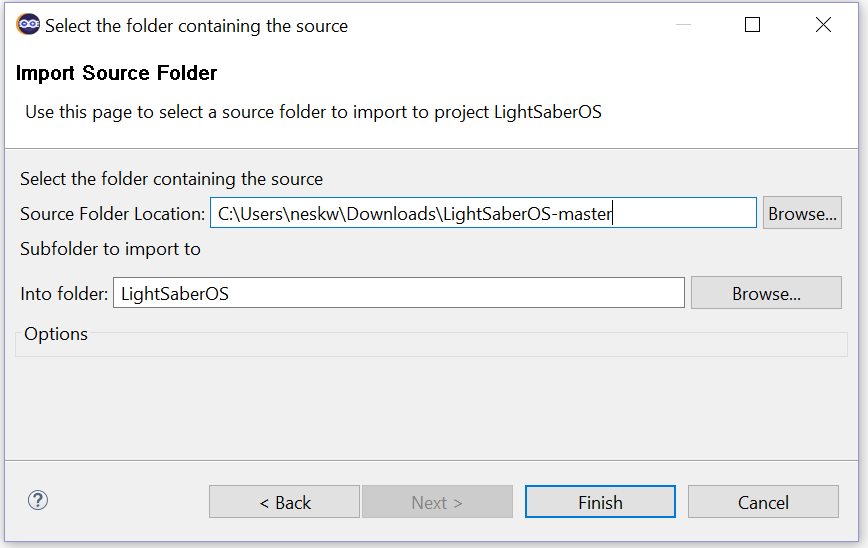
Then press Next
In "Eclipse Project explorer" open the new created LightSaberOS-master and select those files :

Then drag and drop them to the root structure of the project - Inside Eclipse Right click on LightSaberOS project > Import
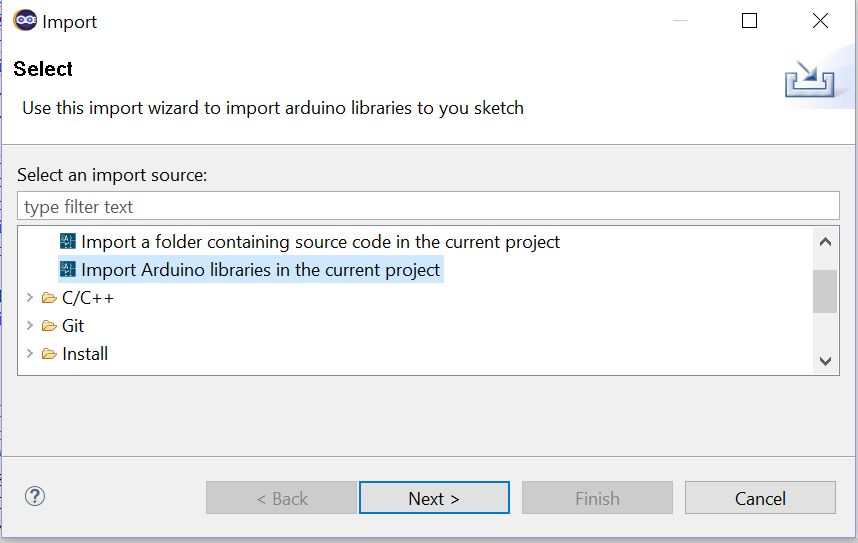
Then press Next
Select those libraries :
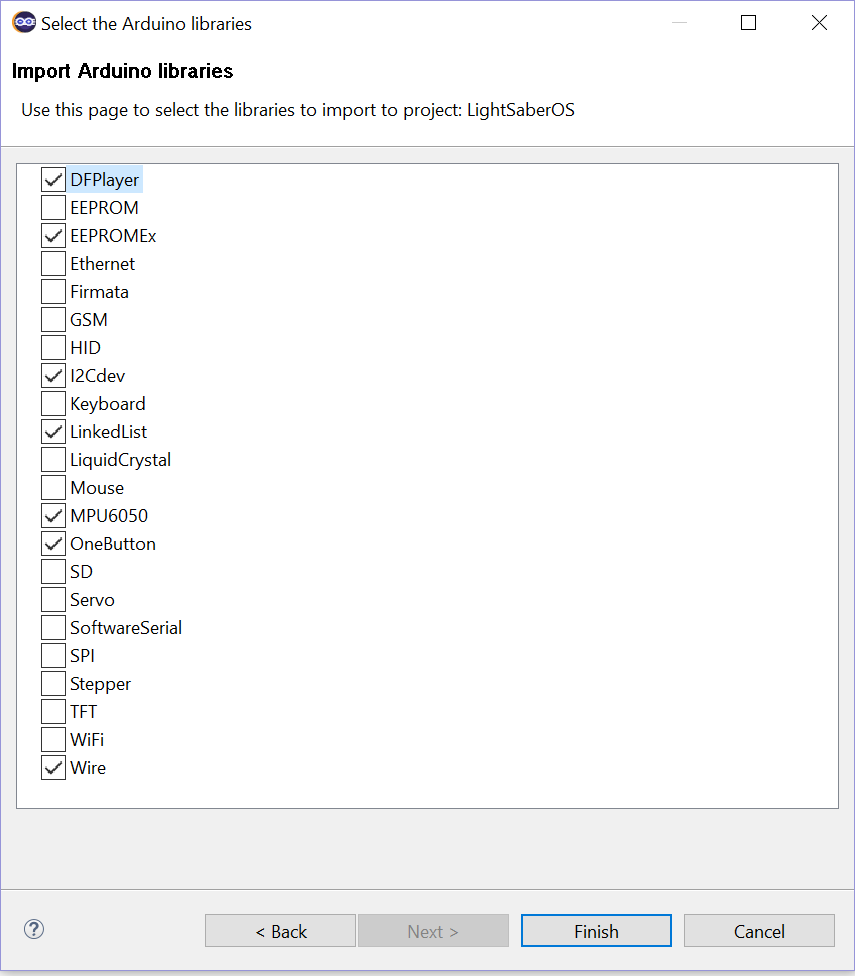
Then press Finish - Delete LightSaberOS-master directory from Eclipse Project explorer
You should end up with this Project explorer structure :
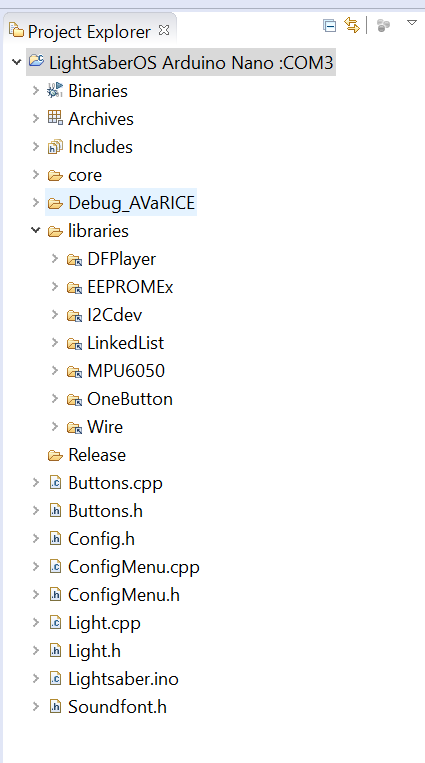
If so, Then you're ready to rock !
First, you'll need (if not already done) to calibrate your MPU6050.
I recommend you use the AutoCalibration script you can find here
Note the offset values it will give you and replace those you'll find inside setup() function in Lightsaber.ino :
/*
* Those offsets are specific to each MPU6050 device.
* they are found via calibration process.
* See this script http://www.i2cdevlib.com/forums/index.php?app=core&module=attach§ion=attach&attach_id=27
*/
mpu.setXAccelOffset(-2645);
mpu.setYAccelOffset(-5491);
mpu.setZAccelOffset(3881);
mpu.setXGyroOffset(27);
mpu.setYGyroOffset(-135);
mpu.setZGyroOffset(-38);The way you physically installed the MPU6050 in your hilt will influence how swing detection works.
You'll have to determine which IMU's axis is parallel to blade axis and change it accordingly in Config.h :
//#define BLADE_X
#define BLADE_Y
//#define BLADE_ZThen, put the content of SDCard.7z on your SDCard:
- Format your SDCard. I insist ! (go read HOW TO MANAGE YOUR SDRCARD section for further explanation)
- Unzip SDCard.7z to a folder
- Select all the files from this folder and "Drag and Drop" them to your SDCard. NO COPY AND PASTE !!! : We need to have this file copied in the same order as their filename order. On Microsoft Windows, Copy/paste produce an anarchic copy order, but Drag and Drop produce an ordered copy...
If you use DIYno board, don't mind that paragraph.
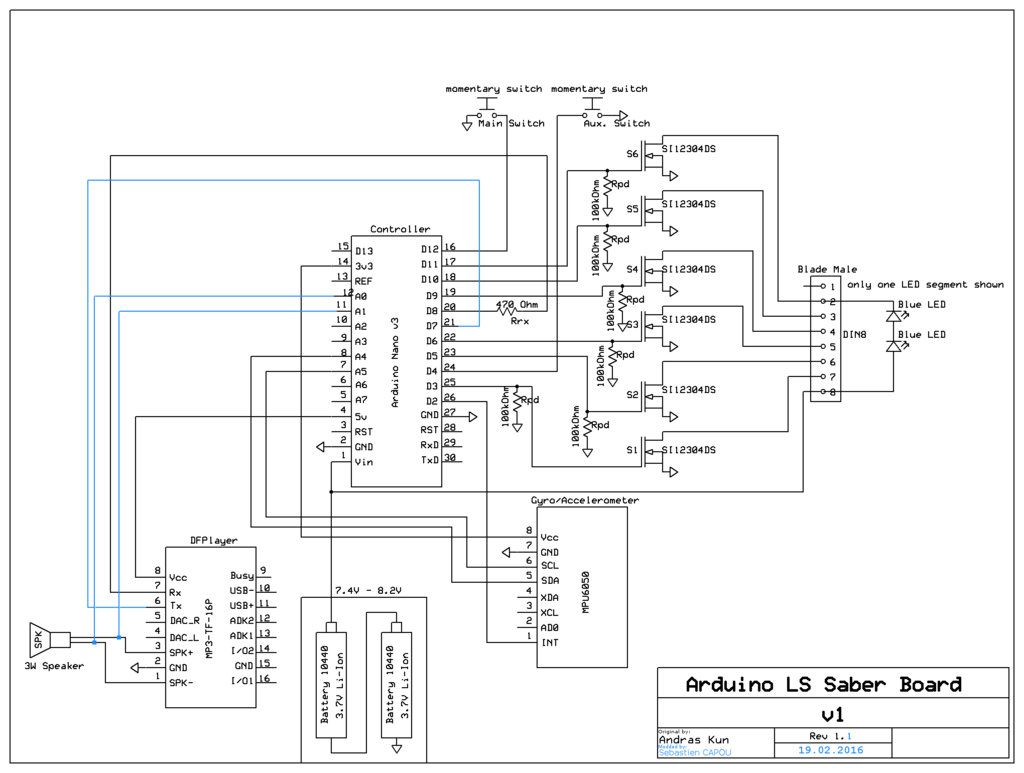
Using Protonerd's wirings.
Don't forget to wire those ones which were added :
- DFPLAYER TX to D7
- DFPLAYER SPK+ to A0
- DFPLAYER SPK- to A1
Wiring of busy pin is optional since LightSaberOS doesn't use it.
In Config.h be sure this line is uncommented :
#define LEDSTRINGS In Config.h comment this line :
#define LEDSTRINGS -
a) Wire your LED on pin D3
-
b) In Config.h comment this line :
#define LEDSTRINGS - c) Modify the following lines in LightSaber.ino so all variables are set to 0 :
#ifdef LUXEON
		storage.mainColor = 0;
		storage.clashColor = 0;
		storage.soundFontColorPreset[2][0] = 0;
		storage.soundFontColorPreset[2][1] = 0;
		storage.soundFontColorPreset[3][0] = 0;
		storage.soundFontColorPreset[3][1] = 0;
#endif- Short press on Main switch : activate your saber (Action Mode)
- Long press on Aux switch : activate Config Mode
- if idle for more than 5 min : PowerSaving mode.
- Short press on Main switch or Aux switch : leave PowerSaving Mode (go back to Standby Mode)
- Move your saber around : Swing effect
- Hit the hilt/blade : Clash effect
- Short press Aux switch : Enable/disable Blaster block modes. Move your saber to produce Blaster effects.
- Long press Aux switch : Blade Lockup effect
- Long press Main switch : Shutdown saber
-
short press Main switch : Up the value
-
short press Aux switch : Down the value
-
long press Main switch : Change menu :
- Volume
- SoundFont
- [ONLY FOR LEDSTRING USERS] Power On effect: change the type of ignition for the current SoundFont
- [ONLY FOR LEDSTRING USERS] Power Off effect: change the type of retractation for the current SoundFont
- [ONLY FOR LEDSTRING USERS] Flicker effect: change the type of flickering for the current SoundFont
- [ONLY FOR RGB LED USERS] Main color : change the color of your saber
- [ONLY FOR RGB LED USERS] Clash color: change the color displayed during clash effect
- [ONLY FOR RGB LED USERS] Assign colors to current soundfont ? : Allows you to save the colors you just defined to the current SoundFont
- Swing sensitivity : adjust swing sensitivity.
-
Long press Aux switch : update config to EEPROM and leave Config Mode
While there are several ways to make DFPlayer Mini plays your sound files from your SDard, only one can provide full gapless sound "enqueuing" : we need to call each sound file by their copy order number.
Let's say you have a fresh formatted SDcard.
You copy one file on it : its copy order is 1.
You copy another one: its copy order is 2.
You copy another one: its copy order is 3.
Now the main "problem" to be aware of is : you remove file 2 (because you maybe want to replace it) : file 3 keep is order number. You copy another one: its copy order is 4.
In that case the only proper way to manage your SDCard I found is he following :
- You create a folder called sdcard on your computer
- Using a batch renamer utility (I personnaly use Bulk Rename Utility) you rename and copy your sound files to that folder in the order you planned
- You format your SDCard
- You select all your files from sdcard directory and DRAG AND DROP them to your SDCard.
Drag and drop on windows genereate a ordered copy following file name sorting.
Copy and paste (Crtl+C/Ctrl+V) generate an anarchic ordered copy. Don't use it !
Each time you will want to modify one file you'll have to do it that way. Adding files on he other hand can be done without formatting.
Files MUST be named that way :
XXXX[-myfileName].wav
where :
- XXXX is the order number planned (ex.: 0001, 0002, 2568,...)
- [-myfileName] is OPTIONNAL. But I encourage you to put one to ease up organisation.
YOU MUST ABSOLUTLY AVOID ALL GAPS IN THE ORDER NUMBER YOU PLANNED !!!
You can put files in different folders if you like. You don't necessarily need to let them on SDCard root.
BUT STILL BEWARE OF THOSE NUMBERS !!!!
Here are different examples of organisation you can use :
- All in SDCard root (like SDCard.7z example provided)
- 1 folder for each SoundFonts. For example :
- CONFIG folder containing files numbered 0001 to 0020
- Barlow's folder containing files numbered 0021 to 0053
- MySoundfont folder containing files numbered 0079 to 0124
- ZZZZZ folder containing files numbered 0054 to 0078 In this example files in ZZZZZ have been copied BEFORE those in MySoundfont
- an other example of organisation :
- CONFIG folder containing files numbered 0001 to 0020
- Barlow's folder containing files 0021-PowerOn.wav, 0022-PowerOff.wav,0023-Hum.wav,0024-Boot.wav
- Swing folder containing only swing sound files numbered 0025 to 1075
- Clash folder containing only clash sound files numbered 1076 to 1078
- Blaster folder containing only blaster sound files numbered 1079 to 2001
- Lockup folder containing only lockup sound files numbered 2002 to 2024
- MySoundFont folder containing files numbered 2025-Hum.wav, 2026-Boot.wav 2027-PowerOff.wav,2028-PowerOn.wav
In that case, the user wants to be able to use all of his swing/clash/blaster/lockup/etc. sounds with every of its soundfont.
He can also configure some soundfont to use just a part like for example Swings 0100 to 0153.
Let's say you want to change the lady voice or ladies usres may want their saber with a male voice or you may want her to talk in Dutch or French or Italian or Spanish (name your langage here).
I used this online free Text-To-Speech generator to produce those sounds.
You can produce your own sentences with it or use any other Text-To-Speech program.
For example :
"Hello Master! You just entered into Config Mode !"
Then rename the file it produces : 0001-CONFIG-ConfigMode.mp3. Remove old 0001-CONFIG-ConfigMode.wav file.
N.B.: Only in Config Mode case, mp3 are OK to use. We don't care in this mode if there's sound gap.
In this video, you'll learn how to create the differents lightsabers sounds-effects.
You can experiment with different device to produce some unique sounds.
Then use Audacity to mix them.
Final sounds MUST BE in WAV format (NO MP3 ! NO WMA!)!
When encoding a sound to those format (MP3 or WMA) the encoder will automaticly put a silence at start.
This work is licensed under the Creative Commons Attribution-NonCommercial-ShareAlike 4.0 International License.
To view a copy of this license, visit http://creativecommons.org/licenses/by-nc-sa/4.0/]http://creativecommons.org/licenses/by-nc-sa/4.0/ .
By priority :
- NEOPIXEL code integration
- Better README.md (Work in progress)
- Try to reduce compiled hex file
- Rewrite to Object Oriented form, using JakeSoft Library
- Find a use to:
- short press Aux switch in standby mode
- double click on Main switch in action/config/standby mode
- double clik on Aux switch in action/config/standby mode.
- Rewrite some function in Assembler
- Pitch shifting on movements (don't know if it's feasable)
Thanks to Andras Kun (Protonerd from Arduino Forum) for initiating this project and his big contributions to LSOS Code
Thanks to Jakesoft from Arduino Forum for :
- his initial idea of using Arduino device to build a lightsaber.
- his idea of using Aux Switch as a triger mode for Blaster Blocks.
and many more source of inspirations.
Thanks to Joe Barlow for his excellent opensource soundfont that I did remix for our needs.
Thanks to Scott Daniels for his [code that allows to monitor the battery charge] (http://provideyourown.com/2012/secret-arduino-voltmeter-measure-battery-voltage/)
Thanks to you for using it ;)
... a real life lightsaber which cut through stuffs, like a pizza, could be made...
But first things first : I need the pizza !
;)

I hope you'll like it.
Don't hesitate to reports bugs (I've made a lot of test but... hey !), or suggest new functionallity.
If you want to contribute to this project, please contact me via mail or on the [thread of this project] (http://forum.arduino.cc/index.php?topic=361566.0)
##12/03/2016 : The following might not be accurate since release of version 1.0
Edit SoundFont.h
- Only WAVs file !!! NOOOO MP3, NOOOO WMA !!! :
When encoding a sound to those format (MP3 and WMA) the encoder will automaticly put a silence at start.
WE DON'T WANT GAPS !!! - With soundfiles with hum extension (you edited a swing file and paste a hum sound repeated for some time), if you put 2 min of hum after your swing sound, if you don't move your saber for 2 min (higly unprobable in real situation) you'll notice a little gap in hum sound at that moment : You've just switch on a pure hum soundfile.
- Don't put gaps in soundfile numbering ex.:001_Boot.wav,002.wav, 0010_Swing1.wav...
The "folder play" command of the DFPlayer will see them as 001, 002, 003...
That will generate unpredictable behaviour. - You can't put more than 255 folders numbered folder on your SDCard, including O1 (which contains config mode sounds)
- You can't put more than 255 files in a folder on your SDCard.
- You won't be able to have more than 65535 sound file on the wole SDCard (including config sounds).
- Don't put names after folder number (ex.: 001_Config or 002_Sith). Your folder won't be detected (tested :( )
- Since I've developped it on a breadboard, clash and swings settings may need some more tweaking.
Still hopping that will not be the case :P. I've developped those wanting to obtain "real life" saber feel. - Beware the amount of debug settings you uncoment: they add significant amount of data to the compile.
I've made them modular for this reason, so take advantage of it.