A complete guide to building a Laravel 12 CRUD application with multiple image upload, live preview before saving, edit & delete images (including AJAX removal).
(Image taken from the blog post for better understanding.)
- Why You Need Multiple Image Upload + Preview
- Features
- Prerequisites
- Implementation Steps
- Create Project & Configure Database
- Models & Migrations
- Controller & Routes
- Blade Views (Create / Edit / Show)
- Multiple Image Upload & Preview (jQuery)
- Image Deletion (AJAX)
- Many real-world applications like e-commerce, portfolio sites, user profiles, or blog attachments require associating multiple images with a record.
- Preview functionality improves UX: user can see what images will be uploaded before submitting.
- Ability to edit and delete images later (including via AJAX) helps in maintenance and cleaner content.
This tutorial shows you exactly how to build all of this using Laravel 12 + jQuery, including how to store images, link them via models, preview before upload, and handle deletion.
- Create / Read / Update / Delete (CRUD) product entries.
- Upload multiple images per product.
- Live preview of selected images before uploading.
- Store image paths in database and store files in
public/uploads. - Edit products: add more images, view existing ones.
- Delete individual images via AJAX without full page reload.
- Delete entire product and its related images properly (both files & DB).
- PHP 8.2 or higher
- Composer
- Laravel 12
- Database (MySQL, SQLite, etc.)
- Basic knowledge of Blade templates, Eloquent relationships
- jQuery for front-end preview & AJAX
Below is a high-level summary. For full code, visit the live tutorial.
| Step | What You Do |
|---|---|
| 1. Create Laravel project & setup database | composer create-project laravel/laravel your-project, update .env with DB credentials. |
| 2. Create migrations & models | Models: Product, Image; Migrations for products and images tables; one-to-many relationship. :contentReference[oaicite:0]{index=0} |
| 3. Define routes & controller | Resource routes for products + extra route for deleting individual images via AJAX. :contentReference[oaicite:1]{index=1} |
| 4. Build CRUD methods | Store, update, delete logic; validate images; manage DB & filesystem. :contentReference[oaicite:2]{index=2} |
| 5. Front-end: Blade views | Create, edit, show views; use file input with multiple; show old images; style with Bootstrap / layout. :contentReference[oaicite:3]{index=3} |
| 6. Image preview before upload | Use jQuery: on file input change, show thumbnail previews before submitting. :contentReference[oaicite:4]{index=4} |
| 7. Image deletion (AJAX) | Remove single image from UI + database + file, without reloading page. :contentReference[oaicite:5]{index=5} |
| 8. Testing & deployment | Test product create/edit/delete; ensure file removal; deploy properly. |
(Embed screenshots for better engagement / SEO)
- Create Product page with image preview
- Edit page showing existing images + delete buttons
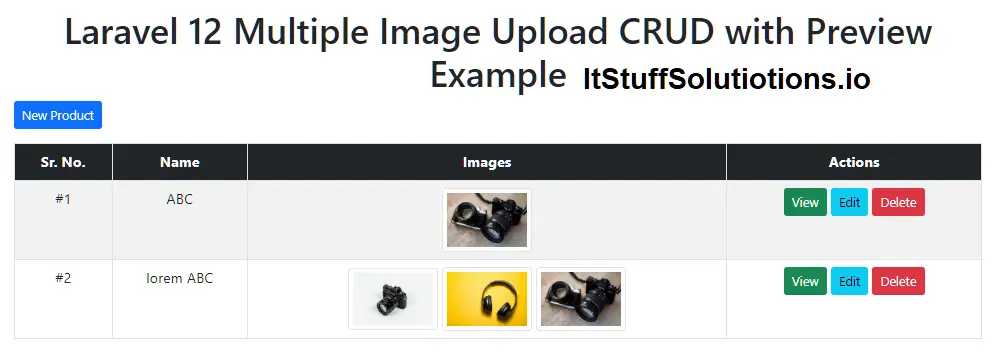
- Product listing with multiple image thumbnails
- Show page with large image display
| Question | Answer |
|---|---|
| Can I use storage disk instead of public folder? | Yes. You can use storage/app/public and then symlink with php artisan storage:link. Update your file paths accordingly. |
| What image types are allowed? | In the example: jpeg, png, jpg, svg up to 2048 KB. You can adjust rules in controller validation. :contentReference[oaicite:6]{index=6} |
| How do I paginate products? | Use Laravel’s paginate() instead of get(), and add pagination links in your index view. |
| Is it safe? | Yes, basic validation is included. But you may add more (e.g. file size, virus scanning, storage outside public if needed). |