Masternode Tool migration guide
Before starting, please backup your Znode Tool Evo v1.0.3 existing configuration to a safe location. You can do this in Znode Tool Evo by going to File -> Save Configuration or by backing up the config.ini file from the following default location:
Windows: C:\Users\YOURUSERNAME\.znode-tool-v5
Linux: ~/.znode-tool-v5
MacOS: ~/.znode-tool-v5
Firo Masternode Tool can be downloaded here: https://github.com/firoorg/firo-masternode-tool/releases
The new Firo Masternode Tool uses a different configuration folder than the previous version. You will need to import your existing configuration into it from the previous version. To do this, go to File -> Import configuration, select the config.ini from the .znode-tool-v5 directory and click Open. This will also import any existing masternodes that you have previously configured.
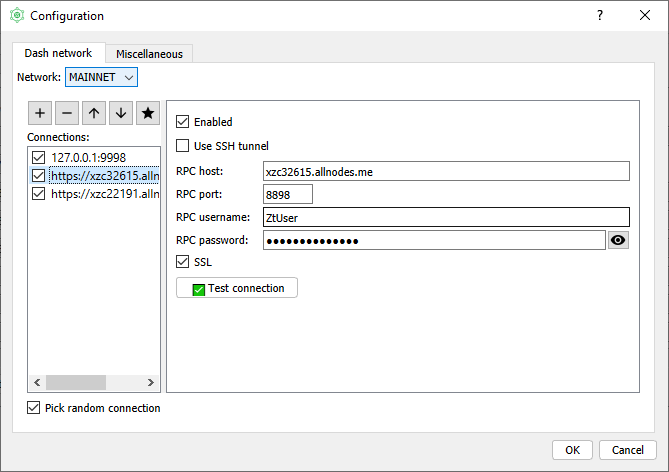
Importing the previous configuration will erase the remote nodes that comes with the new Firo Masternode Tool. Add them back in the File -> Settings -> Dash Network tab using the following information:
RPC host: firo32615.allnodes.me / firo22191.allnodes.me
RPC port: 8898
RPC username: ZtUser
RPC password: ZtUserPassword
SSL: On
Before starting, go to File -> Settings -> Miscellaneous, select your Hardware Wallet type and click on OK.
If you have imported your masternodes into Firo Masternode Tool, you can skip to Step 3.
Click on New. Leave all User Role checked. Fill in the name, IP address and port of the Masternode.

Unlock your hardware wallet and click Locate Collateral, select the relevant TX and click Apply.
The collateral address, collateral TX hash, and index should now be filled in automatically.
If you already have the information above, you can fill them in manually to make the process faster.

Click on Register Masternode.
Set a payout address for this Masternode. If you have filled in the Collateral Address earlier, it should appear here.
For privacy reasons, it is not recommended to use one payout address for all your masternodes. You also might want to use a different payout address rather than reusing your collateral address as payout.
Set operator reward (0% by default). If you are unsure, leave it at default as this cannot be changed later.
Owner private key and voting private key are generated by the Masternode Tool. Make sure both fields are the same.
If you are hosting your own Masternode, you can use the auto-generated operator private key.
If you are using a Masternode hosting provider, your provider will provide you with a operator public key. Click on Use Pubkey and enter the provided key.
Click on Continue.

Choose a method to submit the ProRegTx. If unsure, select Remote Zcoin RPC node. Choose the manual method if you have a Firo wallet running on the same machine and have sufficient Firo to create the transaction.
Once you have made your selection, click on Continue.
Wait until Preparing a ProRegTx transaction on a remote node says Success. After that, you will be prompted to confirm the transaction on hardware wallet. Please do so to continue.

On your Firo wallet, open the Debug Console and enter listaddressbalances 0.01. Choose an address with Firo in it to fund the ProRegTx. Paste the address to Section 1's box.
Some text will appear in the Section 2. Copy the command to the wallet's Debug Console and press Enter.
Now copy the output of the above command from the wallet's Debug Console to the text box in Section 3. Make sure that everything from the first { to the } is copied. Click on the 'Sign message with hardware wallet' and confirm the transaction on your hardware wallet.
Once the above is done, new text will appear in the Section 4 box. Copy it to the wallet's Debug Console and press Enter.
A transaction ID will result from the above command. Copy and paste it into the text box in Section 5 and click on Continue.

Congratulations, you have registered your deterministic Znode. If you set the operator private key yourself, you will be prompted to add it to the firo.conf on the Masternode. Click on Close to close the window and return to the main Firo Masternode Tool window.
Click on the Save icon to save your Master information. Click on New to add and register another Masternode.

To check your masternode's status, select your masternode from the dropdown menu and click on the Get Status button.
To check your masternode's status on the masternode itself, do ./firo-cli evoznode status. If everything was setup correctly, you should see your Znode's details along with these two lines at the bottom:
"state": "READY",
"status": "Ready
- Home
- Information for exchanges
- Technical and Troubleshooting
- Deterministic Masternodes
- Exchanges and Partners
- Vulnerability bounty program