Proof-of-concept Game Boy Advance (GBA) to USB controller, which uses Raspberry Pi Pico as a bridge.
This project is essentially a modified version of GP2040-CE that enables communication with the Game Boy Advance using the GBA link cable.
In the original GP2040-CE, key presses were received using pull-up GPIO signals.
However, The GBA link cable only provides 4 pins for the communication, which is insufficient for the 10 keys on the GBA.
To overcome this limitation, GP2040-CE was modified to utilize SPI for receiving packets from the GBA.
To send key presses on the GBA via SPI, an example program from the gba-link-connection was used with a minor modification.
To run this program on the GBA, gba_03_multiboot is ported to the RPi Pico.
This allows for sending a program from RPi Pico to GBA via SPI and running it, eliminating the need for additional hardware such as a flash cart.
And that's about it.
Read this in Korean(한국어) with a little more detail
-
Download the
gba-pico-gamepad-v*.uf2binary from the Release, and flash it to your RPi Pico.- You may have to nuke your RPi Pico before flashing it.
-
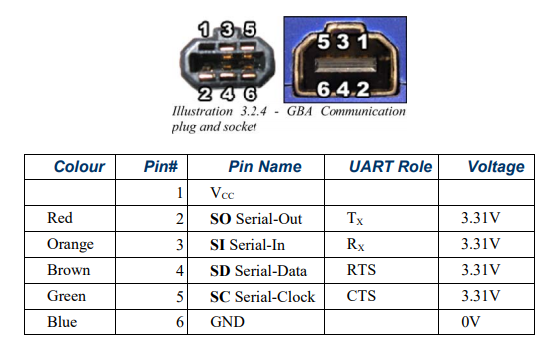
Cut your GBA link cable, and wire it to the RPi Pico as below.
- RPi Pico
21(SPI0 RX) pin <-> GBASOpin - RPi Pico
23(GND) pin <-> GBAGNDpin - RPi Pico
24(SPI0 SCK) pin <-> GBASCpin - RPi Pico
25(SPI0 TX) pin <-> GBASIpin - Raspberry Pi Pico Pinout
- GBA Link cable Pinout
- RPi Pico
-
Connect this cable to the GBA and turn it on without a cartridge.
- The program is sent from RPi Pico to GBA via multiboot, and with a cartridge it will not work.
-
Plug the USB Cable to your PC.
It will start sending the program once the GBA is ready.- You can hold down certain key on boot to change Input Mode.
- Note that the key binding is differ from the original.
- Hold
Bon boot -> Nintendo Switch - Hold
Aon boot -> XInput - Hold
Lon boot -> DirectInput/PS3 - Hold
Ron boot -> PS4
- You can change the D-Pad Mode anytime with certain key combination.
- GP2040-CE's Web Config is disabled.
- You can hold down certain key on boot to change Input Mode.
-
Enjoy your GBA as an USB gamepad.
- If you accidentally pulled out your cable, you can re-plug it and press
Startto reconnect.
- If you accidentally pulled out your cable, you can re-plug it and press
This is a build process for the Ubuntu 22.04.
You have to use WSL2 if you are on Windows.
-
Install devkitARM and
gba-devpackage. -
Install the dependencies via command below.
sudo apt install -y cmake xxd python3
-
Run this command to build.
Change the path if you have installed devkitARM somewhere else.
export DEVKITPRO=/opt/devkitpro/
export DEVKITARM=/opt/devkitpro/devkitARM/
export PATH=$DEVKITARM/bin:/$DEVKITPRO/tools/bin/:$PATH
export CC=$DEVKITARM/bin/arm-none-eabi-gcc
export CXX=$DEVKITARM/bin/arm-none-eabi-g++

./build.sh
-
If everything goes right, you should see the
build/gba-pico-gamepad.uf2binary.
This project is essentially an integration of the projects listed below.
Without them, this would not have been possible.
- gba-link-connection : Game Boy Advance (GBA) C++ libraries to interact with the Serial Port.
- GP2040-CE : Gamepad firmware for the Raspberry Pi Pico
- gba_03_multiboot : Raspberry Pi GBA Loader
- It's integrated in
GP2040-CE/src/gba/multiboot.cpp
- It's integrated in
See the license of each project above.
/build.sh is 0BSD.


