-
-
Notifications
You must be signed in to change notification settings - Fork 130
Technical Overview
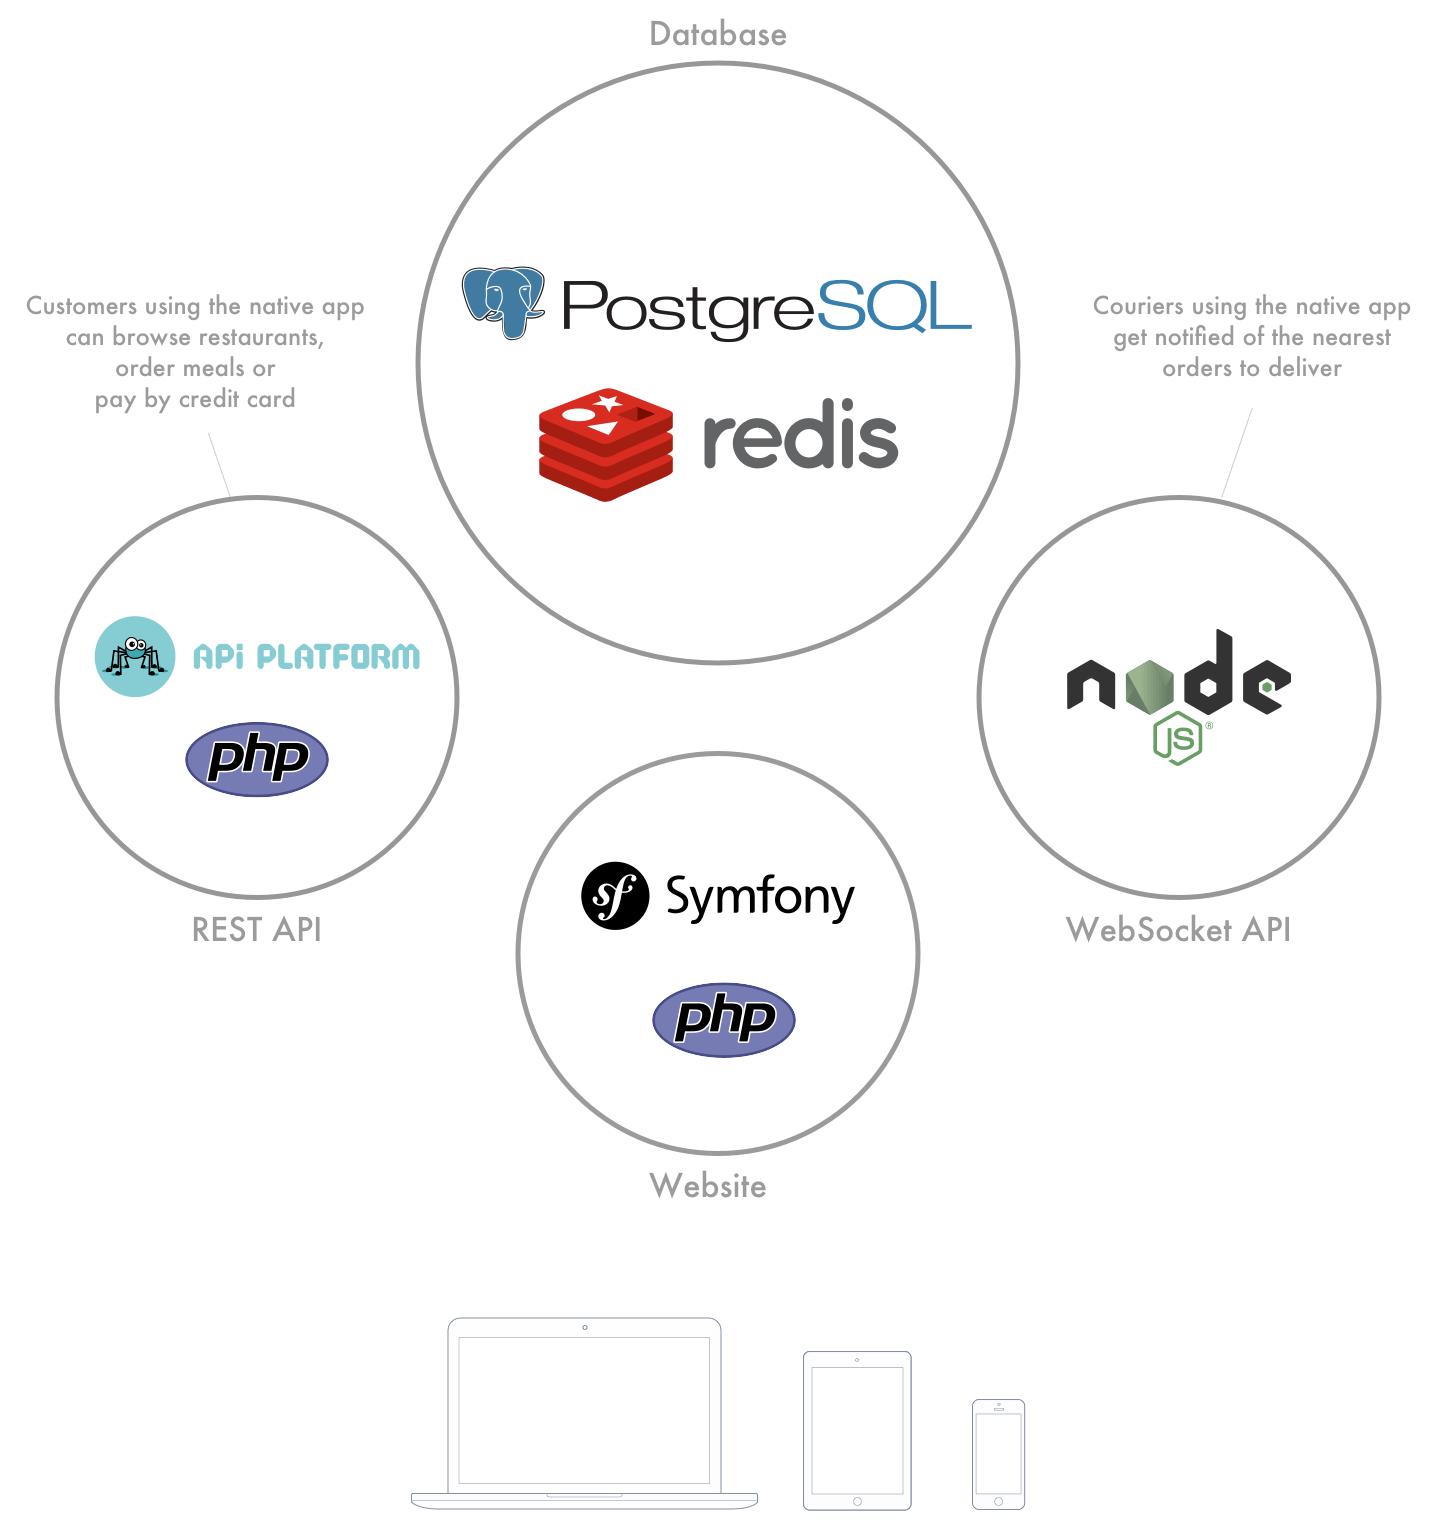
This repository is a monolith containing the platform itself. It is basically a PHP application backed by a PostgreSQL database + Redis/Node.js code to power the realtime services. It also provides a routing service with OSRM.

At the core of the platform, there is an HTTP API, powered by PHP7 & API Platform.
It is used by the apps for pretty everything (view restaurants, place orders…)
Depending on the API endpoint, requests need to be authenticated with JSON Web Token (for example, placing an order).
Also, each user in assigned a role.
This allows different levels of access rights towards the API (for example, customers may not be able to list orders).
To power the dispatch & tracking services, the platform provides WebSocket endpoints, powered by Node.js and/or socket.io.
The platform needs to determine quite often which is the best route to take by bike. To avoid reaching Google Directions API quotas, the platform runs its own routing engine.
It runs an OSRM server which can be used by the website or the apps.
To pay by credit card, the platform uses Stripe.
For countries where Stripe is not yet available (i.e. Argentina, Costa Rica, Brasil) the platform supports credit card payments with Mercadopago. You can test Mercadopago in your local environment following the next section instructions.
Mercadopago provides two ways to test the implementations: using the environment Sandbox given by them (we are using this for payments in web) or creating test users and simulate real operations (we are using this method for payments in app).
We recommend to create 3 tests users: a Marketplace user, a Seller user and a Buyer user. Check this documentation to create them.
Then you have to create an Application here. When you enter to that link you have to log in with the credentials of the user chosen to be the Marketplace owner (if you are already logged in with other user, logout and login with new credentials.)
In Products you have to select "Marketplace" option.
When you are creating the application is important to activate the permissions for read, write and offline_access.
The Redirect URL should be http://localhost/mercadopago/oauth/callback
(If any of these configurations are available when you are creating the app, you can edit it then and all the configurations will be available).
Enter to http://localhost/admin/settings and put the credentials of the application created in the previous step.
Then select a restaurant in http://localhost/admin/restaurants and go to "Payment" section. Click on "Connect with Mercadopago" (previously be sure that you are not logged in with any user in https://mercadopago.com). You are going to be prompted to log in, use the credentials of the test user chosen to be the Seller. If all it's ok you should be redirected to your localhost with a success message. This step will connect the Marketplace application with the Seller account, which will be allowed to sell products in the name of the Marketplace app.
Finally, create a new user in the platform (or edit an existing one) and set as its email the email of the test user choosen as the Buyer.
Web
Go to buy something in the web. In the Email asked in payment form put the email of the test buyer user. Select Credit Card and use the data of a test card. This flow can't be checked in mercadopago accounts because we're using TEST credentials and all the payment process is done in Sandbox environment where Mercadopago doesn't save anything about the payment.
Mobile
Go to buy something in the app logged in with the user which has the email of the test buyer user. Select pay with card and the Mercadopago flow will be opened. Use the data of a test credit card. If the checkout is successful you can log in to https://www.mercadopago.com with the seller user credentials and go to activities. You should see the sell in the list and if you go to its detail you can check the total amount of the sell, the discount of Mercadopago and the discount of delivery cost.
We have two ways to deal with the events/handler pattern in our code:
- PushNotification is a Command. It’s handled by PushNotificationHandler Command handler http://docs.simplebus.io/en/latest/Guides/command_bus.html which sends the data to RemotePushNotificationManager
- we have events for the Orders and Tasks lifecycle. it’s an Event with Event subscribers: http://docs.simplebus.io/en/latest/Guides/event_bus.html . this library is not in active development anymore, and Symfony has built-in support for these patterns nowadays: