Leaflet Osmand React ExpressJS Coordinates (X)
Note
Remember an "X" marks the spot.
Recieve and store coordinates via webhook and display them on a map through an interactive frontend.
Download node for your system and install it.
Download the repository code
Open up a terminal or gitbash etc.
Run the install command for example via npm
npm install
After completion without errors hit
npm run build
Once complete you can start the server using
npm run start
Tip
Build and start can be combined using
npm run dev
Error Message: KEY is missing in environment variables
Before you are able to login and use the webapplication, environment variables need to be setup.
Therefore you need to create a file .env and place it in the root of the project.
This file will be filled with secrets to protect your instance of LOREX.
Usage: open console run: node init/generateKey.js type desired key and hit enter copy output to .env add a line starting with: KEY= directly followed by your output
Prerequisite: KEY already generated! (may require server restart) Run the build command from the package.json (npm run build) Then call the compiled version of this script using the key as environment variable like so: KEY=your-key node ./init/generatePassword.js Enter your password Copy that to the Environment Variables and .env file USER_WHATEVER= followed by the output of the console
Important
In order to run automatic tests and create example data is is highly recommended to have a USER_TEST with the password of test
THe test user cannot be used in an production environment
Once completed rebuild / restart the server and open up localhost/login Login is now possible using the Username from the .env file in this example "WHATEVER" and the password that was created in the previous step.
Now the application is ready
Build and start the server for example using
npm run dev
Wait for the server to start and webpack to compile the assets.
Once done use a second command line to run
npm run test:data
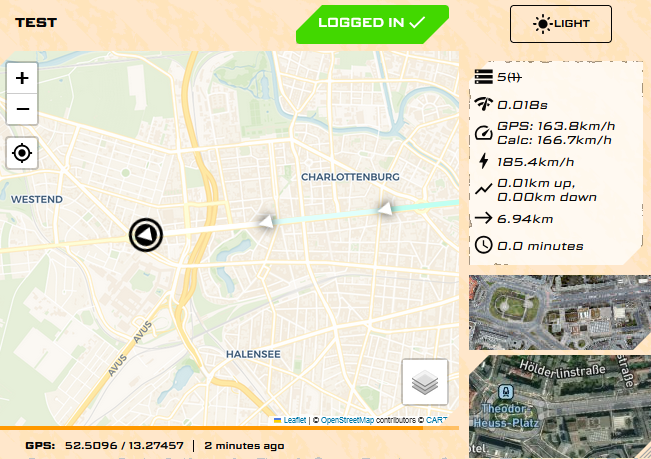
This generates 6 entries each 30s appart and calls the webserver to store this data. The writing of data can be seen in the first console where the server is running. Also once logged in under localhost, a map is visible showing a route westbound from the brandenburg gate.
Data can be generated by calling the /write rout of the server. Here is an example:
http://localhost/write?user=xx&lat=53.5000&lon=10.0×tamp=1720691648188&hdop=10.0&altitude=1000.000&speed=100.000&heading=180.0&eta=1720691659299&eda=1000&key=test
In order to pass validation use the correct key (or test in development envrioment) and create a valid UNIX timestamp.
For example by using this javascript code:
var a = new Date().getTime(); copy(a); a;
This application is not developed with https built in support.
Warning
It is advised to run this application in production mode behind a proxy that uses https for security reasons
Similar to the section Generating Data and Calling writing route manually, the application relies on data being provided using a webhook. Well how data is collected and what data is pushed to the system is user preference. Feel free to build you own application to do so.
This application is designed to be used with the OSMAND+ mobile app. Due to a plugin called Triprecording Using the above link or by clicking here more information can be found to setup webtracking or "online tracking"
Mapbox requires an access token. These can be created for free register required Once available, add it to the envrionment variables.
At this point, there is no demo, but here is a screenshot: