-
Notifications
You must be signed in to change notification settings - Fork 31
Multi Agency Configuration
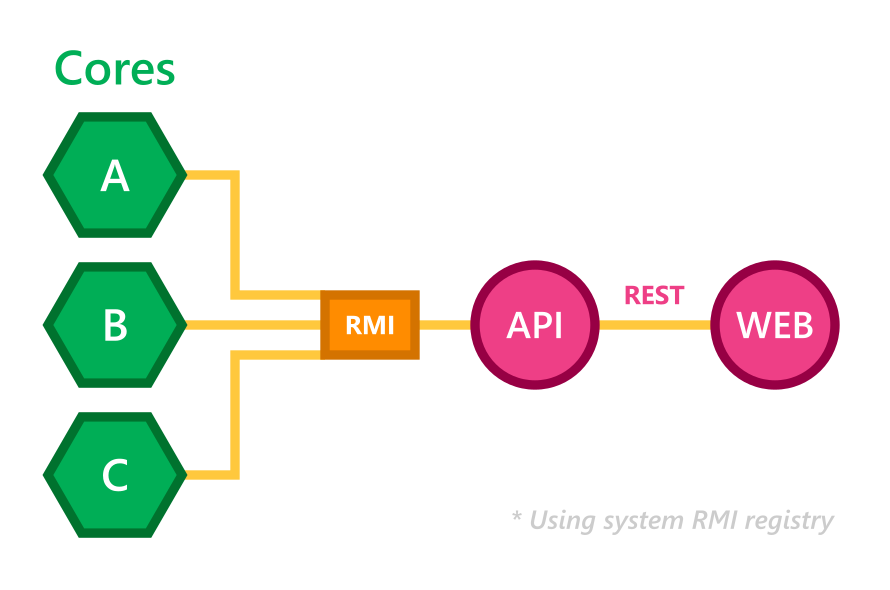
To run TheTransitClock with the Web and API modules, there are three components that need to be running: the Cores, API, and Web. Each application uses a Java properties file (1 per agency) to know the database and agency configuration.
No. The steps may be a bit longer in this guide, however, the process and structure remains the same. For single-agency instances, follow only the steps for the first agency.

The Core is the main application, which processes AVL and GTFS Realtime data to generate arrival predictions. One Core instance is needed per agency. To run the Core, the GTFS file for each agency must be loaded into an SQL database using the GtfsFileProcessor application.
The API is a Tomcat application that uses the RMI registry for communication with the Cores. Only one instance of the API is needed, and it can communicate with many cores at once.
The Web application uses the API's REST interface, and presents useful information to users: realtime maps, reports, a list of agencies, and API tools.
Create one database for each agency with permissions to create tables. PostgreSQL and MySQL are recommended for using TheTransitClock.
For the example on this page, this will include 2 agencies. Each core processes data for one agency only, so there will be 2 running cores by the end of the example.
# Replace database info below with your configuration
transitclock.core.agencyId=halifax
transitclock.db.dbUserName=DatabaseUsername
transitclock.db.dbPassword=DatabasePassword
transitclock.db.dbName=agency-halifax
transitclock.db.dbHost=0.0.0.0
transitclock.db.dbType=postgresql
transitclock.avl.gtfsRealtimeFeedURI=http://gtfs.halifax.ca/realtime/Vehicle/VehiclePositions.pb
transitclock.hibernate.connection.url=jdbc:postgresql://0.0.0.0:5432/agency-halifax
transitclock.hibernate.configFile=hibernate.cfg.xml
transitclock.modules.optionalModulesList=org.transitclock.avl.GtfsRealtimeModule
transitclock.web.mapTileUrl=https://tile.openstreetmap.org/{z}/{x}/{y}.png
transitclock.web.mapTileCopyright=OpenStreetMap
transitclock.rmi.secondaryRmiPort=0# This is a similar configuration used by the Quick Start example (Intercity)
transitclock.core.agencyId=tampa
transitclock.db.dbUserName=DatabaseUsername
transitclock.db.dbPassword=DatabasePassword
transitclock.db.dbName=agency-tampa
transitclock.db.dbHost=0.0.0.0
transitclock.db.dbType=postgresql
transitclock.avl.gtfsRealtimeFeedURI=http://api.tampa.onebusaway.org:8088/vehicle-positions
transitclock.hibernate.connection.url=jdbc:postgresql://0.0.0.0:5432/agency-tampa
transitclock.hibernate.configFile=hibernate.cfg.xml
transitclock.modules.optionalModulesList=org.transitclock.avl.GtfsRealtimeModule
transitclock.web.mapTileUrl=https://tile.openstreetmap.org/{z}/{x}/{y}.png
transitclock.web.mapTileCopyright=OpenStreetMap
transitclock.rmi.secondaryRmiPort=0<?xml version="1.0" encoding="utf-8"?>
<!DOCTYPE hibernate-configuration SYSTEM "http://www.hibernate.org/dtd/hibernate-configuration-3.0.dtd">
<hibernate-configuration>
<session-factory>
<property name="hibernate.dialect">
org.hibernate.dialect.PostgreSQLDialect
</property>
<property name="hibernate.connection.driver_class">
org.postgresql.Driver
</property>
<property name="format_sql">true</property>
<property name="use_sql_comments">true</property>
<property name="hibernate.c3p0.min_size">2</property>
<property name="hibernate.c3p0.max_size">20</property>
<property name="hibernate.c3p0.timeout">300</property>
<property name="hibernate.c3p0.max_statements">50</property>
<property name="hibernate.jdbc.batch_size">25</property>
</session-factory>
</hibernate-configuration>Be sure to specify the correct path to the properties file after the -c argument.
java \
  -Dtransitclock.logging.dir=/tmp \
  -cp Core.jar org.transitclock.applications.GtfsFileProcessor \
  -c "halifax.properties" \
  -storeNewRevs \
  -skipDeleteRevs \
  -gtfsUrl http://gtfs.halifax.ca/static/google_transit.zip \
-maxTravelTimeSegmentLength 100java \
-Dtransitclock.logging.dir=/tmp \
-cp Core.jar org.transitclock.applications.GtfsFileProcessor \
-c "tampa.properties" \
-storeNewRevs \
-skipDeleteRevs \
-gtfsUrl http://www.gohart.org/google/google_transit.zip \
-maxTravelTimeSegmentLength 100To access Core data through the API, an API key is needed. Complete this step for each agency. The API key will be stored in the table ApiKeys in each agency's respective database. This table is then accessed directly by the API.
java \
  -cp Core.jar org.transitclock.applications.CreateAPIKey \
  -c "halifax.properties" \
  -n "Kris Appleseed" \
  -u "https://www.google.com" \
  -e "info@example.com" \
  -p "8005555555" \
  -d "Core access application"
java \
-cp Core.jar org.transitclock.applications.CreateAPIKey \
-c "tampa.properties" \
-n "Kris Appleseed" \
-u "https://www.google.com" \
-e "info@example.com" \
-p "8005555555" \
-d "Core access application"All WebAgency data must be stored in the primary agency's database. For this example, Halifax Transit is the primary agency and all others that follow are secondary. The WebAgency will be stored in the table WebAgencies. This table is then accessed directly by the API.
java \
  -Dhibernate.connection.url=jdbc:postgresql://0.0.0.0:5432/agency-halifax \
  -Dhibernate.connection.username=DatabaseUsername \
  -Dhibernate.connection.password=DatabasePassword \
  -cp Core.jar org.transitclock.db.webstructs.WebAgency \
  halifax \
  127.0.0.1 \
  agency-halifax \
  postgresql \
  0.0.0.0 \
  DatabaseUsername \
DatabasePasswordRemember that WebAgency data is stored in the first (primary) agency's database.
java \
  -Dhibernate.connection.url=jdbc:postgresql://0.0.0.0:5432/agency-halifax \
  -Dhibernate.connection.username=DatabaseUsername \
  -Dhibernate.connection.password=DatabasePassword \
  -cp Core.jar org.transitclock.db.webstructs.WebAgency \
  tampa \
  127.0.0.1 \
  agency-halifax \
  postgresql \
  0.0.0.0 \
  DatabaseUsername \
DatabasePasswordrmiregistry &It's very important that the properties files have a correct database configuration for this step to work.
java \
  -Dtransitclock.configFiles=halifax.properties \
  -Dtransitclock.logging.dir=/tmp \
  -Dtransitclock.rmi.secondaryRmiPort=0 \
-jar Core.jarjava \
-Dtransitclock.configFiles=tampa.properties \
-Dtransitclock.logging.dir=/tmp \
-Dtransitclock.rmi.secondaryRmiPort=0 \
-jar Core.jar
Using Halifax's API key from earlier, set it as a system property for both Java and Catalina (Tomcat)
export JAVA_OPTS="-Dtransitclock.apikey=ABC123 \
-Dtransitclock.configFiles=/usr/local/transitclock/config/halifax.properties \
-Dtransitclock.hibernate.configFile=/usr/local/transitclock/config/hibernate.cfg.xml"

export CATALINA_OPTS="-Dtransitclock.apikey=ABC123 \
-Dtransitclock.configFiles=/usr/local/transitclock/config/halifax.properties \
-Dtransitclock.hibernate.configFile=/usr/local/transitclock/config/hibernate.cfg.xml"
Alternatively, you can set these properties in $CATALINA_HOME/bin/setenv.sh