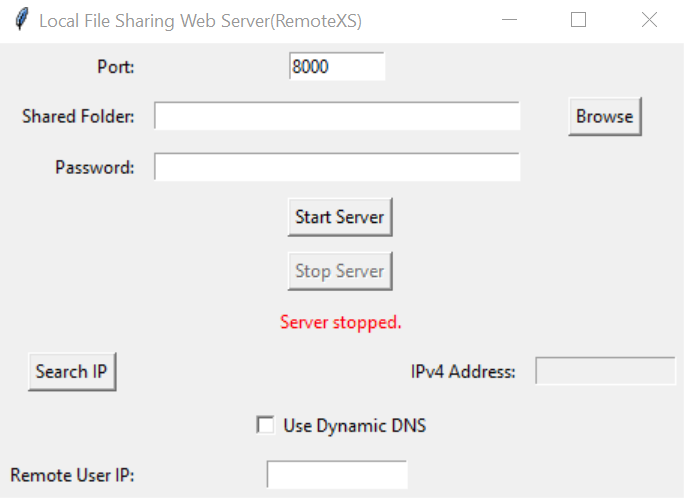
- Install library: Ensure you have Python installed the requests library: pip install requests
- Run the program: Save the provided Python code as a file named
RemoteXS.pyand then run it from your terminal usingpython RemoteXS.py.
- Port: Enter the desired port number for the web server (default is 8000). This is the port where the remote user will access the shared folder.
- Shared Folder: Click the "Browse" button to choose the folder on your computer that you want to share. This folder's contents will be accessible to the remote user.
- Password: Enter a strong password. This password will be required for the remote user to access the shared folder.
- Remote User IP: Enter the static IPv4 address of the remote user who will be accessing the shared files. (e.g., 192.168.1.10)
- Start Server: Click the "Start Server" button to start the web server and make your files accessible.
- Search IP: Click "Search IP" to display your computer's current IP address. The remote user will need this IP to access the shared folder.
- Use Dynamic DNS: Check the "Use Dynamic DNS" checkbox if you want to make your shared folder accessible even if your IP address changes.
- DDNS Provider: Enter the name of your dynamic DNS provider (e.g., No-IP).
- DDNS Domain: Enter the domain name associated with your DDNS account.
- DDNS Token: Enter your DDNS token or password. This is used for updating the IP address with your DNS provider.
- Open a web browser: The remote user should open a web browser on their device.
- Enter the address: They should type the following address in the browser's address bar, replacing
[your_IP_address]with the IP address you displayed in the "IPv4 Address" field:http://[your_IP_address]:[port_number] - Enter the password: The remote user will be prompted to enter the password you set for the shared folder (Admin should be empty).
- Click "Stop Server": When you are finished sharing the files, click the "Stop Server" button to stop the web server.
