
Twitter bot posting 5 frames every half hour from a 1 FPS episode of Nesr El Scene using Azure functions. Technically it can post frames of anything really. Here is how I made it.
So, you have found the best show ever. And you really want to make a twitter bot posting frames from this show like @SbFramesInOrder or @breaking_frames, how would you do it?
Firstly, you need a bot account on twitter. And a server hosting all the frames you will post and posting it regularly.
But servers are expensive right?
What if I told you that you don't need a server to run all of those things? Just write a small piece of code and run it on the cloud every a fixed interval.
This is called serverless computing. One of the serverless computing tools you can use is FaaS or Function as a Service in which you can write a code for a small program and the cloud provider will run it every interval you decide. Saving you the hassle of deployment and money of running a server running a small program every half an hour.
Now you know that we will use some serverless stuff. What do we need exactly?
- Twitter account for the bot
- Twitter developer account
- Microsoft azure account, I am using a student account giving me 100$ free credits annually with no credit card required
- NodeJS 14 LTS
- Visual studio code
- Azure functions extension
- Typescript
- Node twitter API v2
- youtube-dl
- FFmpeg
First, you need an azure functions app. Go to create a resource, then search for function app. Choose a name and a region, the runtime stack should be Node.js and version should be 14 LTS. Also, enable application insights, it will become handy later on.
Once azure finishes deployment, you will find some resources were initialized. The important ones are the Function App itself and the Storage Account.
For our function app to run correctly we need a storage medium. Azure provides us with a default storage account. We will specifically use a certain feature called Azure File Shares. The best part of it is that azure provides you with a Cloud Shell, which is a small server that you can run commands on.
Open the cloud shell from the top-right corner of you azure dashboard. Firstly azure will ask you to create a new storage account, we don't want that as we have an existing one.
Choose Advanced Options and choose the an existing storage account. It will ask you to choose a file share which you will not have at the moment, it would be better to create it from the storage account dashboard instead of accepting the prompt of creating a new file share in the cloud shell as it failed to create one for me.
Now you will have a small server with your storage mounted on it.
Requesting a Cloud Shell.Succeeded.
Connecting terminal...

Welcome to Azure Cloud Shell

Type "az" to use Azure CLI
Type "help" to learn about Cloud Shell

kareem@Azure:~$ ls
clouddrive
kareem@Azure:~$ cd clouddrive
kareem@Azure:~/clouddrive$
Next you can start downloading your favorite videos with youtube-dl (Nesr El Scene was available on Youtube, so I will be downloading videos from Youtube)
~/clouddrive$ pip install youtube-dl
~/clouddrive$ youtube-dl <URL> -f webm
Note that I downloaded the videos in webm format to get the best quality possible. Also, you might experience slow download speeds, most probably that is something to do with the storage account but I am not sure.
Now, we need to extract frames from the videos we have. The function will search for a folder named videos in the root. This folder can contain as many folders as you like, each one named with the episode name you want to show in the tweet. Each folder can have as many frames as you want.
The folders inside videos as well as the frames should be sorted correctly by name, please note that while naming the episode folders and when extracting the frames.
Let's download FFmpeg in the home folder and extract it
~/$ wget https://johnvansickle.com/ffmpeg/builds/ffmpeg-git-amd64-static.tar.xz
~/$ tar -xf ffmpeg-git-amd64-static.tar.xz
Then we can extract the frames using the following command
ffmpeg-5.0-amd64-static/ffmpeg -i <Video path> <Destination path>/thumb%06d.pngIf you have downloaded a different version you will need to change the ffmpeg path. The <Video path> and <Destination path> are self explanatory. The thumb%06d.png part is important. It means the frame number should always contain 6 digits, the first frame should be named thumb000001.png and so on. This is crucial for the application to figure out which frame is next. The number of frames should not exceed those 6 digits, if they do change the 6 to some bigger number.
Also, you need a state file for the function to save state, it is a JSON file keeping track of the current episode and frame. Initialize it with the following command in the root of the file share.
~$ cd clouddrive
~/clouddrive$ echo '{"folder":0,"file":0}' > state.json
Now you will have have finished setting up the files needed for the application to run.
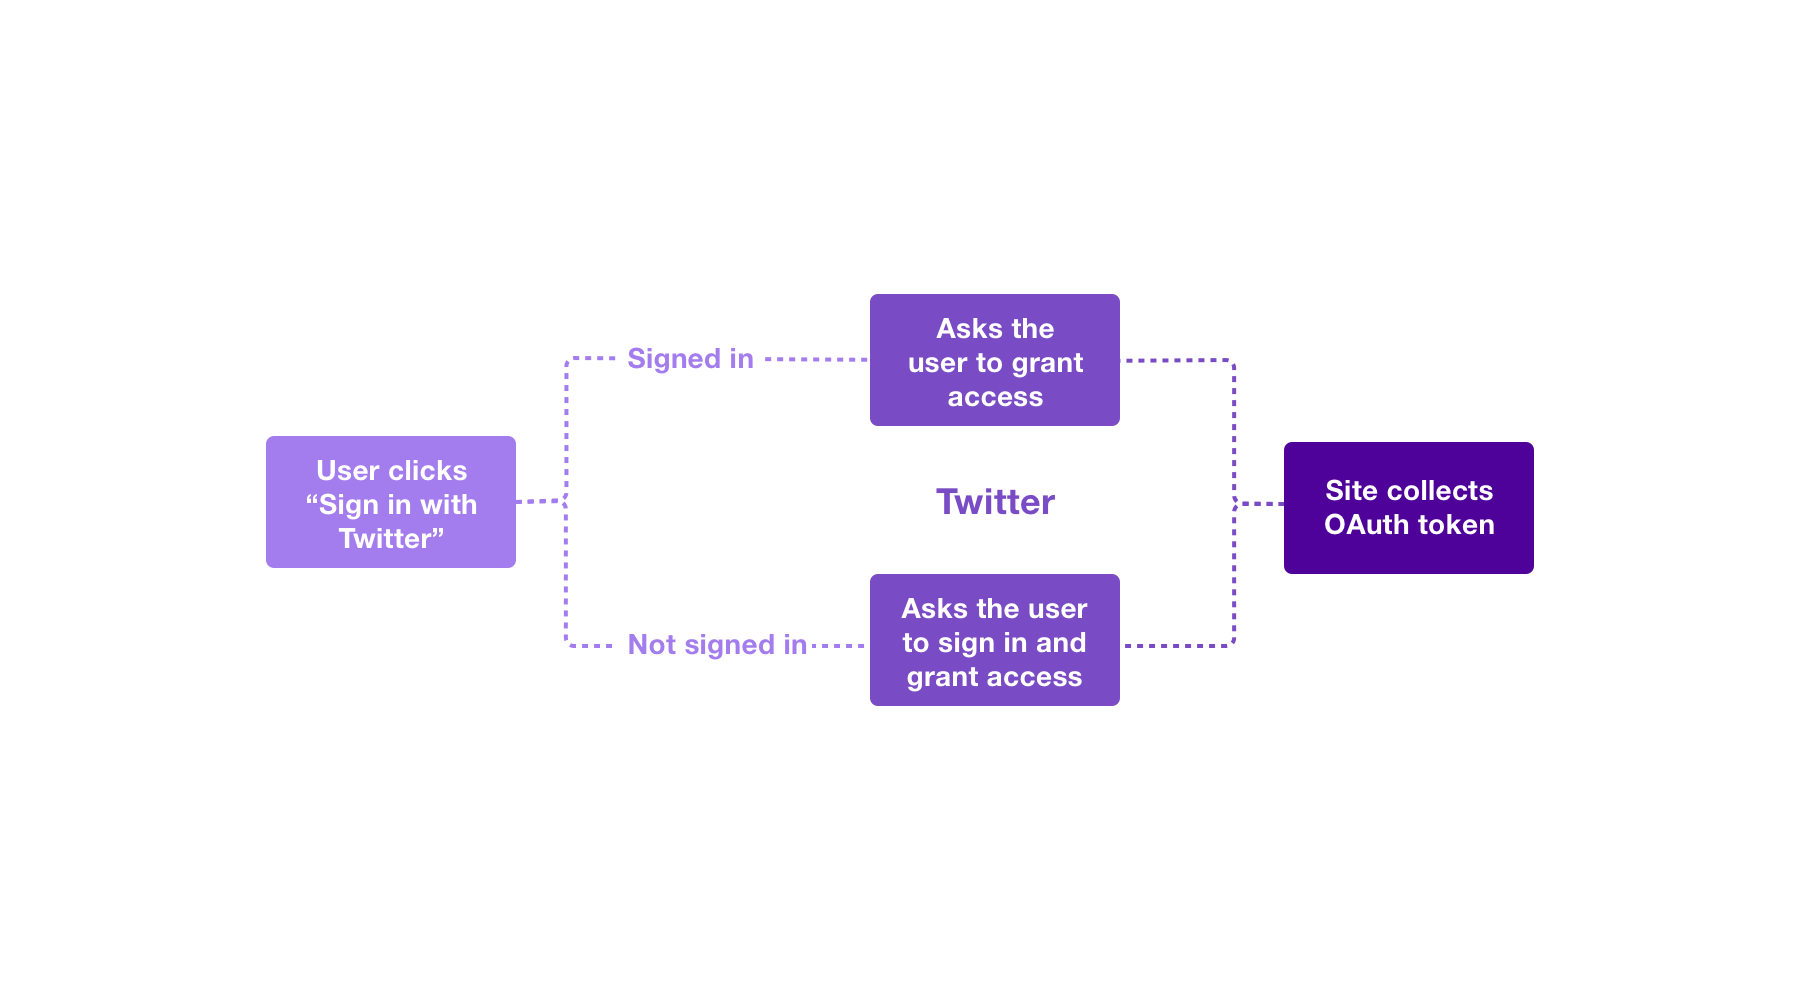
After you have created a twitter account for the bot, you will need to connect an app to this account. Then, you will use some secrets to control your authenticated account.
In the following steps we will be making RESTful HTTP requests. A REST client would come in handy for you to make those requests. I was using Postman as my client. Insomnia is an other choice recommended by twitter, also you can use curl if you are a cli lover.
Also, if you got stuck or need additional documentation, this twitter doc is what I used to create this bot.
Once you have created your twitter app you will receive your app token and secret. Those are like the username and password for your application (of course keep them safe), Once you connect (or authorize) your app with the bot account you will have another pair of token and secret for the user. Afterwards you will need all 4 of those to contact twitter with a request.
To obtain authenticate with the bot account we will be using a method called 3-legged OAuth flow. Here is how it works:
Create a POST oauth/request_token request using your favorite REST client. But note that you will need to sign your requests in OAuth 1.0a format using your app token and secret.
Postman provides me with a tool to do that, so I will just select OAuth 1.0a and make the request.
Finally, the POST request should look like this:
POST https://api.twitter.com/oauth/request_token?oauth_callback=ooboauth_callback is the callback URL for our application. Since we have no servers running to catch our tokens we put oob instead, this indicates that we will be using PIN-based authorization. This will redirect us to a special PIN instead.
The response of this endpoint will be something similar to this:
oauth_token=zlgW3QAAAAAA2_NZAAABfxxxxxxk&oauth_token_secret=pBYEQzdbyMqIcyDzyn0X7LDxxxxxxxxx&oauth_callback_confirmed=trueNow we can create our authorization URL using the before mentions oauth_token in the response. You will need to format your URL like this (with the above response as an example)
https://api.twitter.com/oauth/authenticate?oauth_token=zlgW3QAAAAAA2_NZAAABfxxxxxxkMake sure that you are authorizing the correct twitter account (I have fell for it), after authorizing you will receive a 7 digit PIN which you will use in the next step.
Now with the PIN you have got earlier, you will get the final user access token and secret.
You will make a POST request like this to oauth/access_token:
https://api.twitter.com/oauth/access_token?oauth_verifier=0535121&oauth_token=zlgW3QAAAAAA2_NZAAABfxxxxxxkoauth_verifieris your 7-digit PINoauth_tokenis the token you used to generate the authentication URL
You will get a response similar to this:
oauth_token=62532xx-eWudHldSbIaelX7swmsiHImEL4KinwaGloxxxxxx&oauth_token_secret=2EEfA6BG5ly3sR3XjE0IBSnlQu4ZrUzPiYxxxxxx&user_id=1458900662935343104&screen_name=NesrElFramesWhere oauth_token is the user access token for your bot, and oauth_token_secret is the user access secret.
Now we have all we need to make the bot work, we just need to change those values in code, right?
Storing secret data (API keys) in code is considered a bad practice because it will be easier to steal it. Remember, those keys are considered as you username and password, getting them compromised will compromise you account as well.
So, how can I store my keys safely in a cloud environment. Most cloud providers provide Secrets as a Service, we will use Azure Key Vault to keep our secrets safe. Then, we will provide it to the function as an environment variable.
Steps to setup the Key Vault are:
- Create a Key Vault in the same resource group as your function app.
- Enable Role-based access control in your function app, through
Function app -> Settings -> Identity -> System assigned -> Status On -> Save - Grant access to the Key vault, through
Key Vault -> Settings -> Access policies -> New -> Select function app and permissions -> Save
Now your function app can communicate with the Key Vault. We can start setting up the environment variables. You can setup them in Function app -> Settings -> Configuration.
Add them as ConsumerKey, ConsumerSecret, AccessToken, and TokenSecret. Their values should look like this:
@Microsoft.KeyVault(SecretUri=[Secret_Identifier])Where the SecretUri is the secret identifier for each key, you can find it in the Key Vault looking like this:
https://secretsvaultnesrelscene.vault.azure.net/secrets/AccessToken/c6xxxxxxxxxxxxxxxxxxxxxxxxxxxx6And the final value should look similar to this:
@Microsoft.KeyVault(SecretUri=[https://secretsvaultnesrelscene.vault.azure.net/secrets/AccessToken/c6xxxxxxxxxxxxxxxxxxxxxxxxxxxx6])If you got stuck refer to Sander van de Velde's article.
Now, you need to mount your storage file share to the function app using this command on the Cloud Shell using this command
az webapp config storage-account add --resource-group <resourceGroup> --name <functionApp> --custom-id <shareId> --storage-type AzureFiles --share-name <share> --account-name <AZURE_STORAGE_ACCOUNT> --mount-path /mnt --access-key <AZURE_STORAGE_KEY><resourceGroup>is the name of your created resource group<functionApp>is the name of the function app<shareId>is a custom ID, can be anything<share>is the name of your file share<AZURE_STORAGE_ACCOUNT>is the name of the storage account<AZURE_STORAGE_KEY>is the storage account key, can be found inStorage account -> Security + networking -> Access keys
At the time of creating the bot, the above command kept returning Invalid credentials, turned out to be a known bug in Azure servers, so if it did happen to you don't freak out, the file share is now mounted.
Now you can deploy your function using Visual studio code. The Azure functions extension should automatically identify this project as a Functions project. You can deploy this function to your azure account.
There are some constants you can tinker with in the code.
SKIPPEDFRAMESis the interval of the frames, it is set to 25, meaning it is tweeting the every 25th frame of the show.FRAMEEACHRUNis the number of frames tweeted each run, 5 means every time the script runs it tweets 5 frames.schedulein function.json. A schedule in the form of a cron expression used to decide when the script should run.
Using function apps was for minimizing cost of unnecessary resources, thus reducing costs. But because of my ad-hoc style of creating the bot these figures maybe change.
| Service name | Service resource | Spend |
|---|---|---|
| Storage | LRS Write Operations | $3.93 |
| Storage | LRS Data Stored | $2.70 |
| Storage | Read Operations | $0.31 |
| Storage | Protocol Operations | $0.27 |
| Log Analytics | Data Ingestion | $0.21 |
| Functions | Execution Time | $0.04 |
| Total | $7.46 |
These figures were recorded after processing 5 videos with 77,464 frames (52 minutes and 38 seconds) amounting to 132.25 GiB of data.
As seen above, the application was heavily optimized for execution as expected. But it wasn't optimized for storage which wasn't accounted for previously. Further improvements would be to optimize storage usage more, most likely by removing the need to store all frames on the disk and instead extracting only the needed frames using FFMPEG.

This application was made for fun and I have no intent to use it commercially and I am not endorsing anyone to use it in a way that harms content creators in any means.
Please if you want to use it credit the author of the movie/show, if you want to use this repository commercially you will have to get a consent from the show creator as well as me.
This software and its source code is licensed under the GNU General Public License v3.0, permissions of this strong copyleft license are conditioned on making available complete source code of licensed works and modifications. Please refer to the license for more information.