First off, let me start by what you 100% need to use this,
IF you have a 2024 ioniq 5, please check your entities and if they contain 2024 before the name if so replace all code with 2024_ioniq_5 instead of ioniq_5
Download from hacs the Hyundai bluelink integration, custom brand icons, card mod, slider-entity-row and custom button-card, also install ftp addon from addons as it will make this easier.
-
Upload files from fonts into your www folder (local) (not the font folder but the files within)
-
Upload the folders ioniq5a, ioniq5b (or ioniq6a, ioniq6b) as well as charge port into your www folder (local)
-
First Start off adding the Fonts and files you have uploaded from fonts folder to home assistant, to do this settings/Dashboards and then click the 3 dots in the top right and click resources. Click add resource and paste /local/loadfonts.js (make sure javascript module is selected, then click add resource again and paste /local/fonts.css and this time select style sheet.
-
NEXT OPEN THE configuration file.yaml you downloaded and open it, change only the text in bold and replace with the sensors asked for that you have in your hyundai/kia integration you installed. # Double check before continuing once you are sure its right, open your home assistant and go to studio code (or via file browser if you have samba setup) open the configuration.yaml in home assistant and copy and paste the text into your configuration.yaml in home assistant.
-
Go to developer tools, stay on the the yaml tab and scroll down and click on template entities
-
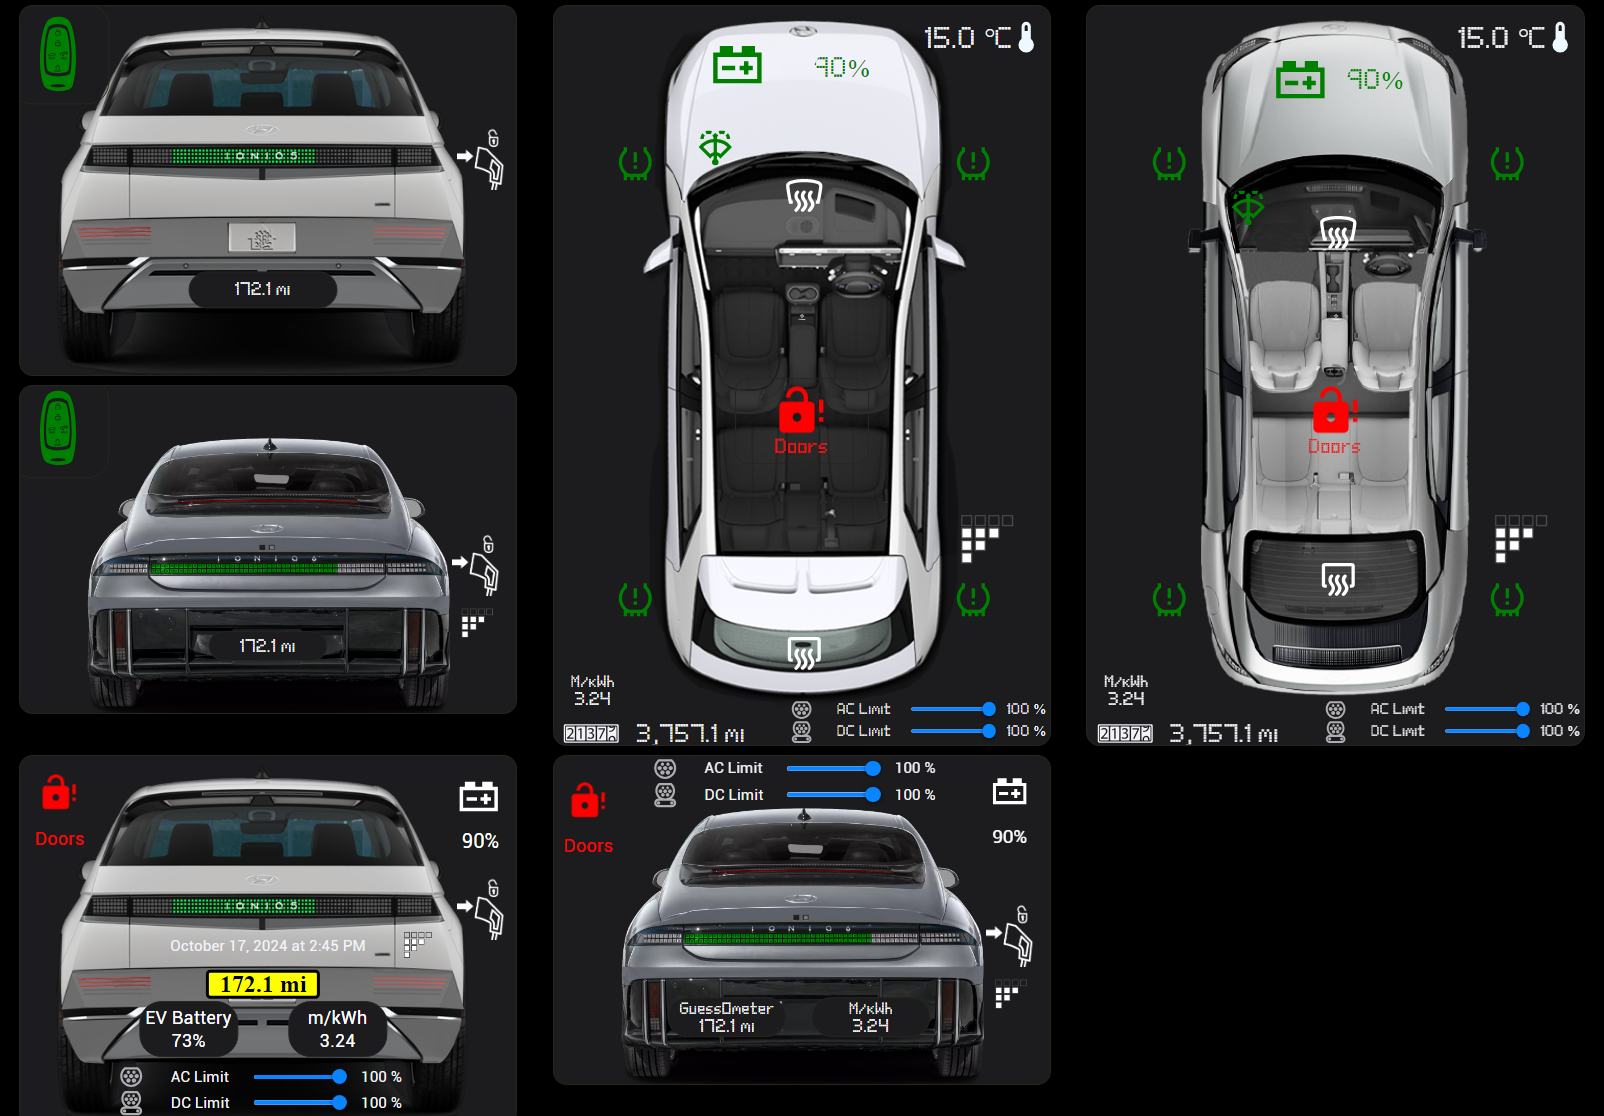
Decide if you want both top down and rear view, or just one of the two bottom ones from the photo are the alt versions.
-
once you have decided if you want the two seperate cards or single alt one, double click the ones you downloaded (warning I dont have a ioniq 6 so you will have to change the the caps lock sensors to match yours, once this is done follow the rest of the insturctions) copy this, open up the page in home assistant that you want the cards on, click add, then choose manual and then paste the content from the downloaded ioniq 6/5 back, top or alt files in, click save job done.
type: picture-elements
image: /local/ioniq5b/ioniq5-top-lhd.png ((or for 6 users use /local/ioniq6b/ioniq6-top-lhd.png )
elements:
  - type: image
    entity: device_tracker.ioniq5_device_tracker (ioniq 6 users put your device tracker in here for the car)
    image: /local/ioniq5b/ioniq5-top-lhd.png (or for 6 users use /local/ioniq6b/ioniq6-top-lhd.png )
    style:
      left: 50%
      top: 50%
      width: 100%
      heigth: 100%

  - type: image
    entity: binary_sensor.ioniq_5_steering_wheel_heater (ioniq 6 users put your steering wheel heater sensor in here)
    state_image:
      'off': /local/ioniq5b/wheel--lhd.png
      'on': /local/ioniq5b/wheel-on--lhd.png  (ioniq 6 users only need to change this entity to ---  'on': /local/ioniq6b/wheel-on--lhd.png
Sit back enjoy, Ill update the code if I add anymore (or if integration gets buttons added for start and stop charge in the future)
Thank you to Nathan Jones from facebook for the alt rear view idea and input and Carton on HA discord for help with the charge port code