-
Notifications
You must be signed in to change notification settings - Fork 9
Getting Started
This page will teach you the basics of creating a simple plugin in Sharpamp. Note that you have to have already installed Sharpamp (if not, download and run the latest installer from the downloads page.
Firstly, open Visual Studio if it's not already open. In Visual Studio, click File → New → Project. When the New Project dialog, click Visual C# on the side, and select the General Winamp Plugin template (under the My Templates heading). We'll just leave the name as "WinampPlugin1" for this example, but you can change it if you want to.
Make sure the Create directory for solution box is ticked, and click the OK button. Once you click the OK button, a solution with two projects is created. One project is the actual plugin itself, and one plugin is a small C++ wrapper for the plugin. You can't make normal DLLs in C#, so the C++ wrapper is (unfortunately) needed for Winamp to load the plugin. Luckily, you won't really have to worry about it or edit it. However, there is one thing you have to do: At the moment, the template doesn't add a reference that is required for the solution to compile (this will be fixed in future versions). To add this reference, do the following:
-
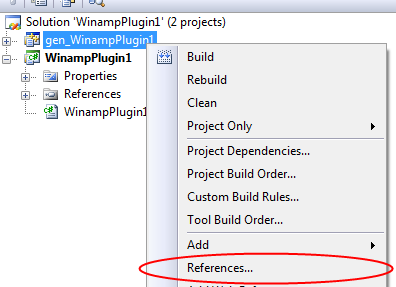
Right-click on the "gen_WinampPlugin1" project and click "References"
-
In the Property Pages dialog that comes up, click the Add New Reference button.
-
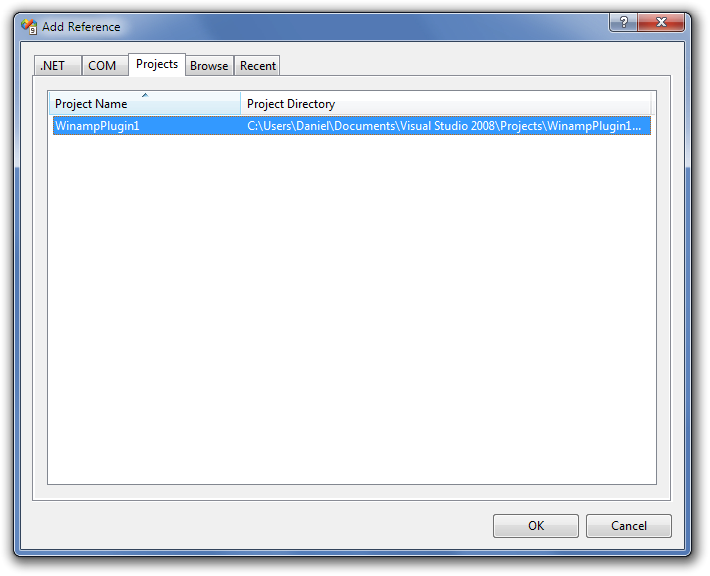
In the Add Reference dialog, click the Projects tab, and select WinampPlugin1 (or whatever you called your plugin)
-
Click OK on both dialogs.
Now that we've finished the set up, our plugin should compile successfully. However, it doesn't actually do anything at the moment. Let's make it do something very simple - Show a message box. WinampPlugin1.cs should already be open (if not, open it). Change its code to the following:
using System;

namespace WinampPlugin1
{
	public class WinampPlugin1 : Daniel15.Sharpamp.GeneralPlugin
	{
		public override string Name
		{
			get { return "Hello World!"; }
		}

		public override void Initialize()
		{
			System.Windows.Forms.MessageBox.Show("Hello world from a C# Winamp plugin!");
		}
	}
}
That's all we need for a very simple plugin. Click Build → Build Solution to compile the solution.
Success! If there were no errors, the plugin has been compiled, and is ready for use in Winamp. The next section covers how to actually use the plugin in Winamp
Now that you've got a plugin, it's time to actually use it in Winamp. If you open the Debug folder inside your project's folder, you'll notice that there are two DLL files: gen_WinampPlugin1.dll and WinampPlugin1.dll. Both are required for the plugin to work.
Debug directory
In order to "install" your plugin, copy the files as shown below:
- Copy gen_WinampPlugin1.dll to the Winamp plugins directory (C:\Program Files\Winamp\Plugins, or C:\Program Files (x86)\Winamp\Plugins on a 64-bit Windows installation)
- Copy WinampPlugin1.dll to the Winamp directory, NOT the plugins directory! (C:\Program Files\Winamp, or C:\Program Files (x86)\Winamp on a 64-bit Windows installation)
Note that you MUST copy the second file to the Winamp directory (not the plugins directory), otherwise Winamp will crash on startup. Also note that when you change your plugin, only the WinampPlugin1.dll will change (gen_WinampPlugin1.dll remains the same). So, if you update your plugin, you only have to re-copy the WinampPlugin1.dll file.
Now, start Winamp, and if everything worked, your message box should be shown when you start Winamp:
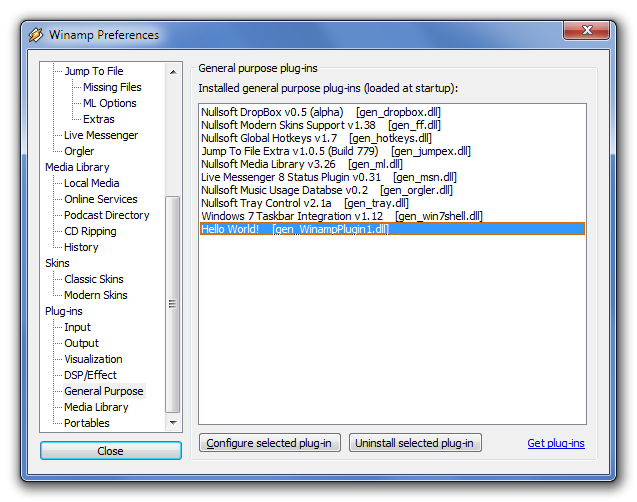
Also, if you open the Winamp preferences dialog and click on the Plugins → General Purpose section, you should notice that your plugin is listed:
That's all there is to it! For a more complicated example, take a look at the HelloWorldGUI sample application that comes with Sharpamp. Happy coding!


