Homematic Binding
Public 1.6.0 builds
Release Notes
Download
- RF and WIRED devices are supported
- CCU variables with synchronisation
- execute programs on the CCU
- flexible converter framework which should convert every datapoint of all devices
- fast and lightweight BIN-RPC communication with the CCU. The XML-RPC protocol is also supported.
- quick metadata and value sync with TclRega scripts. If you start openHAB or reload a item file, it only takes some seconds (with the CCU2) and all items have their states.
- local cache of all metadata and values to prevent unnecessary CCU calls.
- alive validation, if no event is received within a specified time, the binding restarts.
- action to send messages to a Homematic remote control with a display
Requirements:
CCU1 or CCU2
These ports are used by the binding:
TclRegaScript (required): 8181
RF components: 2001
WIRED components (optional): 2000
The CCU firewall must be configured to 'full access' for the Remote Homematic-Script API.
If you don't have a CCU, this may be interesting: CCU2 Firmware on ARM Hardware / lxccu
Important: It's not guarantied to be a 100% drop in replacement for the current Homematic binding, it MAY work without modifications to your configuration, but it's always better to validate if everything works as expected.
Limitation: Since i do not have every Homematic device, i can not test all possible datapoint bindings. The converter framework is rather generic and works with all my devices. If something does not work, i have implemented some tracing so i can try to fix it even without having the device.
These config params are used for the HomeMatic binding.
############################## Homematic Binding ##############################
#
# Hostname / IP address of the Homematic CCU
homematic:host=

# The communication with the CCU. xml for xmlrpc or bin for the lightweight binrpc, (optional, default is bin).
# homematic:rpc=

# Hostname / IP address for the callback server (optional, default is auto-discovery)
# This is normally the IP / hostname of the local host (but not "localhost" or "127.0.0.1").
# homematic:callback.host=

# Port number for the callback server. (optional, default is 9123)
# homematic:callback.port=

# The interval in seconds to check if the communication with the CCU is still alive.
# If no message receives from the CCU, the binding restarts. (optional, default is 300)
# homematic:alive.interval=
Available parameters:
- address: (datapoint) formerly id, the address of the datapoint, e.g KEQ0048285
- channel: (datapoint) the channel number, e.g. 5
- parameter: (datapoint) the name of the datapoint, e.g. PRESS_SHORT, LEVEL, ...
- variable: (variable) the name of the CCU variable
- program: (program) the name of the CCU program
- forceUpdate: (datapoint, variable) if true, the new value is always sent to the CCU even it's equal the current value
- action: (datapoint, variable, program) execute a action, RELOAD_VARIABLES or RELOAD_DATAPOINTS
Important: The current binding uses the attribute id for the address:
Switch Anyitem {homematic="id=KEQ0012345, channel=1, parameter=PRESS_SHORT"}
In this binding the attribute has changed to address:
Switch Anyitem {homematic="address=KEQ0012345, channel=1, parameter=PRESS_SHORT"}
Just do a search/replace and you are done. The id attribute is deprecated and will be removed in future versions!
Dimmer Light_Livingroom "Livingroom [%d %%]" <slider> {homematic="address=JEQ0123456, channel=1, parameter=LEVEL"}

Switch Remote_Key_01 "Remote Key 01" {homematic="address=KEQ0012345, channel=1, parameter=PRESS_SHORT"}

Rollershutter Kitchen_Window  "Kitchen Window [%d %%]" <rollershutter> {homematic="address=KEQ0012345, channel=1, parameter=LEVEL"}
For a window contact, you need a map too:
String Bath_Window "Bath_Window [MAP(window.map):%s]" <contact> {homematic="address=KEQ0123456, channel=1, parameter=STATE"}
CLOSED=closed
OPEN=open
TILTED=tilted
undefined=unknown
A documentation which device is proving which datapoint, please check the documentation from EQ3: Datapoints
// binds to the Homematic program 'Testprogram'.
// if you send a ON Command to the Switch, the program starts on the CCU
Switch Prog_Testprogram {homematic="program=Testprogram"}
// binds to a boolean variable named Holidaymode on the CCU
Switch Var_Holidaymode {homematic="variable=Holidaymode"}
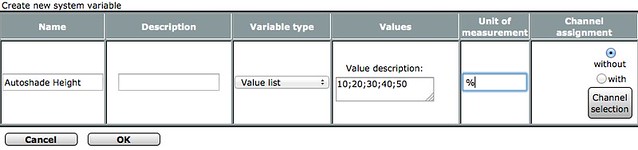
// binds to the INDEX of a valuelist variable (e.g with the values 10;20;30;40;50)
// shows 0 for 10, 1 for 20 ...
Number Var_Autoshade_height "Autoshade height index [%d]" {homematic="variable=Autoshade Height"}
// binds to the VALUE of a valuelist variable (e.g with the values 10;20;30;40;50)
// shows 10, 20 ...
String Var_Autoshade_height "Autoshade height [%s %%]" {homematic="variable=Autoshade Height"}
Sitemap for valuelist variables:
// if you bound the item to the INDEX with a Number Item
Selection item= Var_Autoshade_height mappings=[0="10", 1="20", 2="30", 3="40", 4="50"]

// if you bound the item to the VALUE with a String Item
Selection item= Var_Autoshade_height mappings=[10="10", 20="20", 30="30", 40="40", 50="50"]
The CCU only sends a message if a datapoint of a device has changed. There is (currently) no way to receive a event automatically when a variable has changed. But there is a solution ... variable sync. This is done with the help of the 'Virtual remote control' feature of the CCU. The CCU supports 50 virtual remote control channels and you can use one of them for variable sync.
Here is a example:
Connect to the CCU WebGui, go to devices, search a free 'Virtual remote control (wireless)' and name it as you want. In my example i use channel 1 with the name 'VK_Reload_Variable':

Now you need a item:
Switch Reload_Variables {homematic="address=BidCoS-RF, channel=1, parameter=PRESS_SHORT, action=RELOAD_VARIABLES"}
The key is the action attribute. The binding reloads all variables and publishes only changes to openHAB if the Switch receives ON. You can do this for example in a rule with a cron trigger to sync the variables in certain intervals. Or you do a manual reload from an App, GreenT, ...
If you want to do a reload immediately when a variable changes, you have to write (click together) a program on the CCU. The if condition checks all the variables you want if they have changed, the Activity is only one: send 'Button press short' to the previously bound 'Virtual remote control', in my example 'VK_Reload_Variable'.

Thats it ... if a variable (in my example Holidaymode) changes, the program starts and sends the 'button press short' to the 'Virtual remote control'. This event is published from the CCU to the binding and sends ON to the item with the action attribute. The binding reloads all variables and publishes the changes to openHAB.
The same you can do with the action RELOAD_DATAPOINTS to reload all datapoints. This is normally not necessary but recommended from time to time. The binding has a local cache of all metadata and values of the CCU. In case openHAB misses an event (event not received correctly, network problem, ...), this local cache and of course your items get stale and needs to be updated. With the action RELOAD_DATAPOINTS you can do this. In this example i use channel 2 of the 'Virtual remote control'
Switch Reload_Datapoints {homematic="address=BidCoS-RF, channel=2, parameter=PRESS_SHORT, action=RELOAD_DATAPOINTS"}
Just send ON to this Switch and all datapoints refreshes. Only changes are published to openHAB!
Example: reload all datapoints every 6 hours
import org.openhab.core.library.types.*

rule "Reload datapoints"
when
    Time cron "0 0 0/6 * * ?"   // every 6 hours
then
	sendCommand(Reload_Datapoints, ON)
end
As mentioned earlier, the binding manages a local cache of all metadata and values of the CCU. Lets say you have a rule which is doing something and updates an item bound to a Homematic device. The value is send to the CCU, the CCU sends it to the device and sends back an event to the binding which updates the item. If the new value (State) of an item is the same as the previous value, all this is unnecessary! The default behavior of the binding is to check if a value has changed and only send changed values to the CCU. Example:
Rollershutter Kitchen_Window "Kitchen Window [%d %%]" <rollershutter> {homematic="address=KEQ0012345, channel=1, parameter=LEVEL"}
If the Rollershutter is down and you send a DOWN to this item, the binding recognize this and does nothing. You can override this with the attribute forceUpdate in the binding.
Rollershutter Kitchen_Window "Kitchen Window [%d %%]" <rollershutter> {homematic="address=KEQ0012345, channel=1, parameter=LEVEL, forceUpdate=true"}
Now, if the Rollershutter is down and you send a DOWN to this item, the binding sends the value to the CCU. You hear the click of the relay in the Homematic device and nothing happens, because the Rollershutter is already down. In some situations it may be useful to always send the value to the CCU.
With the Homematic action you can send messages to a Homematic remote control with a display, currently the HM-RC-19-B (Radio remote control 19 button).
Put the file org.openhab.action.homematic-x.x.x.jar into the addons folder. The Homematic binding 1.5.0 (at least pb-04) or higher is also required.
Commands available:
sendHomematicDisplay(REMOTE_CONTROL_ADDRESS, TEXT);
sendHomematicDisplay(REMOTE_CONTROL_ADDRESS, TEXT, OPTIONS);
The remote control display is limited to five characters, a longer text is truncated.
You have several additional options to control the display.
- BEEP (TONE1, TONE2, TONE3) - let the remote control beep
- BACKLIGHT (BACKLIGHT_ON, BLINK_SLOW, BLINK_FAST) - control the display backlight
- UNIT (PERCENT, WATT, CELSIUS, FAHRENHEIT) - display one of these units
- SYMBOL (BULB, SWITCH, WINDOW, DOOR, BLIND, SCENE, PHONE, BELL, CLOCK, ARROW_UP, ARROW_DOWN) - display symbols, multiple symbols possible
You can combine any option, they must be separated by a comma. If you specify more than one option for BEEP, BACKLIGHT and UNIT, only the first one is taken into account and all others are ignored. For SYMBOL you can specify multiple options.
Examples:
show message TEST:
sendHomematicDisplay("KEQ0012345", "TEST");
show message TEXT, beep once and turn backlight on:
sendHomematicDisplay("KEQ0012345", "TEXT", "TONE1, BACKLIGHT_ON");
show message 15, beep once, turn backlight on and shows the celsius unit:
sendHomematicDisplay("KEQ0012345", "15", "TONE1, BACKLIGHT_ON, CELSIUS");
show message ALARM, beep three times, let the backlight blink fast and shows a bell symbol:
sendHomematicDisplay("KEQ0012345", "ALARM", "TONE3, BLINK_FAST, BELL");
Duplicate options: TONE3 is ignored, because TONE1 is specified previously.
sendHomematicDisplay("KEQ0012345", "TEXT", "TONE1, BLINK_FAST, TONE3");
Homematic has two service alerts, unreach and config_pending. For every device, these two datapoints are available at channel 0 and you can bind it to an item. So here is a example which displays the number of unreach devices. But only those which are really unreached. The same you can do with config pending (also in the example) and if the device is battery powered, you can also bind LOWBAT to see if the battery is low.
Item:
Group:Number:SUM Unreached     "Unreached devices [%d]"
Group:Number:SUM ConfigPending "Devices with config pending [%d]"

Number Rollershutter_Kitchen_Unreach "Rollershutter Kitchen unreached" (Unreached) {homematic="address=KEQxxxxx, channel=0, parameter=UNREACH"}
Number Light_Livingroom_Unreach      "Light Livingroom unreached"      (Unreached) {homematic="address=JEQxxxxx, channel=0, parameter=UNREACH"}

Number Rollershutter_Kitchen_Pending "Rollershutter Kitchen config pending" (ConfigPending) {homematic="address=KEQxxxxx, channel=0, parameter=CONFIG_PENDING"}
Number Light_Livingroom_Pending      "Light Livingroom config pending"      (ConfigPending) {homematic="address=JEQxxxxx, channel=0, parameter=CONFIG_PENDING"}
Sitemap:
sitemap homematic label="Example" {
  Frame label="Status" {
		Text item=Unreached labelcolor=[Unreached>0="red"] valuecolor=[>0="red"]
		Text item=Rollershutter_Kitchen_Unreach labelcolor=[Rollershutter_Kitchen_Unreach==1="red"] visibility=[Rollershutter_Kitchen_Unreach>0]
		Text item=Light_Livingroom_Unreach labelcolor=[Light_Livingroom_Unreach==1="red"] visibility=[Light_Livingroom_Unreach>0]

		Text item=ConfigPending labelcolor=[Unreached>0="red"] valuecolor=[>0="red"]
		Text item=Rollershutter_Kitchen_Pending labelcolor=[Rollershutter_Kitchen_Pending==1="red"] visibility=[Rollershutter_Kitchen_Pending>0]
		Text item=Light_Livingroom_Pending labelcolor=[Light_Livingroom_Pending==1="red"] visibility=[Light_Livingroom_Pending>0]
  }
}
These devices have been tested so far and confirmed as working:
- HM-CC-RT-DN (Electronic Wireless Radiator Thermostat)
- HM-CC-TC (Electronic Wireless Radiator Thermostat)
- HM-TC-IT-WM-W-EU (Wireless Room Thermostat)
- HM-ES-PMSw1-Pl (Wireless Switch Actuator 1-channel with power metering, plug adapter)
- HM-WDS10-TH-O (Outside radio-controlled temperature humidity sensor OTH)
- HM-WDS40-TH-I (Inside radio-controlled temperature humidity sensor IT)
- HM-WDS30-T-O (Outside radio-controlled temperature sensor )
- HM-WDS100-C6-O (Radio-controlled weather data sensor OC3)
- HM-RC-19-B (Radio remote control 19 button)
- HM-PBI-4-FM (Radio push-button interface, 4 channel flush-mount)
- HM-LC-Sw4-PCB (Switching actuator, PCB version)
- HM-LC-Sw4-WM (Switch actuator for wall mounting)
- HM-LC-Dim1T-FM (Radio-controlled dimming actuator 1-channel trailing edge flush-mount)
- HM-LC-Dim1T-Pl (Radio-controlled socket adapter dimming actuator 1-channel trailing edge)
- HM-LC-Dim1T-CV (Radio-controlled dimming actuator 1-channel trailing edge ceiling void mount)
- HM-LC-Dim1PWM-CV (Dimming actuator PWM DC-LED, Dropped Ceiling
- HM-LC-Sw1-Ba-PCB (Switch 1 channel PCB Version, low voltage)
- HM-LC-Sw1-Pl (Radio-controlled socket adapter switch actuator 1-channel trailing edge)
- HM-LC-Sw1-FM (Switch-/blind actuators flush-mount)
- HM-LC-Sw2-FM (Switch-/blind actuators flush-mount)
- HM-LC-Sw1PBU-FM (Radio-controlled switching actuator for brand switch systems, 1-channel flush-mount)
- HM-LC-Sw4-Ba-PCB (Switch 4 channel PCB Version, low voltage)
- HM-LC-Sw4-SM (Switch actuator surface-mount)
- HM-LC-Sw4-DR (Radio-controlled switch actuator 4-channel, for mounting on DIN rails)
- HM-LC-Bl1-FM (Switch-/blind actuators flush-mount)
- HM-LC-Bl1-SM (Blind actuators surface-mount)
- HM-LC-Bl1PBU-FM (Radio-controlled blind actuator for brand switch systems, 1-channel flush-mount)
- HM-OU-LED16 (Radio-controlled 16 channel LED Display + push button)
- HM-RC-4-2 (Remote control 4 channels)
- HM-Sen-MDIR-O (Wireless infrared motion detector outdoor)
- HM-Sec-RHS (Radio-controlled window rotary handle sensor)
- HM-Sec-Key-S (KeyMatic)
- HM-Sec-Win (WinMatic)
- HM-Sec-MDIR (Wireless motion detector)
- HM-Sec-SC (Radio-controlled shutter contact)
- HM-Sec-SC-2 (Radio-controlled shutter contact)
- HM-Sec-TiS (Tilt-sensor contact)
- HM-SCI-3-FM (Radio shutter contact interface 3-channel, flush-mount)
- HM-CC-VD (Radio-controlled valve drive)
- HM-PB-6-WM55 (Wireless push button 6 channel)
- HM-RC-12 (Radio remote control 12 button)
- HM-RC-Key3 (KeyMatic remote control)
- HM-PB-4Dis-WM (Radio push-button 4-gang with display)
- ZEL STG RM FFK (a HM-Sec-SC-2 from Rotomatic)
- HMW-Sen-SC-12-FM (RS485 12-channel shutter contact for flush mounting)
- HMW-Sen-SC-12-DR (RS485 12-channel shutter contact for mounting on DIN rails)
- HMW-IO-12-Sw7-DR (RS485 I/O module 12 inputs 7 switch outputs for mounting on DIN rails)
- HMW-LC-Dim1L-DR (Switch/dimming actuator, blind actuator Wired bus for mounting on DIN rails)
- HMW-IO-12-Sw14-DR (RS485 I/O-Modul 12 inputs 14 switch output for mounting on DIN rails)
MAX! devices (via Homegear)
- BC-SC-Rd-WM (Radio-controlled shutter contact)
- BC-SC-Rd-WM-2 (Radio-controlled shutter contact)
- BC-RT-TRX-CyG-3 (Electronic Wireless Radiator Thermostat)
If a button is not working and you do not see any PRESS_LONG / SHORT in your log file (loglevel DEBUG), it could be because of enabled security. Try to disable security of your buttons in the HomeMatic Web GUI and try again. If you can't disable security try to use key INSTALL_TEST which gets updated to ON for each key press
If you change the communication mode in openhab.cfg (homematic:rpc=), one of these exceptions may appear if you restart openHAB:
homematic:rpc=bin -> No BinX signature
homematic:rpc=xml -> BadRequestException: Binsystem.multicall
The binding registers itself with the CCU at startup with the specified communication mode. If you shutdown openHAB (or kill it) and the binding can not unregister successfully from the CCU, the CCU still sends messages. It does this for about three minutes, if there is no answer, it gives up. If you start openHAB in this period of time with another communication mode, these exceptions occur.
Just wait untill the exceptions disappear and restart openHAB. This happens only after switching the communication mode.
If you want to see what's going on in the binding, switch the loglevel in logback.xml to DEBUG.
<logger name="org.openhab.binding.homematic" level="DEBUG" />
If you want to see even more, switch to TRACE to also see the CCU request/response data.
<logger name="org.openhab.binding.homematic" level="TRACE" />
1.) Homegear support including variables and programs (Homegear scripts).
Note: You need at least 0.5.2 of Homegear. Since 0.5.5 you can even control MAX! devices without a cube!
2.) BATTERY_TYPE datapoint. Show the type of the battery for every battery-powered Homematic device.
String ... {homematic="address=KEQxxxxxxxx, channel=0, parameter=BATTERY_TYPE"}
3.) CCU group support. You can group together for example some thermostats and call group datapoints.
Number ... {homematic="address=INT0000001, channel=1, parameter=SET_TEMPERATURE“}
Note: The CCU does not send updates to a group! If you change the temperature manually, you have to write a rule to update the group:
var Timer thermostatChangedTimer = null

rule "Some Thermostat changed"
when
   Item thermostat_l changed or
   Item thermostat_2 changed or
   Item thermostat_3 changed
then
   if (thermostatChangedTimer != null) {
       thermostatChangedTimer.cancel;
       thermostatChangedTimer = null;
   }

   // reschedule timer to cover latest change
   thermostatChangedTimer = createTimer(now.plusSeconds(20)) [|
       sendCommand(thermostat_group, thermostat_1.state)
   ]
end
4.) Remote control display is now driven via RPC (formerly TclRega script)
5.) Many small optimizations
6.) CUxD Support
27.08.2014 (pb09): download binding, download action
- Optimized CCU firmware version extraction
- Fixed broken Homegear support in pb08
25.08.2014 (pb08): download binding, download action
- Fixed CCU firmware version extraction
16.08.2014 (pb07): download binding, download action
- Added state invert for MAX! window contacts
14.08.2014 (pb06): download binding, download action
- Added CUxD Support
21.07.2014 (pb05): download binding, download action
- initial public 1.6.0 build (works in openHab 1.5.x too)