| title | date | categories | tags | description | ||
|---|---|---|---|---|---|---|
RecyclerView绘制流程1 |
2020-03-08 |
|
|
|
onDraw(), onDrawOver()执行顺序和原因
RecyclerView源码:
public class RecyclerView extends ViewGroup implements ScrollingView, NestedScrollingChild2 {
    @Override
    public void draw(Canvas c) {
        super.draw(c);

        final int count = mItemDecorations.size();
        for (int i = 0; i < count; i++) {
            mItemDecorations.get(i).onDrawOver(c, this, mState);
        }

    @Override
    public void onDraw(Canvas c) {
        super.onDraw(c);

        final int count = mItemDecorations.size();
        for (int i = 0; i < count; i++) {
            mItemDecorations.get(i).onDraw(c, this, mState);
        }
    }
}
View源码:
public class View implements Drawable.Callback, KeyEvent.Callback,
        AccessibilityEventSource {
         public void draw(Canvas canvas) {
              // Step 3, draw the content
              if (!dirtyOpaque) onDraw(canvas);

              // Step 4, draw the children
              dispatchDraw(canvas);
         }
}
一般的绘制流程是:
drawBackground() onDraw() dispatchDraw() drawScrollBar()
一般情况下, 是不需要重写 View 的 draw()方法的, 如果一定要重写, 请先调用 super.draw()方法.
这里, RecyclerView 就重写了 draw()方法. 绘制的时候, 首先执行RecyclerView的 draw()方法. RecyclerView 的 draw()方法中第一行就是去执行 super.draw(), 即View的draw()方法。
在 View 的 draw()方法中, 先 drawBackground(), 再 onDraw(), 再 dispatchDraw(), 由于RecyclerView重写了onDraw()方法, 因此所以是先执行了RecyclerView中的onDraw()方法。 等 View 的 draw()执行完了, 也就是 super 执行好了, RecyclerView 的 draw 方法中才开始执行ItemDecorations的:onDrawOver()
因此,它们的执行顺序为:onDraw()->dispatchDraw()->onDrawOver()。
protected void onMeasure(int widthSpec, int heightSpec) {
        if (mLayout == null) {
            //layoutManager没有设置的话,直接走defaultOnMeasure的方法,所以会为空白
            // defaultOnMeasure()方法中 并没有测量子 View 的尺寸, 直接 setMeasuredDimension(width, height) 就结束了. 因此,是不会显示出来子 View 的.
            defaultOnMeasure(widthSpec, heightSpec);
            return;
        }
        if (mLayout.mAutoMeasure) { // 默认为 true
        // 如果 RecyclerView 的尺寸是准确的, 那就跳过测量步骤.
        // 什么时候 MeasureSpec 会是 EXACTLY呢?参考View measure 的过程
        // ①  父布局指定了EXACTLY, 比如 match_parent, 比如 xxdp, 子也指定了 xxdp
        // ②   父布局指定了EXACTLY, 比如 match_parent, 比如 xxdp, 子指定了 match
        // ③  父指定了 wrap, 子指定了 xxdp
        // 这几种 MeasureSpec 会是 EXACTLY
        // 出现这个情况, 就直接 return, 相当于跳过了测量的步骤
        // 正常情况, 在 onMeasure 中, 还要遍历子 View, 对子 View 进行测量, 这里直接跳过了. 会在 后面的 onLayout 中再对子 View 测量
            final boolean skipMeasure = widthMode == MeasureSpec.EXACTLY
                    && heightMode == MeasureSpec.EXACTLY;
            //如果测量是绝对值,则跳过measure过程直接走layout
            if (skipMeasure || mAdapter == null) {
                return;
            }


            if (mState.mLayoutStep == State.STEP_START) {
                //mLayoutStep默认值是 State.STEP_START
                // 在 step1, 做一些处理, 先不管
                 /**
                    * 1.处理Adapter的更新
                    * 2.决定那些动画需要执行
                    * 3.保存当前View的信息
                    * 4.如果必要的话,执行上一个Layout的操作并且保存他的信息
                    */
                dispatchLayoutStep1();
                //执行完dispatchLayoutStep1()后是State.STEP_LAYOUT
            }
             ..........
            //真正执行LayoutManager绘制的地方
            dispatchLayoutStep2();
            //执行完后是State.STEP_ANIMATIONS
             ..........
            // now we can get the width and height from the children.
            mLayout.setMeasuredDimensionFromChildren(widthSpec, heightSpec);
            ...
        } else {
            if (mHasFixedSize) {
                mLayout.onMeasure(mRecycler, mState, widthSpec, heightSpec);
                return;
            }
             ..........
            mLayout.onMeasure(mRecycler, mState, widthSpec, heightSpec);
             ..........
            mState.mInPreLayout = false; // clear
        }
    }
void defaultOnMeasure(int widthSpec, int heightSpec) {
// calling LayoutManager here is not pretty but that API is already public and it is better
// than creating another method since this is internal.
final int width = LayoutManager.chooseSize(widthSpec,
getPaddingLeft() + getPaddingRight(),
ViewCompat.getMinimumWidth(this));
final int height = LayoutManager.chooseSize(heightSpec,
getPaddingTop() + getPaddingBottom(),
ViewCompat.getMinimumHeight(this));
setMeasuredDimension(width, height);
}可以看到这里的chooseSize方法其实就是根据宽高的Mode得到相应的值后直接调用setMeasuredDimension(width, height)设置宽高了,可以发现这里其实是没有进行child的测量, 直接return结束了onMeasure过程,这也就解释了为什么我们没有设置LayoutManager会导致显示空白了。
private void dispatchLayoutStep2() {
        ....
        //重写的getItemCount方法
        mState.mItemCount = mAdapter.getItemCount();
        ....
        // Step 2: Run layout
        mState.mInPreLayout = false;
        mLayout.onLayoutChildren(mRecycler, mState);
        ....
    }
这里有一个mState,它是一个RecyclerView.State对象。顾名思义它是用来保存RecyclerView状态的一个对象,主要是用在LayoutManager、Adapter等组件之间共享RecyclerView状态的。
可以看到这个方法将布局的工作交给了mLayout。这里它的实例是LinearLayoutManager,RecyclerView将View的绘制交给了LayoutManager,因此接下来看一下LinearLayoutManager.onLayoutChildren():
public void onLayoutChildren(RecyclerView.Recycler recycler, RecyclerView.State state) {
        //计算锚点的位置和偏移量
        updateAnchorInfoForLayout(recycler, state, mAnchorInfo);

        if (mAnchorInfo.mLayoutFromEnd) {
            ...
        } else {
            //正常绘制流程的话,先往下绘制,再往上绘制, 走这个分支
            updateLayoutStateToFillEnd(mAnchorInfo);
            ....
            fill(recycler, mLayoutState, state, false);
             ....
            // fill towards start
            updateLayoutStateToFillStart(mAnchorInfo);
            ....
            fill(recycler, mLayoutState, state, false);
             ....
            if (mLayoutState.mAvailable > 0) {
                ....
                // start could not consume all it should. add more items towards end
                updateLayoutStateToFillEnd(lastElement, endOffset);
                 ....
                fill(recycler, mLayoutState, state, false);
                ....
            }
        }
        ....
        layoutForPredictiveAnimations(recycler, state, startOffset, endOffset);
        //完成后重置参数
        if (!state.isPreLayout()) {
            mOrientationHelper.onLayoutComplete();
        } else {
            mAnchorInfo.reset();
        }
        mLastStackFromEnd = mStackFromEnd;
    }
通过 updateAnchorInfoForLayout(recycler, state, mAnchorInfo); 计算锚点的位置. 如果是start to end, 那么就找最接近start(RecyclerView头部)的View作为布局的锚点View。如果是end to start (rtl), 就找最接近end的View作为布局的锚点。
AnchorInfo最重要的两个属性时mCoordinate和mPosition,找到锚点View后就会通过anchorInfo.assignFromView()方法来设置这两个属性:
- mCoordinate其实就是锚点View的Y(X)坐标去掉RecyclerView的padding。
- mPosition其实就是锚点View的位置。
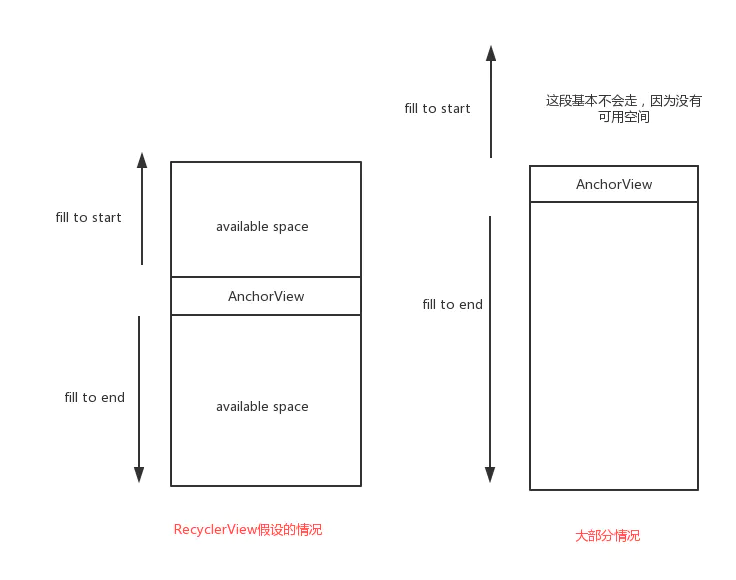
当确定好AnchorInfo后,需要根据AnchorInfo来确定RecyclerView当前可用于布局的空间,然后来摆放子View。
以布局方向为start to end (正常方向)为例, 这里的锚点View其实是RecyclerView最顶部的View:
    // fill towards end  (1)
    updateLayoutStateToFillEnd(mAnchorInfo); //确定AnchorView到RecyclerView的底部的布局可用空间
    ...
    fill(recycler, mLayoutState, state, false); //填充view, 从 AnchorView 到RecyclerView的底部
    endOffset = mLayoutState.mOffset;

    // fill towards start (2)
    updateLayoutStateToFillStart(mAnchorInfo); //确定AnchorView到RecyclerView的顶部的布局可用空间
    ...
    fill(recycler, mLayoutState, state, false); //填充view,从 AnchorView 到RecyclerView的顶部
上面我标注了(1)和(2), 1次布局是由这两部分组成的, 具体如下图所示 :
然后我们来看一下fill towards end的实现:
在fill之前,需要先确定从锚点View到RecyclerView底部有多少可用空间。是通过updateLayoutStateToFillEnd方法:
updateLayoutStateToFillEnd(anchorInfo.mPosition, anchorInfo.mCoordinate);

void updateLayoutStateToFillEnd(int itemPosition, int offset) {
    mLayoutState.mAvailable = mOrientationHelper.getEndAfterPadding() - offset;
    ...
}
mLayoutState是LinearLayoutManager用来保存布局状态的一个对象。
mLayoutState.mAvailable就是用来表示有多少空间可用来布局。mOrientationHelper.getEndAfterPadding() - offset其实大致可以理解为RecyclerView的高度。所以这里可用布局空间mLayoutState.mAvailable就是RecyclerView的高度
接下来继续看LinearLayoutManager.fill()方法,这个方法是布局的核心方法,是用来向RecyclerView中添加子View的方法:
int fill(RecyclerView.Recycler recycler, LayoutState layoutState, RecyclerView.State state, boolean stopOnFocusable) {
    final int start = layoutState.mAvailable;  //前面分析,其实就是RecyclerView的高度
    ...
    int remainingSpace = layoutState.mAvailable + layoutState.mExtra;  //extra 是你设置的额外布局的范围, 这个一般不推荐设置
    LayoutChunkResult layoutChunkResult = mLayoutChunkResult; //保存布局一个child view后的结果
    while ((layoutState.mInfinite || remainingSpace > 0) && layoutState.hasMore(state)) { //有剩余空间的话,并且当前 postion<getItemCount 就一直添加 childView
        ...
        layoutChunk(recycler, state, layoutState, layoutChunkResult);   //布局子View的核心方法
        ...
        layoutState.mOffset += layoutChunkResult.mConsumed * layoutState.mLayoutDirection; // 一次 layoutChunk 消耗了多少空间
        ...
        子View的回收工作
    }
    ...
}
注意一下 hasMore 方法:
        boolean hasMore(RecyclerView.State state) {
            return mCurrentPosition >= 0 && mCurrentPosition < state.getItemCount();
        }
这个方法的核心是调用layoutChunk()来不断消耗layoutState.mAvailable,直到消耗完毕。继续看一下layoutChunk()方法, 这个方法的主要逻辑是:
- 从Recycler中获取一个View
- 添加到RecyclerView中
- 调整View的布局参数,调用其measure、layout方法。
void layoutChunk(RecyclerView.Recycler recycler, RecyclerView.State state,LayoutState layoutState, LayoutChunkResult result) {
        View view = layoutState.next(recycler);  //这个方法会向 recycler view 要一个holder
        ...
        if (mShouldReverseLayout == (layoutState.mLayoutDirection == LayoutState.LAYOUT_START)) { //根据布局方向,添加到不同的位置
            addView(view);
        } else {
            addView(view, 0);
        }
        measureChildWithMargins(view, 0, 0);    //调用子view的measure

        ...measure后确定布局参数 left/top/right/bottom

        layoutDecoratedWithMargins(view, left, top, right, bottom); //调用子view的layout
        ...
    }
//测量ChildView
measureChildWithMargins(view, 0, 0);
//----------------------------------------------------------
public void measureChildWithMargins(View child, int widthUsed, int heightUsed) {
final LayoutParams lp = (LayoutParams) child.getLayoutParams();
//设置分割线中的回调方法
final Rect insets = mRecyclerView.getItemDecorInsetsForChild(child);
widthUsed += insets.left + insets.right;
heightUsed += insets.top + insets.bottom;
final int widthSpec = getChildMeasureSpec(getWidth(), getWidthMode(),
getPaddingLeft() + getPaddingRight()
+ lp.leftMargin + lp.rightMargin + widthUsed, lp.width,
canScrollHorizontally());
final int heightSpec = getChildMeasureSpec(getHeight(), getHeightMode(),
getPaddingTop() + getPaddingBottom()
+ lp.topMargin + lp.bottomMargin + heightUsed, lp.height,
canScrollVertically());
if (shouldMeasureChild(child, widthSpec, heightSpec, lp)) {
//子View的测量
child.measure(widthSpec, heightSpec);
}
}在 measureChildWithMargins() 方法中, 注意
    //设置分割线中的回调方法
    final Rect insets = mRecyclerView.getItemDecorInsetsForChild(child);


   Rect getItemDecorInsetsForChild(View child) {
        ...
        final Rect insets = lp.mDecorInsets;
        insets.set(0, 0, 0, 0);
        final int decorCount = mItemDecorations.size();
        for (int i = 0; i < decorCount; i++) {
            mTempRect.set(0, 0, 0, 0);
            //getItemOffsets()实现分割线的回调方法!
            mItemDecorations.get(i).getItemOffsets(mTempRect, child, this, mState);
            insets.left += mTempRect.left;
            insets.top += mTempRect.top;
            insets.right += mTempRect.right;
            insets.bottom += mTempRect.bottom;
        }
        lp.mInsetsDirty = false;
        return insets;
    }
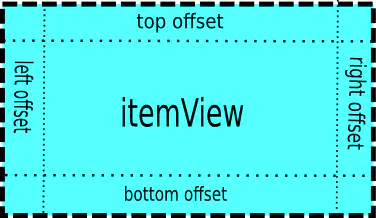
在测量子View的时候调用了 自定义分割线重写的getItemOffsets方法。这里其实也就可以理解了自定义分割线的原理就是在子View的测量过程前给上下左右加上自定义分割线所对应设置给这个child的边距。
测量完成后,紧接着就调用了layoutDecoratedWithMargins(view, left, top, right, bottom)对子View完成了layout。
public void layoutDecoratedWithMargins(View child, int left, int top, int right,
                int bottom) {
            final LayoutParams lp = (LayoutParams) child.getLayoutParams();
            final Rect insets = lp.mDecorInsets;
            //layout
            child.layout(left + insets.left + lp.leftMargin, top + insets.top + lp.topMargin,
                    right - insets.right - lp.rightMargin,
                    bottom - insets.bottom - lp.bottomMargin);
}
当所有的子 View 都测量完, layout 完, dispatchLayoutStep2() 就结束了, 然后调用了
mLayout.setMeasuredDimensionFromChildren(widthSpec, heightSpec);
最终通过 setMeasuredDimension(mRecyclerView.mTempRect, widthSpec, heightSpec); 设置了 RecyclerView 的尺寸
终于到此,我们对于onMeasure方法分析结束了,这里分析完成对于后面的onLayout的分析就比较简单了。
    @Override
    protected void onLayout(boolean changed, int l, int t, int r, int b) {
        dispatchLayout();
    }
void dispatchLayout() {
....
if (mState.mLayoutStep == State.STEP_START) {
dispatchLayoutStep1();
...
dispatchLayoutStep2();
} else if (mAdapterHelper.hasUpdates() || mLayout.getWidth() != getWidth()
|| mLayout.getHeight() != getHeight()) {
// First 2 steps are done in onMeasure but looks like we have to run again due to
// changed size.
...
dispatchLayoutStep2();
} else {
// always make sure we sync them (to ensure mode is exact)
mLayout.setExactMeasureSpecsFrom(this);
}
dispatchLayoutStep3();
}当我们给RecyclerView设置固定的宽高的时候(即 MeasureSpec= EXACTLY),onMeasure是直接跳过了执行,那么为什么子View仍然能绘制出来。 这里可以看到,如果onMeasure没有执行,mState.mLayoutStep == State.STEP_START就成立,所以仍然会执行 dispatchLayoutStep1(), dispatchLayoutStep2();也就对应的会绘制子View。
如果我们在Layout?measure?的时候改变了宽高,也会导致dispatchLayoutStep2();,也就是子View的重新绘制。
如果上面情况都没有,那么onLayout的作用就仅仅是dispatchLayoutStep3(),而 dispatchLayoutStep3()方法的作用除了重置一些参数,外还和执行动画有关。
0. RecyclerView.measure 调用 View 的 measure, 内部调用 onMeasure

1. RecyclerView.onMeasure

    > 2.dispatchLayoutStep1();

    > 3.dispatchLayoutStep2();

        > 4.LayoutManager.onLayoutChildren(mRecycler, mState);  真正完成子 View 的测量和布局工作

            > 5.计算锚点的位置和偏移量, 计算锚点到底部/顶部的可用空间有多少

            > 6.fill
                > 7.有剩余空间的话,并且当前 postion<getItemCount 就一直调用 layoutChunk() 添加 childView

                    > 8. layoutChunk()中执行: 从 recycler 中取出一个 view, 添加到 Recycler, 然后调用 子 view 的 measure 和 layout

    > 9.完了之后, 通过 `setMeasuredDimension(mRecyclerView.mTempRect, widthSpec, heightSpec);` 设置了 RecyclerView 的尺寸

10. RecyclerView.layout(), 由于 RecyclerView 没有重写 layout(), 调用 ViewGroup 的 layout(). ViewGroup 的 layout() 调用 super()

11. View 的 layout() 中, 先 setFrame, 然后  onLayout

12. 进入 RecyclerView 的 onLayout

13. RecyclerView 的 onLayout 根据情况, 再次调用dispatchLayoutStep1(); dispatchLayoutStep2(); dispatchLayoutStep3();

14. RecyclerView.draw()
- RecyclerView是将绘制流程交给LayoutManager处理,如果没有设置不会测量子View。
- LayoutManager获得View是从RecyclerView中的Recycler.next()方法获得,涉及到RecyclerView的缓存策略,如果缓存没有拿到,则走我们自己重写的onCreateView方法。
- 如果RecyclerView宽高没有写死,onMeasure就会执行完子View的measure和Layout方法,onLayout仅仅是重置一些参数,如果写死,子View的measure和layout会延后到onLayout中执行。
https://blog.csdn.net/m0_37796683/article/details/105141373
写的太好了.

