When starting a project many activities need to be done prior to writing code. These planning activities can be as lax or intensive as the project demands. One thing that all projects need is a folder structure that will house the code that will eventually be written. The structure of the folder can change based on the need or methodology, but the fact remains that there needs to be some type of structure. Think of it like a body without a skeleton. The body needs the structure from the skeleton structure to fill out the rest of the muscles, organs, etc.
NodeJS has quite a few built in modules. One of the modules is the file system module which helps with the creation, updating, reading and deletion of folders, files and such. It can be an afterthought given the other Node modules and variety of NPM packages that make our lives easier. However, the file system can be quite effective and this project utilizes that effectiveness to automate a folder structure.
To get started you will need to find, or make, a folder on your local computer to house your projects with this folder structure. From that folder you will need to make another folder that will act as the template folder.
  $mkdir XYZ // this folder will be the main project folder
  $cd XYZ
  $mkdir nodejsautodir
  $cd nodejsautodir
Then you can clone this github repo in whatever method you want. This is an example of one method:
$git clone https://github.com/dking1342/nodejsAutoDir.git
The methodology of the folder structure is similar to the MVC (model, view, controller) pattern. This is a common structure when developing software, web applications, etc. If you're not familiar to the MVC pattern then please see below for a diagram.
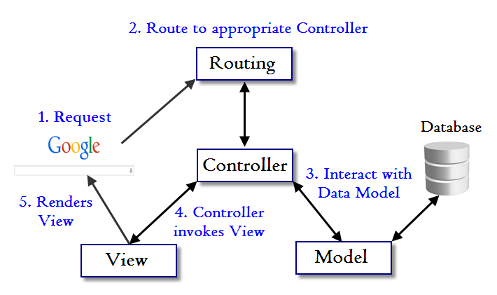
As seen in the diagram, the controller takes in the user requests from the browser in the form of a route. The route will carry such information in which the user is requesting the web app to respond. The controller then acts as a hub between the view and the model. The view is considered to be the rendered view a user will ultimately see in the browser. The model is considered to be the data. The model can be attached to a database where the data is transferred back and forth between the two. Once the view and model have what is required then it will be collated back by the controller and sent back to the user in the browser. The process flow is helpful when building as it tends to be much more scaleable and easier to maintain than writing all your code in one file.
There is only one folder which is the one already made in the 'Getting Started' section. The rest are files. To begin, let's explore some of the text files. The text files are replications of what the file will be in the intended format after the automation is completed. For example, some of the text files will eventually become an HTML file, CSS file or a Javascript file. In each of the text files, it has a boilerplate content which is suitable for the respective file. If you require more verbose content, then you can always edit it to reflect your initial boilerplate.
The javascript file called main.js is where the code for the folder structure is located. The fs module is imported first. A function then follows that will cover all the pertinent details.
It starts with a conditional statement which is there to ensure that you do not duplicate any folder name. This check will find any folder that has the same name as the project name you gave and stop it from going any futher. If no such folder name exists then it will move on to the next.
  if(fs.existsSync(`${__dirname}/../${projectName}`)){
      console.log('the project folder already exists');
  }
The first step taken is to initialize the project folder. As seen below the subfolders are nested when applicable. In this case, the views subfolder is seen and the boilerplate html file is nested inside the views subfolder.
  fs.mkdir(`${__dirname}/../${projectName}`,(err=>{
    if(err) throw err;
    console.log(`the ${projectName} folder didn't exists but a new folder has been made with this name`);

    // creation of the views subfolder
    fs.mkdir(`${__dirname}/../${projectName}/views`,(err=>{
        if(err) throw err;
        console.log('views folder added');

        // creation of the html file in the views subfolder
        fs.readFile('html.txt','utf8',(err,data)=>{
            if(err) throw err;
            fs.writeFile(`${__dirname}/../${projectName}/views/index.html`,data,'utf8',(err)=>{
                if(err) throw err;
                console.log('index html file made');
            });
        });
    })); // views folder
  })); // main folder
These blocks of code make use of the mkdir (make directory), readFile (read file) and writeFile (write file). I used a string literal format when pointing the directories and files. You could alternatively use the path module if that is more comfortable.
The same format is used repeatedly for each subfolder and/or file created. Here is an example of the config subfolder that configures a MongoDB connection. If you do not want to use MongoDB in place of another backend database then feel free to edit the text files and this portion of the code to meet your needs.
  // creation of the config subfolder
  fs.mkdir(`${__dirname}/../${projectName}/config`,(err=>{
      if(err) throw err;
      console.log('config folder added');

      // creation of mongo connection file
      fs.readFile('mongo.txt','utf8',(err,data)=>{
          if(err) throw err;
          fs.writeFile(`${__dirname}/../${projectName}/config/connection.js`,data,'utf8',(err)=>{
              if(err) throw err;
              console.log('mongo connection file made');
          })
      })

  })); // config subfolder
This pattern ends with the completion of the function. Outside this function is the invocation of the function name along with an argument that will be the name of your project.
buildNodeExpressTemplate('test21213');
Once you have edited the content of the text files, the main.js file and entered in the name you'd like to call the folder then the last step is to use Node to complete it. You can go to your preferred command prompt, shell, etc. and type in node main.js. This will run execute the inner workings of the function and you should see confirmation in your console with the message that show you've either successfully created various folders, files or that the folder name already exists. You will also see a new folder in your code editor or file directory.
This repo has helped you automate the initial steps of a project by helping build the folder structure you will use when going through your project. After this point, if more files or folders need to be created, edited or deleted then you'll need to do that manually as you normally would do so. Finally, these files are flexible so more or less content, folders or files can be made according to your comfort level, project design or other considerations. I certainly hope this repo is useful and helps you spend more time on creating value in the code that you end up writing.