Skincare feels like a never-ending experiment with a complicated cycle of trial and error. It is well known that skin is an indicator, by monitoring which we can prevent various serious deceases. Unfortunately, currently skin problems have no commonly used detection and solution algorithm. However, technological progress provides us with computational resources, which are widespread and powerful and can help us to make a huge step towards the solution of the skincare problem and make the detection of skin issues available from home for everyone. The goal of the Project Laboratory is to build a neural network for image processing, that will detect skin problems. Since one of the most visible and wide-spread skin problem is acne, it can become the first skin problem that will be detected by the neural network. In the frames of this Project, the students were engaged in developing a mobile face care application that will help users to track the state of their skin.
- User is able to access application via the email registration
- After the email is successfully verified, user is able to access his profile
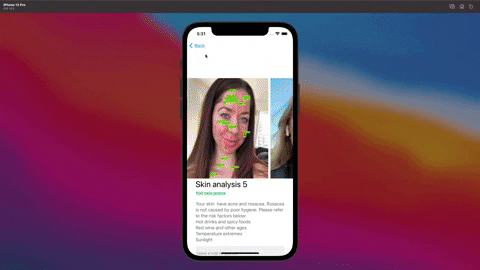
- On the main page user is able to see some of his previous analysis.
- Via tapping on the anallysis, the page with detailed description is opened.
- User can add a new photo from the gallery for the analysis
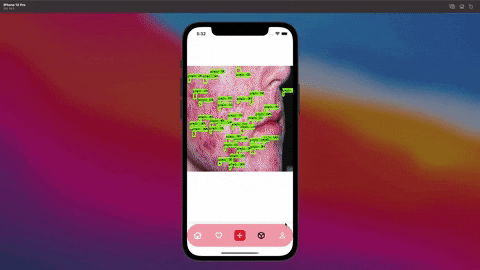
- User will be able to receive the results later, pressing the "Box" item.
- "News feed" functionaloty is available for the user, where he can see some articles related to the skincare and beauty topics
The Google Firebase was used to implement login and registration functionality. All the users and their encrypted passwords are stored in the firebase database
First of all SWIFT UIKit was chosen to build the user interface, however, after the thorough investigation design of the project was implemented using the SwiftUI library.


Local Python server (https://github.com/AirinB/SkinTrackingApp )is supposed to be run to let the application work. When user uploads the photo it is initially uploaded to the Firebse storage and download link is is sent to the locally running server via the POST HTTP request. Server is downloading the image, processes it (it contains AI model trained to detect pimples), uploads to the Firebase and sends the processed image download link as a response. After this, the response link is saved to UserDefault. When user clicks to the "box" icon on the navigation bar, processed image is retrieved and shown to him/her. Image is saved to the local storage later, and added to the list of the last user analysis.
News API was chosen for the implementation of the beauty news feed. The MVVP pattern is used to implement it: View contains ViewModel and ViewModel contains the NewsService, which fires the events when the API call is done. Based on these events ViewModel updates the view.

git clone https://github.com/danilashtefan/SkinCareClient.git- in the main folder
pod install - run the project using Xcode simulator

Skin is the human body's largest organ, which requires constant control and supervision. It is well known that skin is an indicator of people’s health, so by monitoring its condition various serious diseases can be prevented. Unfortunately, currently skin problems have no commonly used detection and solution algorithm. However, technological progress provides us with computational resources, which are widespread and powerful and can help us to make a huge step towards the solution of the skincare problem and make the detection of skin issues available from home for everyone.
Skin tracking API is working on top of the object detection model that we trained with publicly available data. I receives a POST request and sends the data to the processing model which detects acne on the photo and sends as a result the link from where the processed image can be downloaded.
        data={'url': 'https://sampleurl/image.jpg '}
        x = requests.post(server_url, data=my_obj)
print(x.content){
'processed_image_url: 'https://sampleprocessedimageurl/image.jpg'
}For the server we used a Python micro web framework flask, that made the communication through Http very easy. For the uploading of the processed images we used firebase. The processing itself is done by the processing service which is with the model that we trained using the object-detection library build on top of tensorflow.
We created 2 versions for the processed model. The first one did not satisfy the requirements because it had very bad accuracy. So we researched how we could imporove the model and we tried the following tecqniques:
- More data
- Much more accurate labling of the skin issues
- Augmenting the data that we collected
For both models we followed the following steps
Unfortunately there are not public datasets collected for the acne, so we surfed the internet in order to collect all the dataset. It is important to have a diverse dataset in order to not have a biased model. Especially when identifiing skin issues such as acne is very important to handle different nationalities, skin color and different forms of acne such as whiteheads, blackheads, papules, pustules, nodule and other. Since we are limited in the data the model might be not very accurate for the following reasons.
Because this is a classification problem it is required to label images, labelImg is a python based tool that was used for this purpose. It generates a corresponding *.xml file which is used then by the object-detection


As the first step in training the model, a TensorFlow XML-to-TFRecord converter was used in order to transform the *.xml to *.records. Secondly, the SSD ResNet50 V1 FPN 640x640 model from the TensorFlow 2 Detection Model Zoo was used to provide the neural network the ability to detect custom objects. Several parameters were edited in the pipeline.config file so that it would use the appropriate training data and some minor details, such as metrics and batch size, were changed. From the object-detection repository the model_main_tf2.py was incorporated into the project and ran as a training job. This model was run on several computers with different RAM and with/without GPU. In total every training cycle took from 5h to 12h. Tensor board, demonstrated in the following figure allowed to monitor the process.