-
Notifications
You must be signed in to change notification settings - Fork 18
Quick Start
So you want to start with integration of Arrow Client into your device or you just want to play with it? Good! This is the document you should read. In this little how to, we go briefly through compilation, setting up your environment, application usage and the pairing procedure. In the end, you will know what Arrow Client really is and how it works.
In order to make it simple, we will go only through direct compilation here. If you need to set up a cross-compiler, take a look at this page. Now, let's get started! Arrow Client should be able to run in any Linux environment. Currently, it is tested only on Linux x86, x86_64 and ARM architectures. It is written mostly in Rust and there is also a small part written in C. So first of all, you will need a copy of Rust compiler and gcc. Installation is pretty simple, you can get your copy of Rust compiler here:
https://www.rust-lang.org/downloads.html
In case of gcc, it is enough to install the package provided with your distribution. For a Debian-based distribution, run:
sudo apt-get install gccFedora users will need to use this command:
sudo dnf install gccAssuming you have gcc and the Rust compiler installed, you will also need to install some dependencies. Arrow Client has several dependencies but don't worry. You will have to install only one. The others are downloaded automatically. Depending on you distribution, you will have to install OpenSSL development files. In case of Ubuntu, Debian, Raspbian and possibly other Debian-based distributions, you will need a package called libssl-dev:
sudo apt-get install libssl-devIn case of Fedora, the package name is openssl-devel:
sudo dnf install openssl-develThis is it! We have everything we need to compile Arrow Client. We just need to clone this repository and compile the client:
git clone https://github.com/angelcam/arrow-client.git arrow-client
cd arrow-client
cargo build
The resulting binary is called arrow-client and you will find it in the target/debug/ sub-directory.
If you want to use also the network scanning feature, you will have to install one more dependency and compile the client with this feature enabled. Users of Debian-based distributions can use this command:
sudo apt-get install libpcap-devFedora users will use:
sudo dnf install libpcap-develThe compilation command changes to:
cargo build --features "discovery"Arrow Client requires access to /etc/arrow directory to store its configuration and it also needs a file containing RTSP paths in case the network scanning is enabled. The file must be in /etc/arrow/rtsp-paths. You can use the rtsp-paths file from this repository.
sudo mkdir /etc/arrow
sudo cp rtsp-paths /etc/arrow/rtsp-pathsFirst of all, you will need an RTSP server with H.264 video stream and RTP over TCP support. Let us suppose the stream is accessible at:
rtsp://localhost/webcam.264
Our Arrow Servers are accessible at:
arr-rs.angelcam.com:8900
This is the address your client should connect to. You will also need a CA certificate to verify server's identity. Currently, we use a self signed certificate, you can find it in this repository. The certificate will be later replaced by a proper EV certificate, so you should also tell the client where it can find the CA certificates in your system. The application requires root privileges in order to access your network interfaces. All logs can be found in your syslog. Assuming you are logged in as root and the arrow-client is in your PATH, you can use a command like this:
arrow-client arr-rs.angelcam.com:8900 \
    -c /usr/share/ca-certificates \
    -c ca.pem \
    -r "rtsp://localhost/webcam.264"
For more options, start the application without any arguments.
Assuming you have your client running and it knows about at least one IP camera with RTSP and H.264 support, you can proceed to the pairing procedure. This procedure is designed to verify you as an owner of the Arrow Client and it lets you add all IP cameras visible to the client under your Angelcam account. For security reasons, it is possible to initiate the pairing procedure only within the first 20 minutes after the application is started, so it is a good idea to restart the client first.
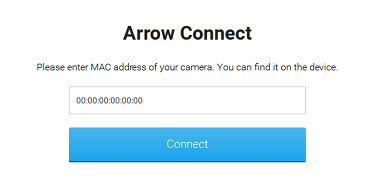
When you are ready, go to the this web page and enter MAC address of the device running the Arrow Client (the client uses MAC address of the first configured ethernet/wlan interface):

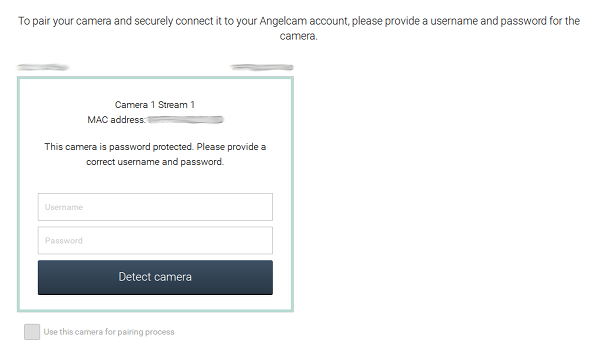
In case the IP camera is password protected, you will see a form allowing you to enter the credentials.

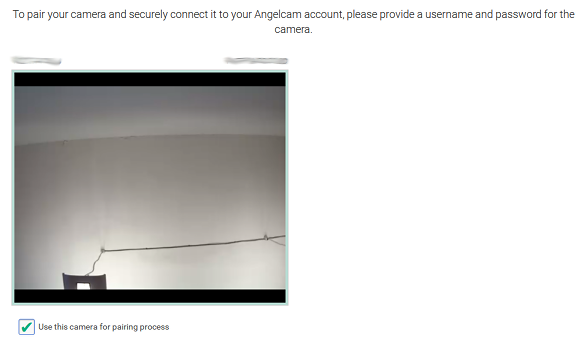
After entering them, you should be able to see the stream from the camera. Proceed by clicking on the checkbox under the stream.

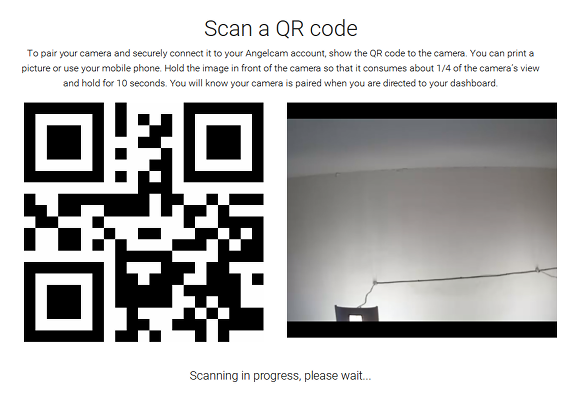
A pop-up window with QR code and the video stream on its right will appear.

Point the camera to the QR code and wait until it shows "success". The video might be delayed a little bit. If everything goes right, you will be able to add the camera under your Angelcam account.