How to work with landmarks and bounding boxes of objects #716
Comments
|
Translate one bbox into four keypoints In my project. |
|
Just pass the augmentable objects to your augmenter when you call it. import numpy as np
import imgaug as ia
import imgaug.augmenters as iaa
import cv2
ia.seed(1)
# Get your image
image = ia.quokka(size=(64, 64))
# Make your keypoints
kps = [ia.augmentables.kps.Keypoint(4*x + 1, 4*x + 1) for x in range(15)]
# Associate your image size
kp_oi = ia.augmentables.kps.KeypointsOnImage(kps, shape=image.shape)
# Make your bounding boxes
bbs = [ia.augmentables.bbs.BoundingBox(x1=10, y1=20, x2=20, y2=30),
ia.augmentables.bbs.BoundingBox(x1=25, y1=50, x2=30, y2=60)]
# Associate your image size to them
bbs_oi = ia.augmentables.bbs.BoundingBoxesOnImage(bbs, shape=image.shape)
# Makr your augmenter
seq = iaa.Sequential([
iaa.Crop(px=(0, 16)), # crop images from each side by 0 to 16px (randomly chosen)
iaa.Fliplr(0.5), # horizontally flip 50% of the images
iaa.GaussianBlur(sigma=(0, 1.0)) # blur images with a sigma of 0 to 1.0
])
# Call the augmenter specifying the respective augmentable objects
# This will output a list of 3 elements
# - first being the augmented image
# - second being the keypoints
# - third is the bounding boxes
example_out = seq(image = image, keypoints = kp_oi, bounding_boxes = bbs_oi)
len(example_out)
# 3
[type(x) for x in example_out]
# [<class 'numpy.ndarray'>, <class 'imgaug.augmentables.kps.KeypointsOnImage'>, <class 'imgaug.augmentables.bbs.BoundingBoxesOnImage'>]
# Example showing 10 augmentations
aug_imgs = [seq(image = image, keypoints = kp_oi, bounding_boxes = bbs_oi) for _ in range(10)]
over_imgs = [x[2].draw_on_image(image=x[1].draw_on_image(image=x[0])) for x in aug_imgs]
im_row = cv2.hconcat(over_imgs)
cv2.imwrite('conc_img.png', im_row)and the 10 augmented images are shown here:
let me know if this helps |

|
@jspaezp Great. I will modify code from this refer. |
|
@jspaezp It doesn't solve the issue! Your solution seems to work with independent keypoints and bounding boxes. In my case, the key points have to go with their bounding boxes. Let checks a sample image below: Each face bounding boxes have its own 5 key points. When I do augmentation for any single face, I have to know which key points are belong to which bounding boxes. I have done this job with the image which has one object by using a support from albumentation (having imgaug inside anyway): bbs = []
kps = []
label_box = []
bbs.append([leftUp[0], leftUp[1], rightDown[0], rightDown[1]])
# landmarks
for x, y in fps:
kps.append((x, y))
class_labels = [
'left_eye',
'right_eye',
'nose',
'left_mouth',
'right_moutht',
]
label_box.append('plate')
# feed bounding box and keypoint to imgaug
image_aug, bbs_aug, kps_aug = self.imgaug(img, bbs, kps, label_box, class_labels)But this code not gonna work with the image which has multi faces inside. Hope to have your idea to solve it! |

|
@cannguyen275 # asumption three face in one image
# correspond every bboxes and keypoints
img_aug = example_out[0]
bbox_aug = example_out[2]
point_aug = example_out[1]
point_aug = [example_out[1].keypoints[5*i:5*(i+1)] for i in range(3)] |
|
I was not able to see any way to add labels to augmented object, but positions are preserved. I believe it would work perfectly but it entails a little more work creating the annotation objects and exporting Really similar example showing how to use the position to relate to a bounding box, comments also mention things you might need to consider/modify: import numpy as np
import imgaug as ia
import imgaug.augmenters as iaa
import cv2
ia.seed(1)
# Get your image
image = ia.quokka(size=(64, 64))
# Make your keypoints
kps = [ia.augmentables.kps.Keypoint(4*x + 1, 4*x + 1) for x in range(15) if x*4+1 > 10 and x*4+1 < 50]
# Associate your image size
kp_oi = ia.augmentables.kps.KeypointsOnImage(kps, shape=image.shape)
# Make your bounding boxes
bbs = [ia.augmentables.bbs.BoundingBox(x1=10, y1=10, x2=30, y2=30),
ia.augmentables.bbs.BoundingBox(x1=30, y1=30, x2=50, y2=50)]
# Associate your image size to them
bbs_oi = ia.augmentables.bbs.BoundingBoxesOnImage(bbs, shape=image.shape)
# Makr your augmenter
seq = iaa.Sequential([
iaa.Crop(px=(0, 16)), # crop images from each side by 0 to 16px (randomly chosen)
iaa.Fliplr(0.5), # horizontally flip 50% of the images
iaa.GaussianBlur(sigma=(0, 1.0)) # blur images with a sigma of 0 to 1.0
])
# Call the augmenter specifying the respective augmentable objects
# This will output a list of 3 elements
# - first being the augmented image
# - second being the keypoints
# - third is the bounding boxes
example_out = seq(image = image, keypoints = kp_oi, bounding_boxes = bbs_oi)
len(example_out)
# 3
[type(x) for x in example_out]
# [<class 'numpy.ndarray'>, <class 'imgaug.augmentables.kps.KeypointsOnImage'>, <class 'imgaug.augmentables.bbs.BoundingBoxesOnImage'>]
# Example showing 10 augmentations
aug_imgs = [seq(image = image, keypoints = kp_oi, bounding_boxes = bbs_oi) for _ in range(10)]
# Since all augmented points are given as a sequence, you can use the sequence to get back the order they were given in ...
# in this example, 5 points are given for each bounding box, so you can relate them by their number.
over_imgs = []
for x in aug_imgs:
# Draw the box
tmp_img = x[2].draw_on_image(image=x[0])
# Draw the keypoints, coloring differently the first and the second 5
for i, kp in enumerate(x[1]):
if i < 5:
col = (0, 0, 255)
else:
col = (255, 0, 0)
tmp_img = kp.draw_on_image(image=tmp_img, color=col)
over_imgs.append(tmp_img)
# you can also have a much more elaborate relation, such as a mapping function/dictionary relating which keypoint
# position belongs to each bouding box...
# something like {'1': {'type' = 'right eye', 'bbox' = 1}, ...}
# or even a pandas dataframe where you would have the keypoint position in the list
# relate to a position in the bbox list position
# generating such dictionary/dataframe would happen when you are making your `KeypointsOnImage` object.
im_row = cv2.hconcat(over_imgs)
cv2.imwrite('conc_img_colored.png', im_row)
|

Dear,
As the title, I would like to augment data for objects which requires to have both bounding box and landmark. Have more than 1 object in a image!
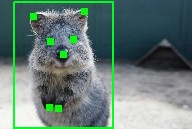
Example:
Any sample code to deal with this?
Thanks in advance!
The text was updated successfully, but these errors were encountered: