This only needs to be done once per machine. If you have already completed the installation and setup, please proceed to perform a build.
Otherwise, you may choose from one of the following options to install Guix:
- Using the official shell installer script ⤓ skip to section
- Maintained by Guix developers
- Easiest (automatically performs most setup)
- Works on nearly all Linux distributions
- Only installs latest release
- Binary installation only, requires high level of trust
- Note: The script needs to be run as root, so it should be inspected before it's run
- Using the official binary tarball ⤓ skip to section
- Maintained by Guix developers
- Normal difficulty (full manual setup required)
- Works on nearly all Linux distributions
- Installs any release
- Binary installation only, requires high level of trust
- Using fanquake's Docker image ↗︎ external instructions
- Maintained by fanquake
- Easy (automatically performs some setup)
- Works wherever Docker images work
- Installs any release
- Binary installation only, requires high level of trust
- Using a distribution-maintained package ⤓ skip to section
- Maintained by distribution's Guix package maintainer
- Normal difficulty (manual setup required)
- Works only on distributions with Guix packaged, see: https://repology.org/project/guix/versions
- Installs a release decided on by package maintainer
- Source or binary installation depending on the distribution
- Building from source ⤓ skip to section
- Maintained by you
- Hard, but rewarding
- Can be made to work on most Linux distributions
- Installs any commit (more granular)
- Source installation, requires lower level of trust
The installation instructions for both the official shell installer script and the binary tarballs can be found in the GNU Guix Manual's Binary Installation section.
Note that running through the binary tarball installation steps is largely equivalent to manually performing what the shell installer script does.
Note that at the time of writing (July 5th, 2021), the shell installer script
automatically creates an /etc/profile.d entry which the binary tarball
installation instructions do not ask you to create. However, you will likely
need this entry for better desktop integration. Please see this
section for instructions on how to add a
/etc/profile.d/guix.sh entry.
Regardless of which installation option you chose, the changes to
/etc/profile.d will not take effect until the next shell or desktop session,
so you should log out and log back in.
Please refer to fanquake's instructions here.
Note that the Dockerfile is largely equivalent to running through the binary
tarball installation steps.
Note that this section is based on the distro packaging situation at the time of writing (July 2021). Guix is expected to be more widely packaged over time. For an up-to-date view on Guix's package status/version across distros, please see: https://repology.org/project/guix/versions
Guix v1.2.0 is available as a distribution package starting in Debian 11 and Ubuntu 21.04.
Note that if you intend on using Guix without using any substitutes (more details here), v1.2.0 has a known problem when building GnuTLS from source. Solutions and workarounds are documented here.
To install:
sudo apt install guixFor up-to-date information on Debian and Ubuntu's release history:
Guix is available in the AUR as
guix, please follow the
installation instructions in the Arch Linux Wiki (live
link,
2021/03/30
permalink)
to install Guix.
At the time of writing (2021/03/30), the check phase will fail if the path to
guix's build directory is longer than 36 characters due to an anachronistic
character limit on the shebang line. Since the check phase happens after the
build phase, which may take quite a long time, it is recommended that users
either:
- Skip the
checkphase- For
makepkg:makepkg --nocheck ... - For
yay:yay --mflags="--nocheck" ... - For
paru:paru --nocheck ...
- For
- Or, check their build directory's length beforehand
- For those building with
makepkg:pwd | wc -c
- For those building with
Building Guix from source is a rather involved process but a rewarding one for those looking to minimize trust and maximize customizability (e.g. building a particular commit of Guix). Previous experience with using autotools-style build systems to build packages from source will be helpful. hic sunt dracones.
I strongly urge you to at least skim through the entire section once before you start issuing commands, as it will save you a lot of unnecessary pain and anguish.
There are a few basic build tools that are required for most things we'll build, so let's install them now:
Text transformation/i18n:
autopoint(sometimes packaged ingettext)help2manpo4atexinfo
Build system tools:
g++w/ C++11 supportlibtoolautoconfautomakepkg-config(sometimes packaged aspkgconf)makecmake
Miscellaneous:
gitgnupgpython3
In order to build Guix itself from source, we need to first make sure that the necessary dependencies are installed and discoverable. The most up-to-date list of Guix's dependencies is kept in the "Requirements" section of the Guix Reference Manual.
Depending on your distribution, most or all of these dependencies may already be packaged and installable without manually building and installing.
For reference, the graphic below outlines Guix v1.3.0's dependency graph:
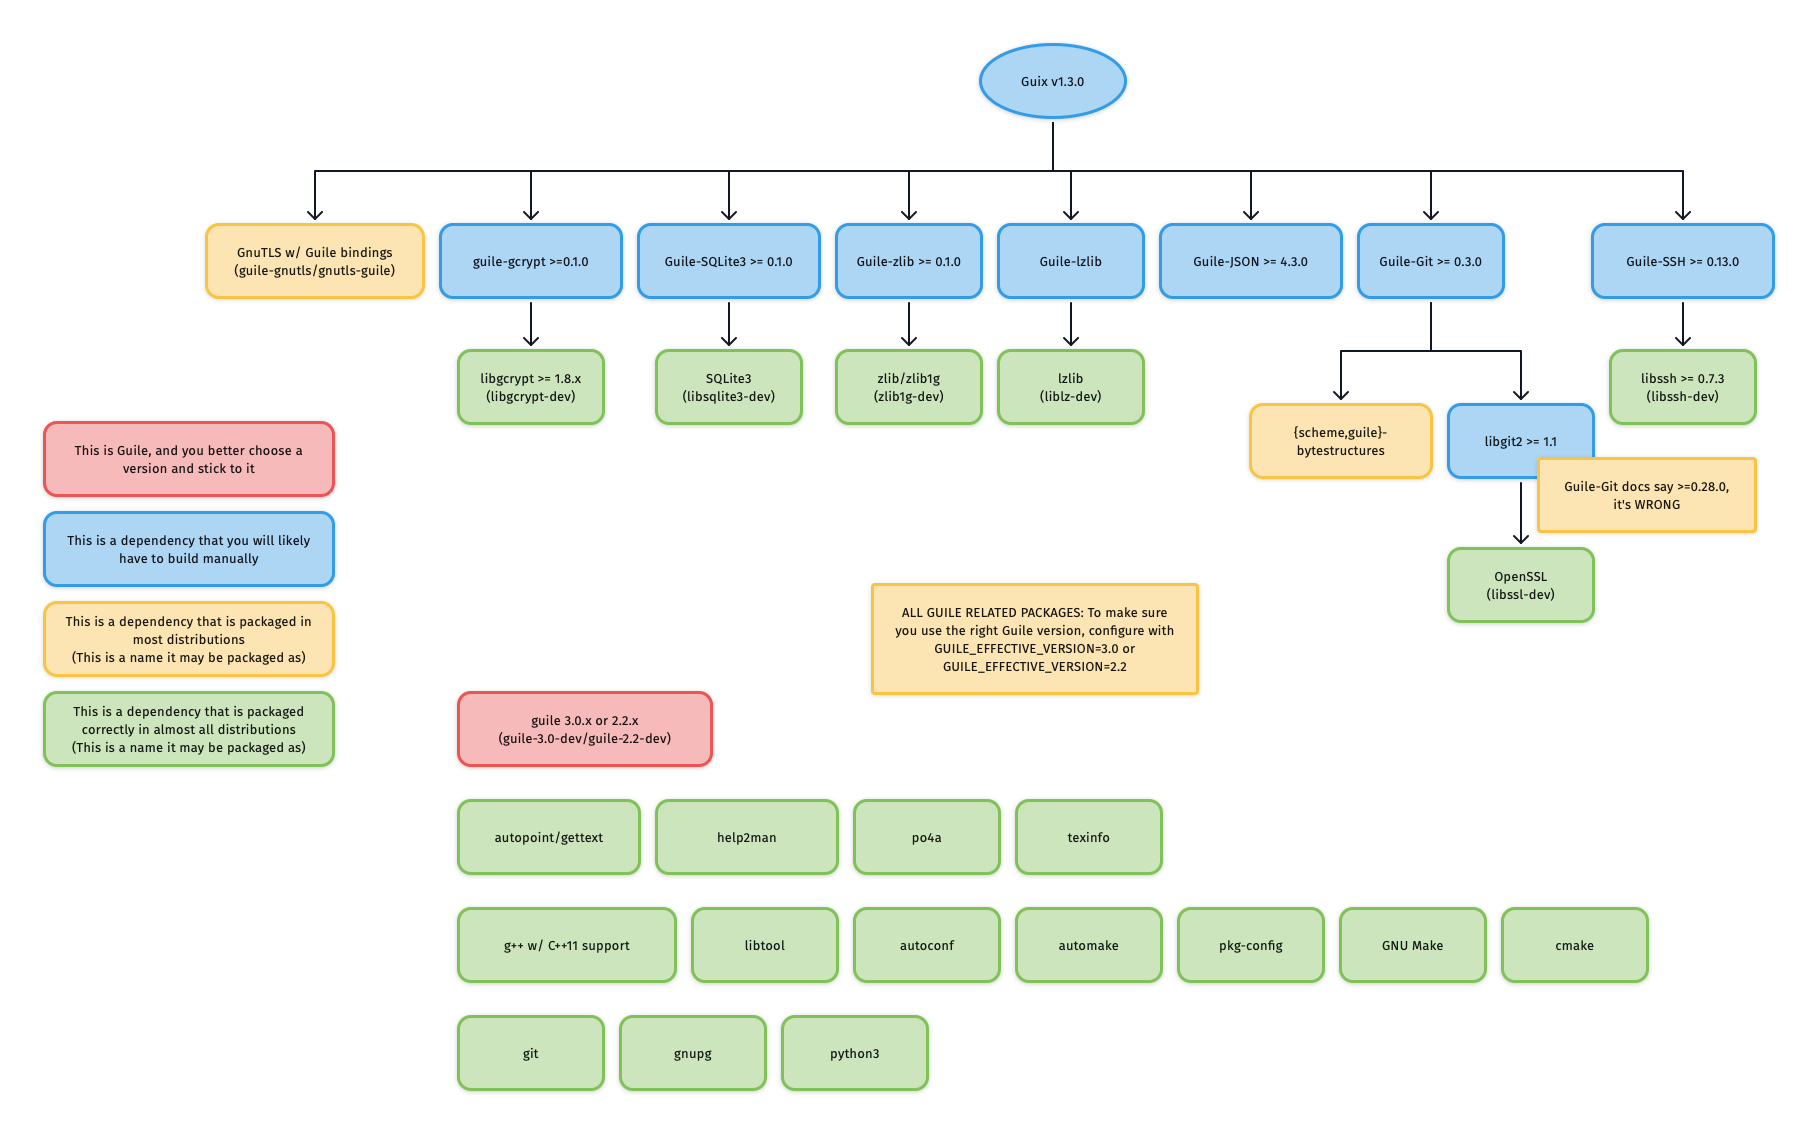
One of the first things you need to decide is which Guile version you want to use: Guile v2.2 or Guile v3.0. Unlike the python2 to python3 transition, Guile v2.2 and Guile v3.0 are largely compatible, as evidenced by the fact that most Guile packages and even Guix itself support running on both.
What is important here is that you choose one, and you remain consistent with your choice throughout all Guile-related packages, no matter if they are installed via the distribution's package manager or installed from source. This is because the files for Guile packages are installed to directories which are separated based on the Guile version.
On Ubuntu Focal:
$ apt show guile-git
Package: guile-git
...
Depends: guile-2.2, guile-bytestructures, libgit2-dev
...
As you can see, the package guile-git depends on guile-2.2, meaning that it
was likely built for Guile v2.2. This means that if you decided to use Guile
v3.0 on Ubuntu Focal, you would need to build guile-git from source instead of
using the distribution package.
On Ubuntu Hirsute:
$ apt show guile-git
Package: guile-git
...
Depends: guile-3.0 | guile-2.2, guile-bytestructures (>= 1.0.7-3~), libgit2-dev (>= 1.0)
...
In this case, guile-git depends on either guile-3.0 or guile-2.2, meaning
that it would work no matter what Guile version you decided to use.
It is recommended to only install one version of Guile, so that build systems do not get confused about which Guile to use.
However, if you insist on having both Guile v2.2 and Guile v3.0 installed on
your system, then you need to consistently specify one of
GUILE_EFFECTIVE_VERSION=3.0 or GUILE_EFFECTIVE_VERSION=2.2 to all
./configure invocations for Guix and its dependencies.
Guile is most likely already packaged for your distribution, so after you have chosen a Guile version, install it via your distribution's package manager.
If your distribution splits packages into -dev-suffixed and
non--dev-suffixed sub-packages (as is the case for Debian-derived
distributions), please make sure to install both. For example, to install Guile
v2.2 on Debian/Ubuntu:
apt install guile-2.2 guile-2.2-devAt the time of writing, most distributions have some of Guix's dependencies packaged, but not all. This means that you may want to install the distribution package for some dependencies, and manually build-from-source for others.
Distribution packages usually install to /usr, which is different from the
default ./configure prefix of source-built packages: /usr/local.
This means that if you mix-and-match distribution packages and source-built
packages and do not specify exactly --prefix=/usr to ./configure for
source-built packages, you will need to augment the GUILE_LOAD_PATH and
GUILE_LOAD_COMPILED_PATH environment variables so that Guile will look
under the right prefix and find your source-built packages.
For example, if you are using Guile v2.2, and have Guile packages in the
/usr/local prefix, either add the following lines to your .profile or
.bash_profile so that the environment variable is properly set for all future
shell logins, or paste the lines into a POSIX-style shell to temporarily modify
the environment variables of your current shell session.
# Help Guile v2.2.x find packages in /usr/local
export GUILE_LOAD_PATH="/usr/local/share/guile/site/2.2${GUILE_LOAD_PATH:+:}$GUILE_LOAD_PATH"
export GUILE_LOAD_COMPILED_PATH="/usr/local/lib/guile/2.2/site-ccache${GUILE_LOAD_COMPILED_PATH:+:}$GUILE_COMPILED_LOAD_PATH"
Note that these environment variables are used to check for packages during
./configure, so they should be set as soon as possible should you want to use
a prefix other than /usr.
IMPORTANT: A few dependencies have non-obvious quirks/errata which are documented in the sub-sections immediately below. Please read these sections before proceeding to build and install these packages.
Although you should always refer to the README or INSTALL files for the most
accurate information, most of these dependencies use autoconf-style build
systems (check if there's a configure.ac file), and will likely do the right
thing with the following:
Clone the repository and check out the latest release:
git clone <git-repo-of-dependency>/<dependency>.git
cd <dependency>
git tag -l  # check for the latest release
git checkout <latest-release>
For autoconf-based build systems (if ./autogen.sh or configure.ac exists at
the root of the repository):
./autogen.sh || autoreconf -vfi
./configure --prefix=<prefix>
make
sudo make install
For CMake-based build systems (if CMakeLists.txt exists at the root of the
repository):
mkdir build && cd build
cmake .. -DCMAKE_INSTALL_PREFIX=<prefix>
sudo cmake --build . --target install
If you choose not to specify exactly --prefix=/usr to ./configure, please
make sure you've carefully read the [previous section] on mixing distribution
packages and source-built packages.
Relevant for:
- Everyone
When building bindings, the -dev-suffixed version of the original package
needs to be installed. For example, building Guile-zlib on Debian-derived
distributions requires that zlib1g-dev is installed.
When using bindings, the -dev-suffixed version of the original package still
needs to be installed. This is particularly problematic when distribution
packages are mispackaged like guile-sqlite3 is in Ubuntu Focal such that
installing guile-sqlite3 does not automatically install libsqlite3-dev as a
dependency.
Below is a list of relevant Guile bindings and their corresponding -dev
packages in Debian at the time of writing.
| Guile binding package | -dev Debian package |
|---|---|
| guile-gcrypt | libgcrypt-dev |
| guile-git | libgit2-dev |
| guile-lzlib | liblz-dev |
| guile-ssh | libssh-dev |
| guile-sqlite3 | libsqlite3-dev |
| guile-zlib | zlib1g-dev |
Relevant for:
- Those building
guile-gitfrom source againstlibgit2 < 1.1 - Those installing
guile-gitfrom their distribution whereguile-gitis built againstlibgit2 < 1.1
As of v0.4.0, guile-git claims to only require libgit2 >= 0.28.0, however,
it actually requires libgit2 >= 1.1, otherwise, it will be confused by a
reference of origin/keyring: instead of interpreting the reference as "the
'keyring' branch of the 'origin' remote", the reference is interpreted as "the
branch literally named 'origin/keyring'"
This is especially notable because Ubuntu Focal packages libgit2 v0.28.4, and
guile-git is built against it.
Should you be in this situation, you need to build both libgit2 v1.1.x and
guile-git from source.
Source: https://logs.guix.gnu.org/guix/2020-11-12.log#232527
Relevant for:
- Those building
{scheme,guile}-bytestructuresfrom source against Guile v2.2
Commit 707eea3 introduced a regression for Guile v2.2 and was first included in v1.0.8, this was later corrected in commit ec9a721 and included in v1.1.0.
TL;DR If you decided to use Guile v2.2, do not use {scheme,guile}-bytestructures v1.0.8 or v1.0.9.
Start by cloning Guix:
git clone https://git.savannah.gnu.org/git/guix.git
cd guix
You will likely want to build the latest release, however, if the latest release when you're reading this is still 1.2.0 then you may want to use 95aca29 instead to avoid a problem in the GnuTLS test suite.
git branch -a -l 'origin/version-*'  # check for the latest release
git checkout <latest-release>
Bootstrap the build system:
./bootstrap
Configure with the recommended --localstatedir flag:
./configure --localstatedir=/var
Note: If you intend to hack on Guix in the future, you will need to supply the
same --localstatedir= flag for all future Guix ./configure invocations. See
the last paragraph of this
section for more
details.
Build Guix (this will take a while):
make -j$(nproc)
Install Guix:
sudo make install
At this point, guix will be installed to ${bindir}, which is likely
/usr/local/bin if you did not override directory variables at
./configure-time. More information on standard Automake directory variables
can be found
here.
However, the Guix init scripts and service configurations for Upstart, systemd,
SysV, and OpenRC are installed (in ${libdir}) to launch
${localstatedir}/guix/profiles/per-user/root/current-guix/bin/guix-daemon,
which does not yet exist, and will only exist after root performs their first
guix pull.
We need to create a -original version of these init scripts that's pointed to
the binaries we just built and make install'ed in ${bindir} (normally,
/usr/local/bin).
Example for systemd, run as root:
# Create guix-daemon-original.service by modifying guix-daemon.service
libdir=# set according to your PREFIX (default is /usr/local/lib)
bindir="$(dirname $(command -v guix-daemon))"
sed -E -e "s|/\S*/guix/profiles/per-user/root/current-guix/bin/guix-daemon|${bindir}/guix-daemon|" "${libdir}"/systemd/system/guix-daemon.service > /etc/systemd/system/guix-daemon-original.service
chmod 664 /etc/systemd/system/guix-daemon-original.service

# Make systemd recognize the new service
systemctl daemon-reload

# Make sure that the non-working guix-daemon.service is stopped and disabled
systemctl stop guix-daemon
systemctl disable guix-daemon

# Make sure that the working guix-daemon-original.service is started and enabled
systemctl enable guix-daemon-original
systemctl start guix-daemon-originalPlease see the relevant section in the Guix Reference Manual for more details.
At this point, you are set up to use Guix to build Bitcoin Core. However, if you want to polish your setup a bit and make it "what Guix intended", then read the next few subsections.
This section definitely does not apply to you if you installed Guix using:
- The shell installer script
- fanquake's Docker image
- Debian's
guixpackage
Although Guix knows how to update itself and its packages, it does so in a
non-invasive way (it does not modify /usr/local/bin/guix).
Instead, it does the following:
-
After a
guix pull, it updates/var/guix/profiles/per-user/$USER/current-guix, and creates a symlink targeting this directory at$HOME/.config/guix/current -
After a
guix install, it updates/var/guix/profiles/per-user/$USER/guix-profile, and creates a symlink targeting this directory at$HOME/.guix-profile
Therefore, in order for these operations to affect your shell/desktop sessions
(and for the principle of least astonishment to hold), their corresponding
directories have to be added to well-known environment variables like $PATH,
$INFOPATH, $XDG_DATA_DIRS, etc.
In other words, if $HOME/.config/guix/current/bin does not exist in your
$PATH, a guix pull will have no effect on what guix you are using. Same
goes for $HOME/.guix-profile/bin, guix install, and installed packages.
Helpfully, after a guix pull or guix install, a message will be printed like
so:
hint: Consider setting the necessary environment variables by running:

     GUIX_PROFILE="$HOME/.guix-profile"
     . "$GUIX_PROFILE/etc/profile"

Alternately, see `guix package --search-paths -p "$HOME/.guix-profile"'.
However, this is somewhat tedious to do for both guix pull and guix install
for each user on the system that wants to properly use guix. I recommend that
you instead add an entry to /etc/profile.d instead. This is done by default
when installing the Debian package later than 1.2.0-4 and when using the shell
script installer.
Create /etc/profile.d/guix.sh with the following content:
# _GUIX_PROFILE: `guix pull` profile
_GUIX_PROFILE="$HOME/.config/guix/current"
if [ -L $_GUIX_PROFILE ]; then
  export PATH="$_GUIX_PROFILE/bin${PATH:+:}$PATH"
  # Export INFOPATH so that the updated info pages can be found
  # and read by both /usr/bin/info and/or $GUIX_PROFILE/bin/info
  # When INFOPATH is unset, add a trailing colon so that Emacs
  # searches 'Info-default-directory-list'.
  export INFOPATH="$_GUIX_PROFILE/share/info:$INFOPATH"
fi

# GUIX_PROFILE: User's default profile
GUIX_PROFILE="$HOME/.guix-profile"
[ -L $GUIX_PROFILE ] || return
GUIX_LOCPATH="$GUIX_PROFILE/lib/locale"
export GUIX_PROFILE GUIX_LOCPATH

[ -f "$GUIX_PROFILE/etc/profile" ] && . "$GUIX_PROFILE/etc/profile"

# set XDG_DATA_DIRS to include Guix installations
export XDG_DATA_DIRS="$GUIX_PROFILE/share:${XDG_DATA_DIRS:-/usr/local/share/:/usr/share/}"
Please note that this will not take effect until the next shell or desktop session (log out and log back in).
Before you do this, you need to read the section on choosing your security
model and adjust guix and guix-daemon flags according to
your choice, as invoking guix pull may pull substitutes from substitute
servers (which you may not want).
As mentioned in a previous section, Guix expects
${localstatedir}/guix/profiles/per-user/root/current-guix to be populated with
root's Guix profile, guix pull-ed and built by some former version of Guix.
However, this is not the case when we build from source. Therefore, we need to
perform a guix pull as root:
sudo --login guix pull --branch=version-<latest-release-version>
# or
sudo --login guix pull --commit=<particular-commit>
guix pull is quite a long process (especially if you're using
--no-substitute). If you encounter build problems, please refer to the
troubleshooting section.
Note that running a bare guix pull with no commit or branch specified will
pull the latest commit on Guix's master branch, which is likely fine, but not
recommended.
If you installed Guix from source, you may get an error like the following:
error: while creating symlink '/root/.config/guix/current' No such file or directoryTo resolve this, simply:
sudo mkdir -p /root/.config/guix
Then try the guix pull command again.
After the guix pull finishes successfully,
${localstatedir}/guix/profiles/per-user/root/current-guix should be populated.
Depending on how you installed Guix, you should now make sure that your init
scripts and service configurations point to the newly-pulled guix-daemon.
If you followed the instructions for fixing argv[0], you can now do the following:
systemctl stop guix-daemon-original
systemctl disable guix-daemon-original

systemctl enable guix-daemon
systemctl start guix-daemonYou will need to create a guix-daemon-latest service which points to the new
guix rather than a pinned one.
# Create guix-daemon-latest.service by modifying guix-daemon.service
sed -E -e "s|/usr/bin/guix-daemon|/var/guix/profiles/per-user/root/current-guix/bin/guix-daemon|" /etc/systemd/system/guix-daemon.service > /lib/systemd/system/guix-daemon-latest.service
chmod 664 /lib/systemd/system/guix-daemon-latest.service

# Make systemd recognize the new service
systemctl daemon-reload

# Make sure that the old guix-daemon.service is stopped and disabled
systemctl stop guix-daemon
systemctl disable guix-daemon

# Make sure that the new guix-daemon-latest.service is started and enabled
systemctl enable guix-daemon-latest
systemctl start guix-daemon-latestAt the time of writing (July 5th, 2021) the systemd unit for "updated Guix" is
guix-daemon-latest.service, therefore, you should do the following:
systemctl stop guix-daemon
systemctl disable guix-daemon

systemctl enable guix-daemon-latest
systemctl start guix-daemon-latestSimply do:
systemctl restart guix-daemonIf you followed all the steps above to make your Guix setup "prim and proper," you can check that you did everything properly by running through this checklist.
-
/etc/profile.d/guix.shshould exist and be sourced at each shell login -
guix describeshould not printguix describe: error: failed to determine origin, but rather something like:Generation 38 Feb 22 2021 16:39:31 (current) guix f350df4 repository URL: https://git.savannah.gnu.org/git/guix.git branch: version-1.2.0 commit: f350df405fbcd5b9e27e6b6aa500da7f101f41e7 -
guix-daemonshould be running from${localstatedir}/guix/profiles/per-user/root/current-guix
When you see a build failure like below:
building /gnu/store/...-foo-3.6.12.drv...
/ 'check' phasenote: keeping build directory `/tmp/guix-build-foo-3.6.12.drv-0'
builder for `/gnu/store/...-foo-3.6.12.drv' failed with exit code 1
build of /gnu/store/...-foo-3.6.12.drv failed
View build log at '/var/log/guix/drvs/../...-foo-3.6.12.drv.bz2'.
cannot build derivation `/gnu/store/...-qux-7.69.1.drv': 1 dependencies couldn't be built
cannot build derivation `/gnu/store/...-bar-3.16.5.drv': 1 dependencies couldn't be built
cannot build derivation `/gnu/store/...-baz-2.0.5.drv': 1 dependencies couldn't be built
guix time-machine: error: build of `/gnu/store/...-baz-2.0.5.drv' failed
It means that guix failed to build a package named foo, which was a
dependency of qux, bar, and baz. Importantly, note that the last "failed"
line is not necessarily the root cause, the first "failed" line is.
Most of the time, the build failure is due to a spurious test failure or the
package's build system/test suite breaking when running multi-threaded. To
rebuild just this derivation in a single-threaded fashion (please don't forget
to add other guix flags like --no-substitutes as appropriate):
$ guix build --cores=1 /gnu/store/...-foo-3.6.12.drvIf the single-threaded rebuild did not succeed, you may need to dig deeper.
You may view foo's build logs in less like so (please replace paths with the
path you see in the build failure output):
$ bzcat /var/log/guix/drvs/../...-foo-3.6.12.drv.bz2 | lessfoo's build directory is also preserved and available at
/tmp/guix-build-foo-3.6.12.drv-0. However, if you fail to build foo multiple
times, it may be /tmp/...drv-1 or /tmp/...drv-2. Always consult the build
failure output for the most accurate, up-to-date information.
This error occurs when your $TMPDIR (default: /tmp) exists on a filesystem
which rejects characters not present in the UTF-8 character code set. An example
is ZFS with the utf8only=on option set.
More information: https://bugs.python.org/issue37584
The derivation is likely identified by: /gnu/store/vhphki5sg9xkdhh2pbc8gi6vhpfzryf0-gnutls-3.6.12.drv
This unfortunate error is most common for non-substitute builders who installed Guix v1.2.0. The problem stems from the fact that one of GnuTLS's tests uses a hardcoded certificate which expired on 2020-10-24.
What's more unfortunate is that this GnuTLS derivation is somewhat special in
Guix's dependency graph and is not affected by the package transformation flags
like --without-tests=.
The easiest solution for those encountering this problem is to install a newer version of Guix. However, there are ways to work around this issue:
If you've authorized the official Guix build farm's key (more info here), then you can use substitutes just for this single derivation by invoking the following:
guix build --substitute-urls="https://ci.guix.gnu.org" /gnu/store/vhphki5sg9xkdhh2pbc8gi6vhpfzryf0-gnutls-3.6.12.drvSee this section for instructions on how to remove authorized keys if you don't want to keep the build farm's key authorized.
This workaround was described here.
Basically:
- Turn off networking
- Turn off NTP
- Set system time to 2020-10-01
- guix build --no-substitutes /gnu/store/vhphki5sg9xkdhh2pbc8gi6vhpfzryf0-gnutls-3.6.12.drv
- Set system time back to accurate current time
- Turn NTP back on
- Turn networking back on
The inotify-dir-create test fails on "remote" filesystems such as overlayfs (Docker's default filesystem) due to the filesystem being mistakenly recognized as non-remote.
A relatively easy workaround to this is to make sure that a somewhat traditional
filesystem is mounted at /tmp (where guix-daemon performs its builds). For
Docker users, this might mean using a volume, binding
mounting from host, or (for those with enough RAM and swap)
mounting a tmpfs using the --tmpfs flag.
Please see the following links for more details:
- An upstream coreutils bug has been filed: debbugs#47940
- A Guix bug detailing the underlying problem has been filed: guix-issues#47935
- A commit to skip this test in Guix has been merged into the core-updates branch: savannah/guix@6ba1058